Introduction
The Vibe sound can be heard in so many classic rock sounds that is a effect well stablished in our mind.
Anyway, not easy to get a good Vibe pedal. Not easy to find a vintage-correct vibe pedal that can handle some of the impedance and buffering issues that happen when combining it with other moderner pedals.
And, definitivelly, not an easy effect. It can sound lush and awesome when played properly or totally weird.
Vibe is one of the signature sounds of Robin Trower and, you can hear it in several of his songs. Vibe was the ammo that used Hendrix in his "Machine Gun" song and, vibe is what you hear in "Us and Them" by Pink Floyd, just to mention a few examples.
This is not my first Vibe pedal. My first one was the Voodoo Lab Vibe. This was ok but lacked I-dunno-what.
My second one was Roger Mayer's Voodoo Vibe+. This has any possible control you can imagine so, it wasn't a plug and play type of pedal and, any accidental touch to one of the knobs would ruin the sound. Very studio-like sounding and big has a hell for a pedalboard but, a really nice one.
My third Vibe was Fulltone's MiniDeja Vibe 2. This one sounded really lush and very vintage-correct but, (as happens often with Fulltone pedals) had some impedance issues that made it very difficult to combine with other pedals and, the speed control cannot be fixed, since it's being controlled with the rocket pedal and, you need to push it up (oposite to a wah) to activate the effect, what means that you have to search for the wanted speed AFTER you switched on the pedal.
Any good phaser, at certain speed levels, can sound close to a vibe but, they will never sound exactly as a vibe. The vibe is some kind of mix between a phaser and a vibrato (and, sometimes, it has some kind of auto-wah sound) so, it's an effect on its own.
The Mad Professor Tiny Orange Phaser can go really close to a vibe (it's the phaser that I've found that can go closer to a vibe), in certain settings, by example but, the vibe has something else.
Well, I wasn't thinking on vibes anymore... until I saw some video around the Lovepedal Pickle Vibe and, liked a lot how it sounded. Easy pedal, straight forward, just a knob for speed, very small so, I thought "Why not?".
Presentation
It cames in a brown carton box, with just an small sticker that says "Pickle Vibe". Inside, the pedal wrapped in some protective plastic and a single sheet with very few information.
The unit is very small. Is one of those pedalboard friendly formats and, so small that it cannot really hold a battery inside so, be aware that you will need a power addaptor to run this pedal.
The instructions address you to play with the inner trim pot to get the sounds you want.
Playing it - First Impressions
Well, when I tried it first, my thought was: "excesive". I mean, the valleys and peaks of the sound are excesive so, some notes are really weak while others (mainly basses) peak really high. Also, the EQ range was excesive, the sound was a bit harsh, with piercing trebles.
So, time to unscrew the tap and go inside the guts.
The Trim Pot can be found inside, in the upper right corner (more or less) and, can be easily accessed with any plain head screwdriver. It worth the try, since you can shape the sound to your taste (between some limits) and it's a one-time operation so, I fully recommend it to you.
The Trim Pot adjustment is a bit tricky. There is a lot of change moving the pot just a hair to right of left.
To left, it seems to increase high end (or to move the sweep range closer to that frequencies) while, to right it seems to increase low end.
Take your time, move it a hair at once and check the sound (what earned, what loosed?). The trim pot is affecting both, the central sweep frequency (I guess) as the depth of the effect so, take it into consideration.
I know, this unit isn't based on photocells, as the original ones (something that Fulltone is also using) but, the sound is very convincing (once you tweaked that trim pot).
I've tried it before and after gain units and, its place is clearly before gain units, as usual with Vibe effects.
I'm still checking the pedal in a wider sense. I need to know if it's having some type of impedance issue when combined with other pedals. The pedal itself, doesn't seem to be affected depending on what do you put before but, still not sure if it is affecting to the following pedal.
Machine Gun's tones can be easily achieved with this pedal but, a depth control could be interesting to allow to tame a bit the excesive modulation for other kind of works, even that it sounds convincing with anything else. That Trim Pot remembers me the BIAS knob of the Voodoo Vibe+.
By now, I have a very small pedal that gives me the tones I wanted from bigger units, as the MDV2 or the Voodoo Vibe+ and, it's way easier to play so, not a bad thing. I still need more time for my final decision but, my first impression is that is practical, useful and nicely voiced.
The Video
The video demoes several speed settings and, how it sounds alone, with overdrive and with distortion.
No sense playing, just trying sounds. About 12 mins.

Everything about electric guitars world
22 November 2012
20 November 2012
Pedal Effects: 3 wah comparison
Introduction
Ah, the Wah!.
Who didn't hear Hendrix' accrobacies with his wah?. Who didn't loved the wah in "Shaft in Harlem"?.
The wah is one of the simpler effects (from the complexity perspective) but one of the most difficult to master.
The wah is all about its core voice, that depends a lot on the kind of inductor being used, the sweep range and the central frequency that has the biggest bump.
But, that's not enough. Most of us developed a high sensibility in our hands but, no so much in our feet and, the wah is all about feet sensibility.
It's an awesome expression pedal but, takes a while to make it work in the way you need at a certain passage. From subtles changes in the central frequency to wide sweeps, the control of a wah is a big weapon for a guitarist but, not all the wahs work the same. Every maker offers one or more models with different characteristics and, some wahs fit better the needs of a particular player than others.
In my case, I prefer wahs based in the Italian Inductor, the early British Wahs. I am not interested on wahs using the American Inductor type, because I fill more human-voiced the Italina one.
That's why, in this comparison, I am leaving out the Morley Bad Horsie 2 wah and, just comparing three British-voiced wahs, instead.
The 3 wahs
The simpler one is the Vox 847. A reedition of the old Voxes, with true bypass modification, what is a clear benefit over vintage units, that were well known as true tone-suckers.
Remember that Jimi Hendrix started all with a Vox wah, before it was hardly modified by Roger Mayer, as the taste of Jimi was changing while recording and performing.
I hear no noises in this wah and, the rocket works well. Nice and wide sweep range, can cover from low to high frequencies and have a good central frequency. Straight forward, simple and effective.
The drawback with the 847 is that it can lead you to issues if you are planning to use it with a vintage fuzz.
The 847 isn't buffered when on so, the fight for the pedalboard chain is assured.
The Real McCoy RMC4 goes so close as possible to the awesome Vox Picture Wahs that started all this.
The Vox Picture Wah was named like this because the picture of McCoy was stamped on the back. The Wah was trying to model the Trumpet accrobatics of McCoy and, that's why that picture.
The Real McCoy RMC4 bases its design in that early wah but, adds true bypass switching and a buffer to make it fuzz-friendly.
Without any doubt, this is the rawest sounding unit in this comparison. The sound is deeply vocal, very human-like and has an awesome sweeping range and central frequency.
The drawback with this wah is that goes noisy with the time and, that the electronics can catch RF interferences and other weird noises (do you remember Machine Gun's by Hendrix, catching some Radio talking in the middle of the song?).
The versatiler of all them is the Roger Mayer Vision Wah. Since Mayer was Hendrix' tech, he knows a lot about how to achieve outstanding effects that work flawless for studio work. Roger Mayer uses state-of-art electronics components, maybe because it has an history in the Navy, what makes him to every time choose military ranged components.
From those 3, the purest or hi-fi sound is coming from Roger Mayer's wah. No noises at all and, the wah has a lot of versatiliy.
One knob controls the tone of the wah so, you can make it sounding more bassy or more trebbly but, I choosed to let the control to match the bypass sound of the guitar.
Other knob controls the output gain. I choosed to let that control to unitary level, to don't hear any difference when switching on the wah. But, the good thing is that you can always tweak gain and tone to your needs.
Four switches provide 16 combinations, where the frequential content, sweep depth and middle frequency change radically, from very vocal to very thin and, everything in between.
I recognize, this can make a new wah-user to be scared and, makes difficult for a non schooled wah-ear to choose the right switch combinations. To walk around the 16 combinations can be a hard job but, at least, you have total control over which kind of wah you are after.
The Vision Wah is also buffered when engaged so, no issues with vintage fuzzes.
The case is made of Carbon Fiber, what makes this wah way expensiver but, it has some other interesting things. By example, the typical 3PDT swith isn't a mechanical one but an electromagnetic one. That means that the clicking pops of switching it dissapear and that the component will last more time, since there is no mechanical fatigue. Same happens with the rocket pot, that works with an optical cell instead of typical mechanical pot, what removes any noise or crack when rotating the pot and, makes it to last longer time.
Tone wise, I prefer the deep vocal sound of the RMC4 but, this wah is way noiser than the other two. When moving the rocket up and down, you can hear the mechanical noise in your sound and, the floor noise is always greater than in the other two wahs.
The best filtered one is the Vision Wah but, I didn't heard any kind of disturbing noise in the 847 at all.
Playing with the switches of the Roger Mayer's you can get close to the sounds of the other two wahs but, I wasn't never able to exactly mime the sound of the RMC4.
Since I can go very close and, I prefer to better control my floor noise, that is already an issue because I am using vintage-correct single coils, I would leave the Vision Wah in my pedalboard.
The drawback is that is a huge pedal, wider than the other two and a bit longer (Roger Mayer is used to big effect boxes, BTW).
The Video
Even that isn't an in depth walking on every pedal, the first part compares the sound in bypass and switched on mode for each wah, trying to cover different sweep ranges and wah works.
I am taking more time with the Vision Wah because, I wanted to check how each switch is actually affecting the sound, to choose the better combination to my taste at the end of the video.
My choosed combination goes close to the sound of the Picture Wah but, it isn't an exact clone.
Pedal effects: 3 buffer comparison
Introduction
If you are running a simple rig, with just a guitar and an amp and, eventually a couple of pedals you will probably never need some buffer in your chain (at least that one of those pedals uses it).
But, even with simple rigs, if the run of guitar cable is long enough, the lost of high end, strength and punch can start to appear. This is when a buffer can help you to restore your lost frequencies, signal strength and punch.
Buffers are very simple circuits and, one of the simplest of any pedal effect. In fact, they are some kind of unitary gain amp that works to make the next pedal to see the signal as if the cable between your guitar and the buffer didn't existed.
This sounds good enough!. But, we were already discussing in my entry "the cost of the cup of tone" that, even the simplest design with a single transistor is now the one that is creating the sound, your guitar isn't anymore. Therefore, how transparent a buffer can be will depend on the design and quality of their components.
Taking the oportunity that I will repatch my pedalboard with Mogami's cables and, that I've removed all the pedals, I wanted to check the three buffer pedals that I actually have.
The three buffers
First buffer I've ever owned was the MXR MC-401 Booster / Line Driver. This pedal has two functions. When the booster knob is on its minimum, the gain is unitary so, just the buffer (Line Driver) is working to restore the original signal's caracteristics. For this test, I was only interested on the buffer side of each pedal.
Second buffer I've bought is the Mad Professor Ruby Red Booster. This pedal has an inner micro-switch to activate or deactivate the buffer and, three knobs that work in two more additional boosters (a typical booster and a treble-booster). I've maintained the inner buffer active but, I didn't stepped over the pedal to avoid to run the booster sections of such a pedal.
Third buffer was the Wampler Clean Buffer. This is the simpler of all them, the buffer is just active when you step over the pedal switch, otherwise, true bypassed.
I don't know why but the MXR never worked fine for me. I remember having lots of troubles when I've tried it to push the rest of the chain. I've always feel it as thinning the sound and removing some of the body.
The Mad Professor one is a very good pedal, a real Swiss-Knife. The two additional boosters help to have exactly what you want to deliver to the rest to your pedalboard.
The reason to go for the Wampler's one was that, after loading the first Wampler pedal in my pedalboard, I've realized that those were the pedals that were delivering the sound I always wanted and, therefore, I didn't needed the booster function of the Ruby or the MXR and, then, a simple buffer should work in my chain.
The Test
To no compromise the results, I've feeded every pedal with the same Pedal Power unit and, plugged just to one at a time, without changing amp' setting and, with guitar controls all the way open.
Overall, I have the impression that all the buffers are bringing back lots of high end and, all them tend to make the sound a bit thinner and sharper but, the effect is more clear in the MXR, then in the Ruby and then in the Wampler.
When you strum hard power chords, I feel some hollowness in the MXR, a bit less in the Ruby and nothing in the Wampler, that retains full strenght and punch, while the punch is being tamed in the MXR.
The MXR is probably the one with more high end and, can sound a bit harsh or even piercing. This effect is less noticiable in the Wampler and a tad less in the Ruby.
What was a real surprise in the test was the tests with the pedals switched off. The Ruby one is out of this comparison, since the inner buffer was active all the time (no true bypass). When I've changed from the MXR to the Wampler I was highly surprised.
The MXR seems to be a tone sucker and, just pluging a cable in each jack makes the sound weaker, with less punch and a clear roll off in frequencies. But, the Wampler sounded strong, with less lost high end, full bodied and with punch. Why?.
Since both pedals are true bypass, I can only imagine that the components involved for both pedals are the ones making the difference. Is the Jack, is the switch, are the inner wires that link jacks to the switch, is the led?. I dunno but this unexpected results blown my mind.
The Video
Unfortunatelly the chained audio processing (24 bits to 16 bits to MP3 to Youtube) can hide the little details that are clearly audible live and, I am not very confident that you can hear them. Therefore this blog entry is a good complement to the video, resuming my feelings and experience.
Accesories: Mogami vs Evidence Audio Guitar Cables
Introduction
The goal of high end cables is just to transfer the original sound the most transparently possible, while preserving signal strength and frequential content.
In a previous test, it was very clear that cables make a difference. In fact, everything that is in the path of your signal and the final sound affects it in some or other way.
Thinking on my previous test, I can group cables in three categories: low, medium and high end cables and, this division isn't related to price but to the sound.
Low end cables are those that have microphonics issues, high floor noise, interferences... and sound dull, lifeless or their frequential content is so equalized that the guitar sounds different to herself.
Medium end cables haven't such a microphonics or noise issues but, deliver an EQ'd signal or lack some definition note to note. They usually work fine... until you compare them to a high end cable.
High end cables have an even representation of the frequential content, nice punch, high definition note by note and a strength signal, while preserving a good relationship between the signal to noise levels.
High end cables are often expensive. Period. But, some are astronomically expensive while others are reasonably "affordable".
Probably, the best sounding cables I've tested are Vovox and Evidence Audio ones but, both have a clear ergonomics issue. They are very thick and have poor flexibility and, are mess hanging from your guitar. So, even that I can use a Lyric II from the pedal board to the amp (because it's static), I don't find myself comfortable using it from my guitar to the pedal board.
In other side, to patch my pedalboard, I wanted to go for a cheaper high end cable and, I've already tested the George's L, Evidence Audio Monorail, Cordial among other low end cables. My last try was to patch the pedalboard making my own cables and using Sommer SC The Spirit cable and, even that they work good, I am finding the resulting sound as having a great amount of high end frequencies, that can result in a piercing sound sometimes.
Something I've noticed is that plated cooper strands tend to deliver a more defined sound but, with a bunch of high frequencies and, when reached some point, the sound can be honky or even harsh and piercing.
Silver plated copper strands have an outstanding definition (as the Vovox) and, sound bright but, comparatively more even than tin plated copper strands (as the Sommer).
There was a Brand that I always wanted to try, because it's an standard in lots of Recording Studios. I know most of the patch cables used with studio gear are usually made with Mogami' stuff. I didn't wanted a HI-FI like cable so, I went first to Mogami' site to explore their catalog and choose the cable that could probably suit my needs and, I found that Mogami 2524 instrument cable was what I was looking for.
I've run away of plated copper strands this time and, my election was that cable, without solid core copper (as The Lyric II) and with a thinner gauge and higher flexibility (even that the Spirit).
Well, today I was comparing the two cables that I was using till today (Evidence Audio The Lyric II and The Forte) against the Mogami 2524 and, this entry is all about my feelings with those three cables direct to amp, in a clean setting.
Comparing 3 cables
The thicker one is the The Lyric II, that has solid core wires inside and some complex geometry that makes the cable thick and very rigid. The Forte was Evidence Audio's approach to a flexible cable with the good things of The Lyric II, is less thick and more flexible than the Lyric II but, still rigid for a guitar cord. The Sommer cable is more or less equally thick than The Forte but, it's more flexible than The Forte, maybe because of the very special design of Evidence Audio cables.
The Mogami is the thinner of all them, with a gauge very similar to typical low end cables (what scared me at a first glance) and, just a tad thicker than the typical cheap Asian cables that come with cheap Asian guitars.
Tone-wise, the Lyric II stands its head over the other two. Has an outstanding definition note by note (same range as the Vovox) and a very even equalization. Every little nuance pops up in the sound. The sound is punchy (even overdiving the preamp gain, compared to the other two) and strong, while transparent clear and defined.
The Mogami 2524 has also a very even representation of frequencies, the sound is strong, well bodied and has a good punch (but a tad less than the Lyric so, it doesn't overdrives the preamp) and has an awesome definition note by note but, slightly minor than the Lyric. But, in the Mogami, notes seem to be better "glued", while in the Lyric, sensation is that they are somewhat "independently sounding". We are talking about very fine nuances and, not about big differences in the quality of sound. I have no doubt that the Lyric is just one step over the Mogami, even that this step is very short.
The Forte surprised me this time. More or less, it has the same strength and punch of the Mogami (maybe a tad less) but, the frequential reproduction isn't so even. It sounded to me as a bit hollow in the mids and with an slight bump on high end (specially) and low end frequencies. Compared to the other two, percussive chords sounded with less punch and with less body. Once again, we are talking about very fine details here but, I have no doubt that the Mogami is slightly better and, its flexibility admits no comparison with the other two.
The Video
I've prepared a very short video (about 8 mins) demoing the three cables. Take into account that the conversion process, from the original 24 bits audio to the 16 bits that allow the video editor generates a lost in subtle details of the sound (that at the end are which make the difference). The audio is then converted to MP3 format, when rendering the video and then processed by Youtube so, I am not very confident you can get the details I am mentioning above and, that's why this blog entry complements the video with the sound information that the video cannot accurately reproduce.
Anyway, you will notice that, once reached some quality level, any good cable can do the job with ease.
Final Comment
My original thought was to substitute the Spirit cable with Mogami's in the pedalboard, because I thought that they will probably not stand a comparison against the Evidence ones but, I was gratefully surprised with the results of the test so, I am thinking in substitute The Forte one with this Mogami. I don't see the urgent need to remove the Lyric, instead (because it rests on the floor).
Most Mogami cables are sell bulk so, you can make your own cables to your wanted length and, they are thin and flexible enough to patch a pedalboard and to hung from your guitar. Sonically are at same level than The Lyric or Vovox and are expensiver.
I have still to compare them against Sommer SC The Spirit ones and see how well they work on the pedalboard.
19 November 2012
Accesories: Neutrik Timbre Plug Test
Introduction
If your rig is limited to just one guitar and one amp (despite of one or more pedal effects), you can spend some time looking for the guitar cable that better fits your needs.
When you are using instead very different guitars and amps, the characteristics of a certain cable can be unwanted for a certain rig.
By example, imagine that we are using a Fender Stratocaster with vintage-correct single coils in an amp that's naturally trebbly (like a Vox) with a trebbly speaker (like a Celestion V30) and, using a high end cable that preserves or even pushes the high frequencies. The results can be really harsh and ear piercing.
Or, imagine that we are using a darker amp, with darker cab and/or speakers, with A2 humbuckers and, we use a cable with high capacitancy that still roll offs lots of trebles. The results can be really tud, muddy or dark, liveless.
So, it seems that the best approach wold be to preserve the most of your high frequencies possible and, being rolling off those later. But, this can lead to some other issues.
If you are using certain amount of pedals between your guitar and your amp (because you love pedals or because you cannot crank your amp and need a bit of help), you will probably end adding some buffer at the beginning of the chain, to feed the rest of pedals with a quality signal that preserves frequential content and signal strength.
Well, this last is my case. I was unable to remove the excesive high end that the Evidence Audio The Forte cable was delivering at the input of the pedalboard. So much high end makes the sound honky, a bit bonny, sharped and without body. The different gain stages (gain pedals) in the chain were increassing the loudness of such a high end, delivering a final sound that didn't liked to me.
Traditional approaches would be to roll off some high end content from your guitar, rolling off the tone control (what works the most of times) or to get a warmer cable, with higher capacitancy that can get rid of that excesive high end.
Some time ago, I saw some interesting video demoing the Neutrik Timbre plug. A plug that has 4 different positions that help to change the frequential response of your cable. I checked the price and, even that expensiver than other plugs, was affordable for just an extreme of a single cable so, I went for it and bought it. This is my short experience with that plug.
Presentation
Nothing great. Just a plastic bag with the plug dissasembled inside. No instructions.
You need to go to Neutrik's home page and search for assembling instructions to determine if the red wire inside the plug goes to ground or hot. It goes to hot (to the tip).
Assembling it
Overall, Neutrik plugs are very well designed and are easy to solder and mount. Just a child's game.
But, in the case of the TimbrePlug, things go a bit different. In first place, if you don't peal enough of the external isolant layer (the instructions say 2 cm, what ISN'T ENOUGH), the assembling screw (THAT IS IN THE MIDDLE OF THE WIRE PATH!) will be a mess and, to put everything together becomes a hard work. While to prepare an standard Neutrik plug can take me about 5 mins, I spent more than 20 mins traying to assemble it in the right way. So, take into account to peel more external isolant layer than specified in the assembling instructions, check the clearance between signal wire, shield and that screw.
If you take this into account, this will become easier.
The red cable of the Timbre plug should be soldered together with the signal wire to the plug's tip.
Testing it
I've prepared a Mogami 2524 Intrument cable (with cooper strands, not platted), with such a plug and one silent plug in the other extreme. I've plugged my guitar, direct to the amp to check both things: the Timbre Plug and the cable. I had another Mogami cable of same length, with an standard plug in one side and one Silent plug in the other side, for comparison.
That was weird!. I've switched on the amp and, inmediatelly was scared... The volume was weak, weak, weak and, the sound was dull, dark, distant. I've checked the 4 positions of the TimbrePlug and, just a bit of enhancement or darkness in one or the other positions but, same incredible low volume.
I played with the amp controls, increassing the gain (that basically increassed the floor noise) and the volume that seemed to do nothing.
For a moment, I've run in panic: were my amp's tubes went wrong?.
I've switched the other two amps and tested the guitar in both and, same results.
So, I decided to test the other cable (regular + silent plugs) and, the volume became normal.
At this point, I desoldered the TimbrePlug and mounted just a regular plug in this cable, tested again, and everything was as usual.
I am then very disapointed with the TimbrePlug but, I am still not sure if the issue was the plug itself or that, due to the difficult assembly and narrow space between wires and screw, maybe the screw drilled the isolant layer of the signal wire and created some kind of derivation to ground, what can explain the weak signal.
Since the second thing that I wanted to check is how that Mogami cable worked, in comparison with the Evidence Audio and the Sommer SC The Spirit ones, and liked what I've heard, I will delay a further test of that TimbrePlug for any other day in the future.
I am now recabling the pedalboard with Mogami 2524, because I am suspecting that the current Sommer SC The Spirit, that has a tin plated cooper strands core is the responsible for this excesive high end. My experience with plated cooper strands says me that this kind of cables are very bright sounding. While silver plated ones seem to deliver a more even response (but still bright), tin plated ones seem to be really harsh sounding.
After recabling the pedal board with Mogami 2524, I will compare again Mogami 2524 against the Evidence Audio cables that I am currently using from Guitar to pedal board and from pedal board to Amp.
16 November 2012
Wiring Diagram: LP - 1 Prail - 4 sounds
Classification
Guitar Modded
Gibson Les Paul
Description
Difficulty Level
Hard
Features
Click on the diagram for a full sized view.

With pull/pushed down, we achieve the typical LP combos.
The requester wanted to control the P-Rail neck pickup just with the two pots assigned to neck pickup (NV = Neck Volume, NT = Neck Tone).
For more easy memory map, the Neck Volume (the upper one) selects the P90 coil (up) and the Neck Tone (the lower one) selects the Rail coil (down).
For the 4 sounds switching, I am not using the SD standard (by Frank Falbo) but, the approach of ArtieToo, that avoids the antenna effect when the outer coil is being selected.
Color codes correspond to P-Rail, therefore Seymour Duncan's ones. The white wire is being represented here in light blue.
Volumes are wired in an independent way.
Tones are wired as per '50s mod, to provide an smoother roll off of trebles, when rolling off the volume.
Guitar Modded
Gibson Les Paul
Description
- HH Pickup layout (1 4 conductors P-Rail, 1 braided single conductor humbucker)
- 1 Swiftcraft 3-way toggle switch
- 2 volume pots (1 with pull/push)
- 2 tone pots (1 with pull/push)
Difficulty Level
Hard
Features
- Provides standard LP combos, plus the 4 different sounds of a P-Rail
- Independent volume and '50s tone for each pickup.
Click on the diagram for a full sized view.

Comments
With pull/pushed down, we achieve the typical LP combos.
The requester wanted to control the P-Rail neck pickup just with the two pots assigned to neck pickup (NV = Neck Volume, NT = Neck Tone).
For more easy memory map, the Neck Volume (the upper one) selects the P90 coil (up) and the Neck Tone (the lower one) selects the Rail coil (down).
For the 4 sounds switching, I am not using the SD standard (by Frank Falbo) but, the approach of ArtieToo, that avoids the antenna effect when the outer coil is being selected.
Color codes correspond to P-Rail, therefore Seymour Duncan's ones. The white wire is being represented here in light blue.
Volumes are wired in an independent way.
Tones are wired as per '50s mod, to provide an smoother roll off of trebles, when rolling off the volume.
13 November 2012
Wiring Diagram: Jimmy Page's mod
Classification
Guitar Modded
Gibson Les Paul
Description
Difficulty Level
Hard
Features
Click on the diagram for a full sized view.


Guitar Modded
Gibson Les Paul
Description
- HH Pickup layout (4 conductors)
- 1 Swiftcraft 3-way toggle switch
- 2 volume pots with pull/push
- 2 tone pots with pull/push
Difficulty Level
Hard
Features
- Provides standard LP combos, plus a high variety of other combinations.
- Independent volume and tone for each pickup.
Click on the diagram for a full sized view.

Comments
When someone wants the highest versatility for its limited Les Paul (just 3 pickups combinations against the stock 5 combinations of a Strato), he/she immediately thinks on Jimmy Page's mod.
This mod provides 21 very interesting combinations, that can be read here: (click for full size pickup):

What I don't like about Jimmy Page's approach is the following:
- There are several combinations where all what you get is a blackout (no sound)
- It's not easy to map in your memory what controls to pull or push to achieve a given combination
This design is really tricky and needs a careful inspection and hard explanation.
I've seen many other wiring diagrams around there that are incorrect.
A nice one can be found on Seymour Duncan's forum (The Vault), drawn by ArtiToo, with the information that Robert S or Jeremy gave to him. That list above was prepared by some of those two guys (thanks!).
You can easily detect other false JP mods because you will see the two central lugs of the 3-way soldered together, what is not part of the JP mod and, one of the tricks that this mod wisely uses.
I have my enhanced version of this wiring, named Hermetico's LP Exchanger mod 3 that will introduce, once I update the design to a moderner look.
I have my enhanced version of this wiring, named Hermetico's LP Exchanger mod 3 that will introduce, once I update the design to a moderner look.
Wiring Diagram: Hermetico's Stratosphear mod 4
Classification
Guitar Modded
Fender Stratocaster SSS
Description
Medium
Features
Click on the diagram for a full sized view.

Guitar Modded
Fender Stratocaster SSS
Description
- SSS pickup layout
- 3 single coils, direct Fender replacement pickups
- 1 volume pot with S-1 switch
- 2 tone pots
- 1 Fender Super Switch
Medium
Features
- Provides standard SSS switching mode plus an alternate mode with interesting combos.
Click on the diagram for a full sized view.

Comments
For this mod, an S-1 switch or a 4PDT on/on switch is needed. Even that most of the job can be done with a DPDT switch, some position can leave some coils hunging from the hot path, what converts the pickup in a very large antenna that can catch any kind of noise. This is avoided with the help of a couple more of poles and, the reason why I am designing this with a 4 poles switch.
Given that Fender includes in several of their strato models the S-1 switch and, that this kind of switch is really discrete and easier to actuate than a pull/push, I went in that director for this mod.
Due to the complexity of the wiring, there is a dedicated tone pot for the bridge pickup but, a master tone for all positions. So, you can tweak the overall trebles roll off with the master tone (MT) and roll off a bit more for the bridge position (BT), what is always convenient, since the bridge pickup has always more high end frequencies.
When the S-1 is up (unactive), we achieve the standard strato combinations but, tone controls work as described above. When the S-1 is down, we enter in an alternate mode, with the following combinations:
1. Neck in Series with Bridge (like the 4th position of a Tele mod)
2. (Neck in series with Bridge) in parallel with Middle (very open but strong)
3. Neck in parallel with Bridge (like the middle position of a Tele)
4. (Middle in series with Bridge) in parallel with Neck (strong an open)
5. Middle in series with Bridge (some kind of Bridge virtual humbucker)
I've tried lots of combinations but, those alternate one that this mod has were the ones that I liked more.
This gives a lot of versatility to your strato, without repetitive combinations (by example, neck in series with middle is quite similar to middle in series with bridge) and, all them delivering an interesting alternate sound.
For sure, there is more room for improvements or changes. By example, we could use a master treble tone and a master bass tone, to better narrow the sound. I cannot cover every variant.
As always, not represented ground wires (as bridge's or shielding's) should be soldered together with the rest of grounds (inverted triangle).
Wiring Diagram: Mike Richardson mod 03
Classification
Guitar Modded
Fender Stratocaster SSS
Description
Medium
Features

What can be a bit hard to understand for some people.

Guitar Modded
Fender Stratocaster SSS
Description
- SSS pickup layout
- 3 single coils, direct Fender replacement pickups
- 1 volume pot with pull/push
- 2 tone pots
- 1 Fender Super Switch
Medium
Features
- Provides standard SSS switching mode plus an alternative mode with interesting combos.
This is the original sketch from Mike Richardson's:

What can be a bit hard to understand for some people.
I translated that sketch to a more friendly diagram. This is the diagram:

Comments
This is a more standard alternative to mod 02 of same author, because we are achieving the 5 regular Stratocaster combinations when the pull/push is down.
This time, in the alternate mode (pulled up), we achieve the following combos, instead:
1. Neck in series with Middle in series with Bridge
2. Neck in series with Middle
3. (Bridge in series with Middle) in parallel with Neck
4. Bridge in series with Middle
5. Neck in parallel with Middle in parallel with Bridge
I would swap postions 5 and 1, to make it going from weak to strong.
Respect of mod 02, we are loosing the Telecaster-like intermediate position (Neck and Bridge in parallel) and, we are adding a virtual bridge humbucker (bridge in series with Middle) in parallel with Neck, what gives a very interesting combination with strength an openess, at same time´
12 November 2012
Wiring Diagram: Mike Richardson mod 02
Classification
Guitar Modded
Fender Stratocaster SSS
Description
Medium
Features

What can be a bit hard to understand for some people. This time, there is specific information about what to do with the 3 pots (volume and 2 tones).

Guitar Modded
Fender Stratocaster SSS
Description
- SSS pickup layout
- 3 single coils, direct Fender replacement pickups
- 1 volume pot with pull/push
- 2 tone pots
- 1 Fender Super Switch
Medium
Features
- Provides standard SSS switching mode plus an alternative mode with interesting combos.
This is the original sketch from Mike Richardson's:

What can be a bit hard to understand for some people. This time, there is specific information about what to do with the 3 pots (volume and 2 tones).
I translated that sketch to a more friendly diagram. This is the diagram:

Comments
One more tricky design by Mike Richardson. This time using a super-switch and getting rid of the black out issue with the middle position of their mod 01 (see previous entry in this blog).
Also, in my opinion, the alternate combos that provide the "alternate" mode are more usefull for the real work.
While the volume's pull/push is pushed down, standard strato wiring takes place but, except for the middle position that, instead of select the middle pickup is selecting Bridge in parallel with Neck pickup.
When the the pull/push is pulled up, we enter in an "alternate" mode and we are getting the following combinations:
1. Neck in series with Middle in series with Bridge
2. Neck in series with Middle
3. Bridge in series with Neck
4. Bridge in series with Middle
5. Neck in parallel with Middle in parallel with Bridge
I would probably swap positions 1 and 5 to make the combos go from the weakest to the loudest one, by example in this way:
1. N + M + B (all parallel)
2. N & M
3. N & B
4. B & M
5. N & M & B
To me this makes more sense but, Richardson's design is very clever, anyway.
The drawback is that you loose your middle pickup alone sound but, you replace it with neck and bridge pickups in parallel, what is very similar to the center position of a Telecaster and, not a bad sound, anyway.
The tricky part of this wiring is related to that cap linking the neck negative and the lug 3 of the neck's tone pot. Not positive about the function of this cap there.
I will still introduce two more Richardson's designs in next entries.
Wiring Diagram: Mike Richardson mod 01
Classification
Guitar Modded
Fender Stratocaster SSS
Description
Medium
Features

What can be a bit hard to understand for some people. Even that the wiring of the 5-way is clear, there is no specific information about what to do with the 3 pots (volume and 2 tones).

Guitar Modded
Fender Stratocaster SSS
Description
- SSS pickup layout
- 3 single coils, direct Fender replacement pickups
- 1 volume pot with pull/push
- 2 tone pots
- 1 Fender 5-way switch.
Medium
Features
- Provides standard SSS switching mode plus an alternative mode with interesting combos.
This is the original sketch from Mike Richardson's:

What can be a bit hard to understand for some people. Even that the wiring of the 5-way is clear, there is no specific information about what to do with the 3 pots (volume and 2 tones).
I translated that sketch to a more friendly diagram and decided to have a master volume an independent tone controls for neck and bridge pickups. This is the diagram:

Comments
Mike Richardson was providing few tricky and usefull diagrams. This one is the first I would like to introduce to you but, a couple more will come soon.
You can see that when the pull/push is pushed down, the 5-way switch behaves in a regular strato way, delivering the typical strato combinations but, when the pull/push is pulled up, we enter in an "alternate" mode and the positions deliver the following:
1. Neck in series with Middle
2. Neck in series with Middle-out-of-phase
3. NOTHING
4. Middle-out-of-phase in series with Bridge
5. Middle in series with Middle
Not sure about positions 2 and 4.
For position 2, having the bridge negative grounded in one side and it's positive ground thru the cap on lug M but, also linked to neck's negative (also grounded thru the cap on lug M), it seems like if the middle pickup was shortcut and therefore, just the neck pickup should work.
Same case applies for position 4 and the bridge and middle pickups.
Maybe the cap between the ground and the link spot for both pickups is reversing the polarity of the middle pickup without shortcutting such a pickup. I am not 100% positive on this but, I have to rely on Richardson's design.
The weirdest thing of this wiring is the middle position that gives you no sound. I don't like mods were some position can accidentally shut up your guitar.
But, wait, Richardson have some other tricks in the hat. Wait for next mod.
Wiring Diagram: Guitar Tech Craig's Mega Switch
Classification
Guitar Moded
Fender Stratocaster SSS
Description
Medium
Features
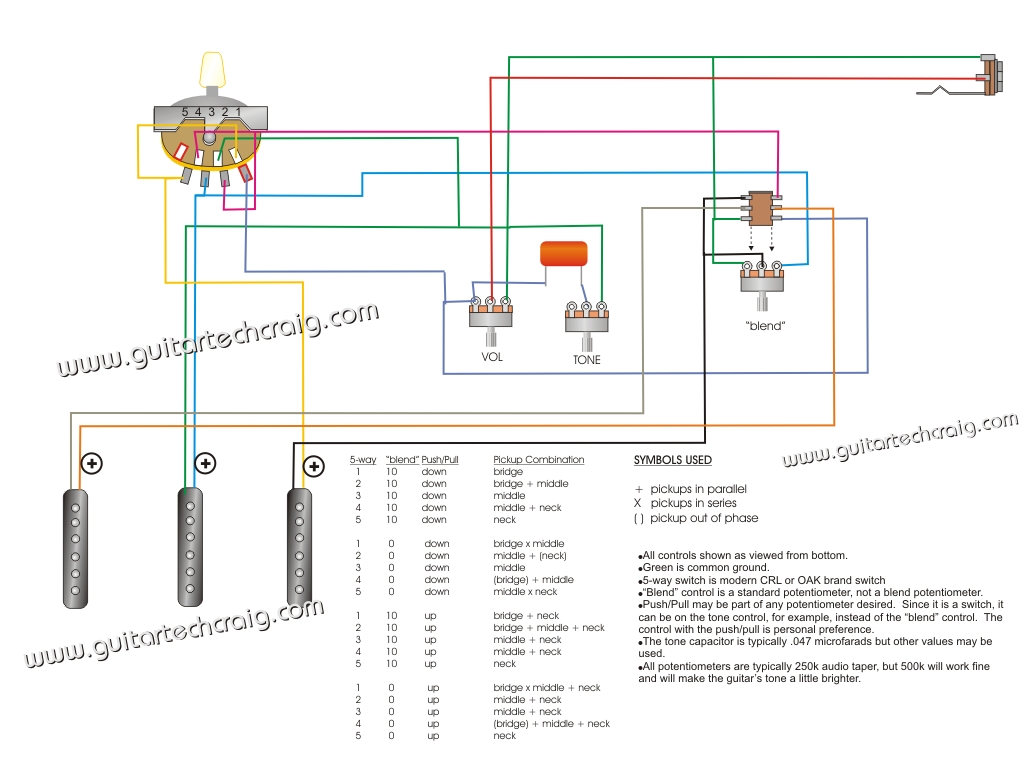
Many people tried it and didn't success. I bet that the issue is that this diagram is showing the common lugs as they would be in an old Fender switch but, current switches have their common lugs swapped.

When the pull/push is down, the center poles are in contact with the lower poles (in this diagram with the upper lugs, since the switch is seen as mounted in the pickguard).
So, at left, the neck pickup goes to its natural lug in the 5-way and, at right, the bridge negative goes to the middle lug of the blender pot and, the middle positive goes to the right lug of the blender. That makes a virtual link in series between both pickups, depending on the position of the blender pot.
When at zero, both pickups are connected together in series (in fact, when going from middle position to zero). When at 10, the bridge pickup is grounded and disconnected from the middle's positive (the series arrangement is broken).
And, in the right side of the pull/push, the center of the blender (negative of bridge pickup) is linked to the negative wire of the neck pickup.
So, if the pull/push is down and the blender is at zero, for neck position (position 5 in the original diagram), what we have in fact is the middle pickup in series with the bridge pickup and the neck pickup. The positive of the bridge pickup is disconnected in the 5-way for this position so, no sound middle in series with bridge.
But, the neck is connected to the hot path and the middle is always grounded so, what we have for this position is Middle in Series with Neck.
In this same case, if the blender is at 10, we are disconnecting the middle positive from the bridge negative and the bridge negative is being grounded but, since in the pull/push the bridge negative is linked to the necks negative, the neck results ground as well. Since the positive of the bridge isn't linked to the hot path in the 5-way but the neck positive is, we achieve just the neck pickup for this position.
So, blender at ten gives us neck pickup, blender at zero gives us middle in series with neck, instead.
But, what happens when the pull/push is up then?.
Now, the neck negative will be always grounded and the neck positive will be always on the hot path so, at least the neck pickup will sound always by default, if we don't do anything else to avoid it.
Remember that we still have that virtual link between the middle and bridge pickup in the blend pot so, let analyze all together and let see what happens.
Both (middle in series with bridge) pickups are unlinked of the neck pickup and, since the bridge positive isn't in the hot path, we will get no sound from those pickups, when the blender is at zero.
When the blender is at 10, the serial link is broken and the bridge pickup is being grounded but, since neither the bridge positive or the middle positive are in the hot path, we just get the neck pickup.
Let analyze the middle + neck position now (Position 4) in the original drawing.
First effect is that the bridge positive is being grounded (in the right side of the 5-way).
The bridge negative is linked to the neck negative in the pull/push, when pushed down.
This time, the middle positive is added to the hot path, together with the neck positive.
The middle positive can be also potentially linked to the bridge negative in the blender pot.
In one side, we have the neck pickup linked with the bridge pickup out-of-phase. The negative of the neck pickup is linked in the pull/push with the negative of the bridge pickup and, the positive of the bridge pickup is grounded so, we have a virtual humbucker with the bridge pickup out-of-phase.
In other side the middle pickup has it's negative grounded and the positive linked to the negative of both pickups, bridge and neck. So, what we have here is bridge out-of-phase in series with neck in parallel with middle in series with neck but, neck positive is also linked to the hot in the 5-way switch.
That shortcuts the neck pickup, removing it from the signal path and therefore, what we have is bridge-oop in parallel with middle.
When the blender is at 10, the link between middle positive and bridge negative is removed and the bridge negative is grounded. Since the bridge positive is grounded in the 5-way switch also, the bridge pickup is removed from the circuit but, since the negative is linked to the neck negative, the neck pickup is being grounded now. The middle negative is always grounded and, the positive was already added to the hot path, therefore, we have here Neck in parallel with Middle.
And when the pull/push is up?.
Neck positive is always in the hot path and the negative is grounded so, this pickup should sound as default.
Middle negative is always grounded and for this position, the positive was added to the hot path so, in principle, both pickups should be in parallel.
Bridge positive is still grounded and, the negative is virtually linked to the middle positive in the blender pot.
When the blender is at zero, the three pickups are sounding in parallel.
When the blender is at 10, the link bridge negative - middle positive is being removed and, the bridge negative is being grounded and, since the positive is also ground, the pickup is being removed from the circuit. The other two pickups continue as they were so, we have neck in parallel with middle.
To go one by one can take very long so, try to understand the basics of how the combination of that blender with the pull/push work together. Maybe, it's easier for you to think on that blender as if it was just a SPDT on/on switch.
The good thing of doing it with a blender pot is that you can reuse one of the stock tone pots for that job and the guitar still looks like it was and, between zero and 10 there are some grey zones, where you can get other nuances for each combo.
But I think it can be easier to have a toggle DPDT on/on there instead of the blender to do the job.
Guitar Moded
Fender Stratocaster SSS
Description
- SSS pickup layout
- 3 single coils, direct Fender replacement pickups
- 1 volume pot with pull/push
- 1 blender pot
- 1 tone pot
- 1 Fender 5-way switch.
Medium
Features
- Provides multiple alternative combos to the original stock wiring..
- The different combinations are achieved with the use of a blender pot and a pull/push under the volume pot.
This is the original diagram found on Guitar Tech Craig.
Many people tried it and didn't success. I bet that the issue is that this diagram is showing the common lugs as they would be in an old Fender switch but, current switches have their common lugs swapped.
The following diagram is my take of the original one, fixing the issue with the lugs, clarifying the design respect of grounds and jumpers.

Comments
This request was originally made during Juny 2009, were some users were interested on use the Mega Strat Wiring mod presented in Guitartechcraig and, that reported as not working.
I suspect this was the case if they didn't understand the meaning of each lug and they tried to directly solder everything as drawn. Without taking into account which lug is which, a direct soldering of this design in a modern Fender 5-way switch will lead to unexpected results because, by example, you will be wiring the hot output to the neck pickup lug, instead of the common lug, etc.
This is a very tricky design and, the major key is how the blender pot works. It's relatively easy to wire but, a clever and tricky design that, it's not easy to understand for everyone.
Just to give an example about how this wiring works. Let analyze Neck position.
So, at left, the neck pickup goes to its natural lug in the 5-way and, at right, the bridge negative goes to the middle lug of the blender pot and, the middle positive goes to the right lug of the blender. That makes a virtual link in series between both pickups, depending on the position of the blender pot.
When at zero, both pickups are connected together in series (in fact, when going from middle position to zero). When at 10, the bridge pickup is grounded and disconnected from the middle's positive (the series arrangement is broken).
And, in the right side of the pull/push, the center of the blender (negative of bridge pickup) is linked to the negative wire of the neck pickup.
So, if the pull/push is down and the blender is at zero, for neck position (position 5 in the original diagram), what we have in fact is the middle pickup in series with the bridge pickup and the neck pickup. The positive of the bridge pickup is disconnected in the 5-way for this position so, no sound middle in series with bridge.
But, the neck is connected to the hot path and the middle is always grounded so, what we have for this position is Middle in Series with Neck.
In this same case, if the blender is at 10, we are disconnecting the middle positive from the bridge negative and the bridge negative is being grounded but, since in the pull/push the bridge negative is linked to the necks negative, the neck results ground as well. Since the positive of the bridge isn't linked to the hot path in the 5-way but the neck positive is, we achieve just the neck pickup for this position.
So, blender at ten gives us neck pickup, blender at zero gives us middle in series with neck, instead.
But, what happens when the pull/push is up then?.
Now, the neck negative will be always grounded and the neck positive will be always on the hot path so, at least the neck pickup will sound always by default, if we don't do anything else to avoid it.
Remember that we still have that virtual link between the middle and bridge pickup in the blend pot so, let analyze all together and let see what happens.
Both (middle in series with bridge) pickups are unlinked of the neck pickup and, since the bridge positive isn't in the hot path, we will get no sound from those pickups, when the blender is at zero.
When the blender is at 10, the serial link is broken and the bridge pickup is being grounded but, since neither the bridge positive or the middle positive are in the hot path, we just get the neck pickup.
Let analyze the middle + neck position now (Position 4) in the original drawing.
First effect is that the bridge positive is being grounded (in the right side of the 5-way).
The bridge negative is linked to the neck negative in the pull/push, when pushed down.
This time, the middle positive is added to the hot path, together with the neck positive.
The middle positive can be also potentially linked to the bridge negative in the blender pot.
In one side, we have the neck pickup linked with the bridge pickup out-of-phase. The negative of the neck pickup is linked in the pull/push with the negative of the bridge pickup and, the positive of the bridge pickup is grounded so, we have a virtual humbucker with the bridge pickup out-of-phase.
In other side the middle pickup has it's negative grounded and the positive linked to the negative of both pickups, bridge and neck. So, what we have here is bridge out-of-phase in series with neck in parallel with middle in series with neck but, neck positive is also linked to the hot in the 5-way switch.
That shortcuts the neck pickup, removing it from the signal path and therefore, what we have is bridge-oop in parallel with middle.
When the blender is at 10, the link between middle positive and bridge negative is removed and the bridge negative is grounded. Since the bridge positive is grounded in the 5-way switch also, the bridge pickup is removed from the circuit but, since the negative is linked to the neck negative, the neck pickup is being grounded now. The middle negative is always grounded and, the positive was already added to the hot path, therefore, we have here Neck in parallel with Middle.
And when the pull/push is up?.
Neck positive is always in the hot path and the negative is grounded so, this pickup should sound as default.
Middle negative is always grounded and for this position, the positive was added to the hot path so, in principle, both pickups should be in parallel.
Bridge positive is still grounded and, the negative is virtually linked to the middle positive in the blender pot.
When the blender is at zero, the three pickups are sounding in parallel.
When the blender is at 10, the link bridge negative - middle positive is being removed and, the bridge negative is being grounded and, since the positive is also ground, the pickup is being removed from the circuit. The other two pickups continue as they were so, we have neck in parallel with middle.
To go one by one can take very long so, try to understand the basics of how the combination of that blender with the pull/push work together. Maybe, it's easier for you to think on that blender as if it was just a SPDT on/on switch.
The good thing of doing it with a blender pot is that you can reuse one of the stock tone pots for that job and the guitar still looks like it was and, between zero and 10 there are some grey zones, where you can get other nuances for each combo.
But I think it can be easier to have a toggle DPDT on/on there instead of the blender to do the job.
11 November 2012
Wiring Diagram: Custom Carvin mods 02 and 03
Classification
Guitar Moded
Carvin Custom HH
Description
Difficulty Level
Easy
Features
Wiring Diagram
Two diagrams, this time. Both are designed for Seymour Duncan pickups.
First one is the solution with a Schaller Megaswitch E (regular 5-way), that will work also with any cheap Asian importation switch.
Second one is same wiring with a regular and trustful Fender 5-way blade switch.
Remember to click on the images for full size.


Comments
To adapt the Custom Charvel Wiring Mod 01 to Seymour Duncan pickups it's even trickier than the original mod was. While Charvel pickups split by default (grounding the link) to TOP pickup, Seymour Duncan split by default to inner coil (usually slug coil), except for some tricky pickups, like the P-Rails.
That means that while in Charvel, with regular split, with achieve the outer coil of the neck and the inner coil of the bridge (they are both their respective "top" pickups in their position), in standard SD' split, we achieve inner coil in neck (or bottom pickup for Charvel) and inner coil in bridge (or top pickup for charvel).
A direct remapping of wires, from Mod 01, doesn't give us the right combinations. When I split humbuckers to single coils, I prefer to favor the inside (or top) coil of the bridge and the outer coil (or top) of the neck, so we achieve two things at same time: first to get the louder coil for each position and, second to get hum cancelling positions if both pickups are being selected together.
So, I redesigned mod 01 for Seymour Duncan pickups, to achieve following combos:
1. Neck humbucker
2. Neck split to outer coil (screw)
3. Bridge split to inner coil (slug) in series with Neck split to outer coil (screw)
4. Bridge split to inner coil (Slug)
5. Bridge humbucker.
To achieve those results, I had to totally reverse the way both coils are being put in series in both pickups.
Guitar Moded
Carvin Custom HH
Description
- HH pickup layout
- 2 humbuckers (Seymour Duncan)
- 1 volume pot
- 1 tone pot
- 1 Schaller Megaswitch E (regular 5-way) or 1 Fender 5-way switch
Difficulty Level
Easy
Features
- Provides full humbuckers and split combinations
- Simple treble bleed mod (just a cap)
Wiring Diagram
Two diagrams, this time. Both are designed for Seymour Duncan pickups.
First one is the solution with a Schaller Megaswitch E (regular 5-way), that will work also with any cheap Asian importation switch.
Second one is same wiring with a regular and trustful Fender 5-way blade switch.
Remember to click on the images for full size.


Comments
To adapt the Custom Charvel Wiring Mod 01 to Seymour Duncan pickups it's even trickier than the original mod was. While Charvel pickups split by default (grounding the link) to TOP pickup, Seymour Duncan split by default to inner coil (usually slug coil), except for some tricky pickups, like the P-Rails.
That means that while in Charvel, with regular split, with achieve the outer coil of the neck and the inner coil of the bridge (they are both their respective "top" pickups in their position), in standard SD' split, we achieve inner coil in neck (or bottom pickup for Charvel) and inner coil in bridge (or top pickup for charvel).
A direct remapping of wires, from Mod 01, doesn't give us the right combinations. When I split humbuckers to single coils, I prefer to favor the inside (or top) coil of the bridge and the outer coil (or top) of the neck, so we achieve two things at same time: first to get the louder coil for each position and, second to get hum cancelling positions if both pickups are being selected together.
So, I redesigned mod 01 for Seymour Duncan pickups, to achieve following combos:
1. Neck humbucker
2. Neck split to outer coil (screw)
3. Bridge split to inner coil (slug) in series with Neck split to outer coil (screw)
4. Bridge split to inner coil (Slug)
5. Bridge humbucker.
To achieve those results, I had to totally reverse the way both coils are being put in series in both pickups.
09 November 2012
Guitars: Prestige Heritage Elite and Standard
Introduction
Note: this entry was already published during September 2009, in my old Spanish version of this blog. I am revisiting this entry an mixing the information about two Prestige Heritage models: the Elite, that I bought first time, and the Standard, that I actually own. The entry has been updated with additional information derived of experience.
Ah, yes, Les Paul, Les Paul!.
Same thing that happens with Jimi Hendrix and Stratocasters, happens with Les Pauls and Jimmy Page.
If you even saw Led Zeppelin's film called "The song remains the same", the images of that Page's guitar doing anything you can imagine will be still alive in your mind.
Yes, I wanted a Stratocaster (because of Hendrix) but, I wanted a Les Paul, also!.
The main issue with all Gibson' stuff is the price tag. Incredible high. You see their building facilities in some videos, where the most of process is highly mechanized and you wonder why that price!.
Fender' stuff is always more affordable, in my opinion rightly priced but, that's how life goes: do you want a Gibson? pay it!.
Nowadays, I would probably save money for a real Gibson but, when I retook the guitar (2008 - 2009), I knew less than I new when I played my first guitar and, this is close to Zero knowledge. I didn't wanted to break my pocket buying an expensive guitar that could be my second one.
For sure, the best alternative to a real Gibson LP is a Tokai but, the good ones (by example the equivalent to a R9) are reaching high price tags, close to the price of a Gibson Standard and, they don't have the same resell price. Other good clones are in the same price level (or even expensiver if they are Japanese clones of around 80-90's).
Then, we have the little brother of Gibson, Epiphone. I currently thing that Epiphone has increased his quality level since those years. Two Epiphones I bought are really convincing, specially on wood work. But, people was claiming about fret work, cheap hardware and weak electronics those days so, I turned my head in other directions.
What I wanted is to get some LP type of guitar with good wood work and, with the possibility to be upgraded during the time. If wood is ok, you can always enhance the guitar.
Following the rule that says: "cheaper often means expensiver" (because you end buying same thing several times), I went first for the "Chinese way".
Those years, a lot of Ebay activity was happening (no Crisis!) and was really easy to buy, resell and sell again. I bought first a couple of Chinese LP's, really cheap, from a couple of European traders on Ebay.
What can I say!. They could serve as a table for your workshop but, as guitars, had a lot to grow.
Bad woods, bad work, bad settings, weak necks, bad pickups, cheap electronics... you know, everything that makes a guitar to sound and play simply horrible.
I saw a friend of mine buying a couple of Chinese "exact" clones of a Fender Stratocaster and a Gibson LP Custom that played and sounded simply bad. They are even putting there the name of brand and models that they are cloning, without shame and with total impunity. Nobody can stop that people?. It's a shame for the real Brands and a trap were many unknowledgable people caught!.
Well, still under the rule "cheaper often means expensiver", I did resold both guitars practically the same month I had them and went an step higher: this time, I wanted to try Korean stuff and stay away of Chinese Stuff.
This time, I did a more careful search and, I wanted a cheap Korean guitar but, having good electronics loaded, to avoid the extra expense of upgrading electronics, what makes the guitar to cost more or less double than when you bought it.
That search leaded me to Prestige Heritage guitars.
As per their page's information. They seem to send Canadian wood to Korea, let the Korean people to do what they do really well (woodwork) and finish the guitar with American hardware and pickups, setting up the guitar finally in Canada.
Prestige Heritage models were loaded with real CTS pots and Seymour Duncan pickups ('59 at neck and JB at bridge) so, I had to try it.
I bought first the Elite model, that sounded absolutely magic. I sold it because it had that kind of gorgeous "Tree of Life" inlay, that I love to see but, that makes me to be lost when walking the neck (just a personal limitation) and, because they hadn't same model with regular inlays, I had to go for an Standard.
This entry will talk simultaneously of both guitars.
Presentation
Both guitars come in a thin hard case, with good look but, the walls of the case are so thin that cannot protect the guitar enough. The hard case is shaped with the shape of the guitar, as usual for LP like guitars.
Inside, just the warranty (for life!), the thrussrod key and, that's all.
The Elite model has stunning finishes. It's sexy as hell. The body top is made of quilted maple of quality AAAA, absolutely gorgeous. The paint work on the back, neck and headstock shine like a mirror and, the whole frontal shape (body, fretboard and headstock) are surrounded with a mother-of-pearl inlay that makes this guitar incredible sexy.
The fretboard is inlayed with some variant of the "Tree of Life", with mother-of-pearl inlays. This work is way more beautiful that the "Tree of Life" that you can see in a JEM7VWH, that disappointed me a bit.
If you see the two pictures in the header of this blog, this is the guitar I am talking about!.
The woodwork is perfect. No flaws, everything was done to the perfection.
The joint neck and body is completely different of any standard LP. It has some kind of shape in form of an S that makes really comfortable to reach the last frets (one of the things I don't like of LPs).
The neck is thin, closer to the '60s neck style but, maybe, even thinner.
Paint isn't nitro but, I hate nitro necks, in fact, because it's some kind of brake when walking on the neck.
So, the high gloss finish of this guitar made it easy to walk the fingerboard.
Tuning keys are typical Korean, oil-sealed Die Cast. Not a great thing but, they do their job. The guitar remains in tune more time than my 3 Gibsons (now, I just have one).
The electronics work is perfect, using CTS pots, Swiftcraft jack and switch and, the guitar comes stock with a couple of Seymour Duncan's pickups, a '59 on neck and a JB on bridge.
You really don't need to upgrade the electronics. The guitar is already completed in this area.
The above details are related to the Elite model.
The Standard model is more standard. It lacks the incredible mother-of-pearl inlays that follow the guitar' shape and, even the typical block inlays on frets are made of abalone, instead of mother-of-pearl.
The joint neck-body is the same as in a LP so, worst to reach the lower frets.
Even mounting the same electronics and hardware that the Elite model, woods seem an step down in quality and, this is something that immediately is transferred to the resulting sound.
While the Elite model sounded and played just perfect, the Standard model sounds and plays a bit looser.
I did always regret selling the Elite one. It was lately stolen to the guy I've sold it and, I am wondering if one who has her on his hands would even appreciate that guitar!.
Playing it
In the Elite, the shape of the neck, the inlays of the fretboard (that increase the speed) and the kind of paint used for the neck, make it easier to play than a regular Gibson. Unplugged, its woods resonate round, with complex harmonics and a lot of sustain.The wood is of quality and give a good body to the sound.
The guitar weights exactly 4 KG! (and the case, other 4 KG!).
The sound is simply magical. They choosed a nice pair of classical SD pickups that help to enhance the natural sound of this guitar.
The '59 sounds warm, very vocal, with some kind of wah effect, rich overtones, harmonically rich and complex. Really nice. Can go a bit dirt and undefined under high gain.
The JB cuts the mix in any situation. More modern voiced, cuts as a blade and, very specially, under high distortion.
To get a good EQ in your amp, can be more tricky than usual because both pickups are EQ'd in a very different way so, you should go for a compromised in-between EQ. But, once you achieve it, the guitar starts to sing like a bird (a fat one) and, thanks to the very different nature of both pickups, the guitar is actually very versatile.
My only limitation with that guitar was the fretboard inlay. I am lost when I play any guitar having such a "Tree of Life" inlay, it already happened to me with 4 guitars (that I resold because of the same thing!).
But I am missing her tone everyday, and I always regret selling her!.
If you don't have such a silly issue with that kind of inlays and you are still doubting if Elite or Standard: DON'T DOUBT IT: ELITE ALL THE WAY DOWN!.
Fretwork is also good. Frets are well polished and sanded, nothing that stops your fingers.
The set up was really good, as comes stock.
Overall, even that both guitars are very similar respect of hardware and electronics, the Elite is clearly a plus and, not just esthetically talking but, related to woods quality also. The magical sound that the Elite was delivering isn't the same as the Standard delivers (a bit looser) and, overall, the Standard feels weaker in every sense but, still a good guitar (that's why is still in my arsenal, after 3 years).
The Standard remains for less time in tune than the Elite.
Even that it was unnecessary to upgrade the pickups, I did it. I wanted to explore different coils combinations and found that this guitar is a good platform to do it.
I've swapped the original pickups with a couple of Bareknuckle's: The Mule on neck and, Riff Raff on bridge. A set that is quite similar to the original one but that has a better definition and easier EQ.
I also swapped the original caps with a couple of 0.047 PIO caps (Sprage Vitamin-Q).
The guitar (Standard) is currently wired according to my "LP Exchanger mod #2", that is some kind of enhanced JP wiring mod.
The Videos
I did just a video with the Elite and, it lacks video quality (recorded with a cheap webcam) and the unprocessed sound is a bit weak but, I think from frame to frame, and thru the dark image, you can imagine how the guitar looks and sounds. This video was done for a Seymour Duncan's contest and, I won a Twin Tube pedal with it!. LOL.
The Standard is appearing in more videos. In this one, I am improvising an "on-steroids" free improvisation over Led Zeppelin's "Since I am loving you", that allows you to hear the Standard in a real application.
This two are probably the closer to a "demo" of the different sound of this guitar with the "LP Exchange mod #2" wiring mod and the two Bareknucle's:
Guitars: Fender American Deluxe HSS Stratocaster
Introduction
Note: this entry was originally posted during September 2009, in my old version of this blog, in Spanish. I am revisiting here such an entry and updating it with the tests and changes that I did to this guitar until today.
As happened to many other guitarists, the magical image of Jimi Hendrix creating incredible sounds with the help of that white Stratocaster, while pushing hard his Marshalls, is something that is still alive in my mind.
So, yes, like many other guitarists, I wanted to dead a Stratocaster and a Marshall.
Well, I wasn't able to buy my dreamed guitar until it was very late, when I had to play alone at home. In 1991 I bought my very first guitar of a well known maker: a Fender American Standard Stratocaster.
I was previously owning two cheap guitars: a copy of a Gibson Marauder of a Japanese maker and, some kind of Floyd Rose guitar of some other unknown maker.
I loved my new brand Stratocaster, for sure. I loved even her smell.
Some years later, I went to my first Marshall but, it was a wrong decision, since I've got one Valvetone one, instead of the real deal.
After playing that Strato for years, I started to be uncomfortable with some things. By example, the lack of tuning stability, the weak sound of the pickups, the noise of single coils, etc.
Before knowing absolutely nothing of what I actually know, I tried several things on the guitar: as noiseless pickups (that I hated), single-coil sized humbuckers (that I hated) and many other things.
Then, during 2009 I saw Fender offering some Deluxe models and, after carefully reading their description, I thought this Strato could be the kind of Strato that will make my playing more comfortable.
I sold my old American Standard and bought a new brand American Deluxe HSS Stratocaster.
Presentation
The guitar comes inside a guitar-shaped hard case. Since the case fits to the shape of the guitar, there is less room to store your stuff inside, compared with the rectangular case of my old Standard.
In any case, the case seems harder than the old one and, the locks seem of a better quality (I've brook one after one month in the Standard).
Comes with all the goodies, including a Fender Instrument Cable and a nice leather guitar strap.
Compared to the look of my old Standard, this one seemed to me less sexy but, honestly, none of the Deluxe models had an attractive look to my taste. So, I went for the less ugly one but, still ugly.
Despite of the thick paint that covers the body, all the rest seemed really stunning.
The finishing quality of the neck is incredible good. While in the standard the dots of the fretboard were painted, in the Deluxe the dots are all mother-pearl inlays. The neck profile was a bit thinner and wider than in the Standard and, the radius bigger also. The look of the rosewood fretboard was also gorgeous and, the maple of the neck had a very gorgeous look.
The typical nut is being replaced here with a LRS nut. A nut that provides less friction to the strings, since each one is surrounded by a couple of little bearing balls. This increases the sustain of the strings but, it also adds some metallic high end to the sound.
The headstock mounts staggered locking tuning keys that make unnecessary the use of string trees to modify the angle of the strings 1 to 4. That's helps also to the sustain. Also, since the string is being locked inside the post, you can cut the remaining part of the string and therefore wrap less turns.
Frets are perfectly leveled and don't disturb you when walking the fretboard. The Standard had frets not perfectly sanded that made a bit more difficult to walk the fretboard.
The junction body-neck has some cut that helps to better reach the lower frets. Still not so comfortable as the junction that you can find in some super-stratos, like Ibanez' ones but, way better than the typical Strato junction.
The bridge, apparently looks like the vintage one but, it's a real floating bridge, which blade rests on two little posts (similarly as a Floyd Rose). The material and finishing seems to be a bit better than the typical standard tremolo. The tremolo bar is of pop-up type so, you just push it to insert it in the bridge's hole, instead of having to screw it. Also, the bar is thicker and with a better look. The Standard is thinner and bends when you handle it and, that white tap falls down very often. No tap in the Deluxe's tremolo bar.
The sensibility of this tremolo bar is very similar to the sensibility of a good Floyd Rose.
The bridge, with 5 springs retaining it, stays very stable and, it's very easy to do anything without having to use a great force to play it and, at the same time, is not so easy to accidentally bend the strings if your palm rests over it.
The combined action of the locking keys and this type of bridge, give to the guitar a great tuning stability and, it comes back to perfect tuning even after hard dive bombing, what is some kind incredible in a Strato.
Pickups are a pair of SCN (Samarian Cobalt Noiseless) and the atom-1 humbucker by Fender.
Neither the SCN neck and middle, neither the humbucker liked me. The humbucker was surprisingly noisy. All them seemed to lack some attitude and, none gave that typical Strato sound.
I would say that, when I bought that guitar, I had just that one so, her should cover all the ground and, even didn't loving those pickups, they did the job. Not a sound that a purist would appreciate but, they were useful to cover everything, from cleans to high gain.
The guitar comes with a push/push S-1 switch, under the volume pot, that allows to get alternate combinations, different of the typical 5 ones that any regular 5-way switch provides. Honestly, just one or two of the alternate one was of interest to me (at least with that set of pickups). In my opinion, the alternate combos available in the Deluxe SSS are more interesting.
The silly thing about that guitar is that it costed just 200 Eur more than the Standard model and, the difference was HUGE, in any single detail. I never understood it but, when I recommended it to a friend, those guitars had increased their price in more than 600 Eur more than when I bought her.
Not sure if I would go for this guitar at that new price, nowadays.
Maybe, I had luck this time!.
Playing it
Compared to the Standard, the Deluxe was comfortable from the very first day and, it's today my number 1.
The nice sensitivity of the floating tremolo, the smoothness of the neck... everything makes me to love this axe to dead (except for the ugly paint of the body).
The fretboard isn't so fast as in the PRS 513 or in a Red Special or in a JEM7VWH but, good enough.
It gives me very few tuning stability issues. Not so stable as the PRS 513 but, even better than in my LP-clone.
The guitar is well balanced and stands stable when you hung her.
Modding it
As soon as I've stocked some other types of guitars, including one with Floyd Rose, the idea of having a guitar for everything disappeared and, the idea of have an Strato that sounded like a Strato started.
My first try was with a set of Bareknuckle pickups: Mother's Milk, an awesome set of pickups with lots of details but, probably a bit trebly for this axe.
After a year of using them, I went for a set of Seymour Duncan Antiquity II Surf and, I think this was a good election but, maybe a set of staggered Sultans of BKP can do the trick, as well. anyway, I am not planning to swap those pickups again.
I've decided to have a separate tone control for the bridge pickup since, this is the one that usually needs some roll off of the high end. I've also shielded the electronics cavity, swapped pots and caps (actually, a couple of .0047 PIO caps).
Some day, I would do some other wiring design to provide it with more options but, I am playing it practically all the sessions so... I have to wait until my interest turns over other axe. LOL.
I went for 0.10" strings, because I feel that the LRS nut adds some metallic character to the sound, some sparkle and excessive high end that can sound a bit thin. The bigger gauge adds body and helps me to achieve more stable chords (were you don't accidentally bend one or the other string with some finger pushing hard). This made necessary to setup again the guitar but, did worth it.
Video
The videos I had about this guitar mounting the original HSS pickguard were removed, since they lacked sound quality. This guitar is present in most of my videos but, I think I am not demoing it specifically but, using it to demo another thing.
Maybe this one represents its current status and, can be heard clean and with several pedal effects:
Subscribe to:
Posts (Atom)