Combos
Following with my tests of Wampler's pedals, I am still enjoying the different gain nuances that you can get by combining two or more Wampler's gain pedals.
From all possibilities, I have my preferrences, as follow:
Paisley into Euphoria
Probably the one I like more. These two overdrives bring a very Rock-Stadium sound when stacked together. The Paisley gives to Euphoria that mid-low bit and the Euphoria opens a bit the overal sound of the Paisley, giving a tube-like sag to the final sound, also.
Paisley into Plexi Drive
The senstation of driving a vintage amp with a vintage tube screamer. Just delicious. Vintage Hard Rock.
Euphoria into Plexi Drive
While being similar to Paisley into Plexi Drive, those two pedals combined have a lot of openess and definition. Part of the excess of compression than the Euphoria can have is being removed in this combo.
Euphoria into SLOstortion
The Euphoria seems to clarify that boxy sound that the SLOstortion has on its own. It's the sound of an SLOstortion but, way clearear and less boomy.
Plexi into SLOstortion
Even more open that the previous one. With some of the bite and sparkle of Marshall amps but, with the depth basses and liquid distortion of the SLO 100.
Paisley into Pinnacle
A good marshall driven by a Tube Screamer?. That's the ballpark, more or less. Absolute Stadium Rock.
The slight high frequencies roll off of the Paisley help to tame a bit the harsh of the Pinnacle. Resulting sound has anything you need for hard rock.
Plexi Drive into Pinnacle
Well... that's pure Marshall sound. The marshallish sound of the Plexi, together with the hot-rodded marshallish sound of the Pinnacle bring a vintage hot-rodded marshall, all the way down.
It remembers to me the sound of Ritchie Blackmore's guitar.
You've got a mail!
I have a friend on NY, on holidays. I just received a mail from him that he was on GC and, just picked up a Soverign distortion for me. I want him to enjoy his holidays but... I cannot wait so much time. Please, come back and bring me that pedal!!!!. AGGGHHH!:
LOL.
Video
This is a short video with the combos I've described above. Better to hear than to try to explain them.
A short one this time (about 7 mins) and, no speech.
Enjoy it.

Everything about electric guitars world
24 July 2012
Troubleshooting my pedal board
Introduction
I've recently re-tubed my Vox Night Train. The NT is an amp with very simple design and tube topology so, some of the issues that can be masked on others amps, easily pop up in the NT.
I checked first the guitar direct to the amp and then thru the pedal board (all pedals true bypass) and, with my basis pedals switched on (buffer, booster and delay).
What I have realized is that as soon as I started to switch off any of the basis pedals and, very specially, the buffer, the sound went way thinner and brighter. So, I wanted to re-check my pedal board as I had to do from the very beginning, pedal by pedal. There is no short path.
And certainly, I have found some things that surprised me. This is the history and, maybe can be of help to yourself.
Pedal Board Head
Well pedal board issues usually start on pedal board's head then, the issues are being propagated to the rest of pedals and even magnified by them.
Since I have realized that as soon as I switched on Compressor or Buffer the sound went damn thinner and brighter, I wanted to start with the first pedal I always check: the Wah, arranging then the rest of the "head" around the wah.
In first place, I have plugged the guitar directly to the amp, using an Evidence Audio The Forte cable. I tweaked the controls until get my amp's foundational tone, leaving the volume below tube's break up spot, since the final push will be done with the Xotic EP Booster.
Once checked the guitar direct to the amp, I plugged the guitar through the Wah. I have tested first the wah off and then on, just to check if they were issues due to the additional length of the cable going from the wah to the amp (Evidence Audio The Lyric II). Everything was OK.
I wanted to check then the Wampler Clean Buffer and, I have placed it before the Wah. I've tested the sound with the buffer off and then on and, everything sounded OK. I switched on the Wah, also to check if anything changed. At this point, I've noticed nothing special.
I've added the Wampler EGO Compressor then. Placed before or after the Wah and switched on alone I had no issues but, as soon as the buffer was switched on, placed before the compressor (even directly before or with the Wah in between), the sound become thinner and brighter.
That made me to suspect that, against my logic, this buffer would work better at the end of the chain, instead of at the very beginning of the chain.
I placed then the compressor before the wah and the buffer after the wah and, that become the best way.
As a curiosity, I made also a test checking same pedal plugged to different outputs of the same power supply (Voodoo Lab Pedal Power 2) and, I was surprised to find a slight difference in tone. Some outputs sounded a bit brighter than the rest. The compressor worked best on output number 6. I did the same for every pedal that I've found delivering a thinner or brighter tone.
Once set up the chain compressor --> wah --> buffer, I wanted to check if the TC Electronics Polytune (in principle, bypass) could affect the tone so, I've placed it at the very beginning of the chain (to make it to work as a general switch). Everything remained the same, therefore, I've leave it there: tuner --> compressor -> wah --> buffer.
Overdrive / Phaser
I wanted to check an overdrive then, specially to see if the sound went thinner with the buffer before it (to confirm my suspect). I've placed first the Wampler Euphoria after the buffer and, effectively, when switching on the buffer, the sound went thinner and brighter so, I swapped the order, putting the buffer at the end and, everything sounded better. That confirmed my suspect that this buffer would work better at the end of the chain.
Then, I've added the Xotic EP Booster and, I've checked it before and after the buffer and, clearly, if the buffer was before, the sound went thinner and brighter so, I've confirmed once more that this buffer would work better at the end of the chain. The chain was like this: tuner --> compressor --> wah --> overdrive --> booster --> buffer.
I've thought that this was a good time to check if the Mad Professor Tiny Orange Phaser works best before or after the overdrive. One more surprise for myself. Usually, I like more phasers and vibes (vintage ones, at least) before the gain pedals but, this time, the phaser worked clearly better after the overdrive so, the traditional way of arrange modulation pedals made the most sense. The chain was: tuner --> compressor --> wah --> overdrive --> phaser --> booster --> buffer.
The next step was to arrange my three overdrives. Previously, I had overdrives arranged in this mode: Euphoria --> Paisley --> Plexi Drive and, my previous tests did show me that the Paisley is very good pushing other pedals but, the Euphoria into the Paisley didn't sound so nice to my ears and, same I can say about the Euphoria into the Plexi Drive.
I checked first the Paisley into the Euphoria and, this was definitively a better way than Euphoria into Paisley. It seems that, the Euphoria in its sweet mode (Dumble-alike) has a noticeable compression so, when stacked before other gain pedals tends to make the sound a bit confusing.
Well, that made me to think that the natural place for the Plexi Drive should be between those two other two pedals so, I've tested it and, I liked the results way more than the old order.
So, the chain was like this now: tuner --> compressor --> wah --> paisley --> plexi drive --> euphoria --> phaser --> booster --> buffer.
Distortions
Once the right order for the overdrives was clear and, also the place of modulation effects after gain effects, I went for the two distortions: the Wampler SLOstortion and the Wampler Pinnacle.
I checked first the Pinnacle, after the overdrives and, before the booster and buffer. Everything was OK.
I added then the SLOstortion and checked both swapping their order. Even that I will not usually stack both distortion pedals together, I did the test anyway. In my opinion, the SLOstortion into the Pinnacle has a better sound but, the drawback is that the Pinnacle is a noisy and raw pedal while the SLOstortion sounds to me more depurated so, the output of the SLOstortion into the Pinnacle increases a lot the noise and, therefore, I've choose to put the Pinnacle before the SLOstortion, because one never knows if I will need both at same time any day.
So the chain order was: tuner --> compressor --> wah --> paisley --> plexi drive --> euphoria --> pinnacle --> SLOstortion --> phaser --> booster --> buffer.
I've checked also the behaviour of the different overdrives with every distortion unit. To my taste, the Paisley seems to work better with the SLOstortion, while the Euphoria seems to work better with the Pinnacle.
The Paisley adds a bump in middle-trebles to the boxy middles of the SLOstortion, focusing a lot the sound.
The Euphoria adds a tad of compression and darks a bit the shrill sound of the Pinnacle.
The Plexi Drive seems to like more the SLOstortion.
The Pinnacle seems to like a bit of compression on its input. A compressor or an overdrive with light compression (Dumblish) can be the cherry to the pie.
The SLOstortion likes better, more open gain pedlas before, clean and dynamic overdrives help to open the boxy sound of the SLOstortion.
Modulation
I had to add the Wampler Nirvana Chorus to the chain and, it was clear that modulation effects should work better after gain pedals (as per my test with phaser) so, the doubt was, phaser into chorus or chorus into phaser.
I've checked first phaser into chorus and, it was OK. Even that I don't dig too much to mix both pedals together, I needed to check which order is the best if I even need them together.
One more surprise to me. When the phaser was before the chorus, the chorus started to sound thinner (switched on alone!). But, I liked the sound more in that way.
It seems to be some kind of impedance or other kind of issue when stacking these two pedals together.
That phaser into that chorus affected the sound of the chorus, even if the phaser was off.
Swapping the order, everything sounded better.
So, the chain was like this: tuner --> compressor --> wah --> paisley --> plexi drive --> euphoria --> pinnacle --> SLOstortion --> chorus --> phaser --> booster --> buffer.
I've had to stop the tests at this point, leaving without tests the last pedal that I have to add to the pedal chain: the delay. But, it should go after modulation effects, anyway and, before the booster and buffer.
The issue between the two modulation effects, makes me to suspect if the Tiny Orange Phaser has some kind of incompatibility with Wampler's pedals or if it is the Nirvana who has some issues. I have to check what happens to the Chorus and Delay if I remove the phaser and chorus out of the chain.
Comparison old and new order
Following chart shows the order that the pedal board had before this intensive test. This was the order I thought would work better, without testing every pedal in deep (shame!).

And, this is the order after testing in depth every pedal and with the issues, surprises and compromised solutions discussed above.

Video
Evidently, it makes no sense to do a video with the whole session. Anyway, I am trying to show a bit of the each step of the whole process, with my findings after every critical step. To someone that never did this exhausting job, this could give a better understanding on how to proceed.
Conclusions
There is no short way!. I cannot give nothing as granted when facing a new pedal board!.
It doesn't matter how experienced you are with chain of pedals, when mixing together more than one new pedal, everything must be tested in depth.
Some of my well established rules felt down. Some of the standard rules were reinforced and, some of my bets were appropriated while others were absolutely out of reality.
Probably, what surprised me more is the need to move the buffer (Wampler Clean Buffer) to the end of the chain, after every other pedal, when I've bet that it should go the first on the chain (to recover a possible lost in the original guitar' sound). This pedal, in this particular case is thinning and brightening the sound of any pedal after it (ones more than others, specially affected are compressor, chorus and delay).
I also changed the placement of the Xotic EP Booster. Definitively, it works better at the end of the chain (but before the buffer, in this particular case) than at the very beginning. This can be masked if we are using a darker gear (darker guitar and darker amp) but, with a bright guitar (Stratocaster with classic single coils), a bright amp (Vox NT) and bright speaker (Celestion), placing the EP before any other pedal, increases a lot the high-end content. Even placed at the end of the chain, the gain level should be set up very carefully. There is a sweet spot were it sounds amazing but, crossing this point, it can sound harsh.
The EGO Compressor, in this particular case, needs to maintain the Tone knob at minimum to preserve the original tone of the guitar. As soon as we add the single bit of treble with this knob, we are making the sound clearly thinner and brighter.
The Paisley works awesome as the very first gain pedal. It loves to push other pedals and combines nicely with any other gain pedal. It works well into the Euphoria (Dumblish) and into the Plexi Drive (Marshallish) and, even with the three switched on together.
It also pushes nicely the both distortion units but, it probably does a better job with the SLOstortion.
The Euphoria seems to want the last place in the overdrives chain, at least in its Smooth mode (Dumblish). Reason is that is tends to compress the sound and, it can add confusion to other overdrives if placed before. The Euphoria also pushes good distortion pedals but, not so nicely as the Paisley but, it seems to work better into the Pinnacle than the Paisley.
Even that the Plexi Drive is designed to be played alone, to achieve that JTM45 tone, it's being nicely pushed by the Paisley and it can push distortion pedals but, maybe in a not so good way than the Paisley or the Euphoria. In any case, it seems to work better pushing the Pinnacle than the SLOstortion.
A compressor before can help to give it some sustain and some glue between notes (a bit staccato, to my taste).
Other of the surprises (even that I was already suspecting something similar) is the fact that some pedals seem to be very sensible to the output of the power unit that you use to power the pedals. This was specially true for the EGO Compressor, the Nirvana Chorus and the Faux Tape Delay.
22 July 2012
Wiring DIY - Part 03
Resistors
Despite of the potentiometers, that are variable resistors at the end and that we already discussed above, the use of resistors is very uncommon in guitar wiring but, for some specific applications they are being used.
In principle, a resistor should transform part of the electrical power that receives into heat and, therefore, dismisses the overall energy (decreasing the voltage). But, a capacitor together with a resistor are the basic bricks to build a passive filter and, resistors change the Q of an iinductance and, our coils are inductances, at the end.
Fender TBX tone control works with some resistors. A resistor can be seen in Treble Bleed mods, also. And, there are some other wiring that include resistors just to modify the sound of a pickup for a certain switch position.
We can say that the higher the total resistance is in our circuit, the lowest the output level and the sharper the resonant peak of our pickups will be.
We will discuss those cases later, when they appear. By now, forget resistors (except pots).
Switches
Switches are mechanical devices that allow us to choose between different alternative connections for a certain wire. Switches are usually described by their number of poles (wires that we can switch at same time) and throws (number of alternative ways for each pole).
The simplest switch is of type SPDT (Single Pole Double Throw), that is, a switch where we can attach a wire to the Pole lug or pin and then choose two different connections or paths depending on the position of the switch. This can be compared to the switch you use to light on and off any lamp at home. The lamp is wired to the pole and there are two alternate paths: one disconnects the lamp (so the wire deads there) and the other connects the lamp.
Even that the number of poles and throws basically define a switch, they are being designed in different ways and, sometimes they have more positions (handles) than throws. By example, a SPDT switch can have just two handles (positions of its actuating lever or button) but, each position can be implemented in different ways. You will read following additional info together with a switch:
Usually, toggle switches (actuated with the help of a lever that has several positions) use an additional handle or position, when the lever is centered. This center position can be implemented as center ON or center OFF.
Switches with center ON will connect the pole to both throws at same time if the lever is centered.
Switches with center OFF will disconnect the pole from both throws at same time, if the lever is centered.
So, we can have SPDT on/on/on and SPDT on/off/on switches, by example.
Look at the following picture, that describes which contacts are being actually linked when changing the position of the lever.


Despite of the potentiometers, that are variable resistors at the end and that we already discussed above, the use of resistors is very uncommon in guitar wiring but, for some specific applications they are being used.
In principle, a resistor should transform part of the electrical power that receives into heat and, therefore, dismisses the overall energy (decreasing the voltage). But, a capacitor together with a resistor are the basic bricks to build a passive filter and, resistors change the Q of an iinductance and, our coils are inductances, at the end.
Fender TBX tone control works with some resistors. A resistor can be seen in Treble Bleed mods, also. And, there are some other wiring that include resistors just to modify the sound of a pickup for a certain switch position.
We can say that the higher the total resistance is in our circuit, the lowest the output level and the sharper the resonant peak of our pickups will be.
We will discuss those cases later, when they appear. By now, forget resistors (except pots).
Switches
Switches are mechanical devices that allow us to choose between different alternative connections for a certain wire. Switches are usually described by their number of poles (wires that we can switch at same time) and throws (number of alternative ways for each pole).
The simplest switch is of type SPDT (Single Pole Double Throw), that is, a switch where we can attach a wire to the Pole lug or pin and then choose two different connections or paths depending on the position of the switch. This can be compared to the switch you use to light on and off any lamp at home. The lamp is wired to the pole and there are two alternate paths: one disconnects the lamp (so the wire deads there) and the other connects the lamp.
Even that the number of poles and throws basically define a switch, they are being designed in different ways and, sometimes they have more positions (handles) than throws. By example, a SPDT switch can have just two handles (positions of its actuating lever or button) but, each position can be implemented in different ways. You will read following additional info together with a switch:
- ON: Permanent on. This links the pole to the throw until the lever is being moved to a new position.
- OFF: Permanent off. This leaves the pole linked to no throw (disconnected).
- [ON]: Temporary on. This links the pole to the throw while we manually maintain the force on the lever or we remain pushing the button.
- [OFF]: Temporary off. This disconnects the pole while we manually maintain the force on the lever or we remain pushing the button.
Usually, toggle switches (actuated with the help of a lever that has several positions) use an additional handle or position, when the lever is centered. This center position can be implemented as center ON or center OFF.
Switches with center ON will connect the pole to both throws at same time if the lever is centered.
Switches with center OFF will disconnect the pole from both throws at same time, if the lever is centered.
So, we can have SPDT on/on/on and SPDT on/off/on switches, by example.
Look at the following picture, that describes which contacts are being actually linked when changing the position of the lever.

The pole is the center hole in this pictures, that correspond to the center pin or lug in a typical switch, the throws are the upper and lower ones. The blue lines determine which lugs are connected together at a certain lever position. Lever is simplified here with that black dot-ended line.
See that the way as the center position is being implemented in a center on or center off switch is completely different and, correspond to different logical decisions.
An on/on switch responds to alternative decisions: or path1 or path 2.
An on/on/on switch responds to alternative decisions: or path1, or both, or path 2.
An on/off/on switch responds to alternative decisions: or path1, or none, or path 2.
When we put two SPDT switches together, under the same case and, we actuate both at same time with a single lever or button, we are having a DPDT (double pole double throw switch).
A DPDT can have a tricky central position. There are several ways to implement the centered position.
Look at the following chart:

A Pull/Push or Push/Push Pot, has a switch under its pot that can be actuated by pushing down or pulling up the pots rod (case of pull/push pot) or the switch toggles when pressing down the rod (push/push).
Usually, pull/push and push/push pots seen in guitar wiring are DPDT on/on types but, they can be implemented in two ways: connecting the upper throws when the rod is down or connecting the lower throws when the rod is down so, be careful when getting a pull/push or push/push pot.
Usually, when the rod is down, the lower pins are being connected with the pole and, when the rod is up, the upper pins are being connected, instead.
Mini Toggle Switches that are usually found for guitar circuits have their centered on position usually implemented as i the type 2 shown above but, you should always identify how the centered position is being implemented in any on/on/on switch you are buying because, the diagram design can change or, if you are trying a diagram designed with type 2 in mind and you are using type 1 or 3, your project will fail (and you will wonder why?).
You cannot order type 1, type 2 or type 3, this is how I named them to distinguish them in our context. They have no special name on stores, you need to look to the switch's technical specifications or directly ask to your seller.
Toggle switches, usually have just two throws (two alternative paths by pole) and up to 4 poles.
So, if we combine a DPDT switch together with an SPDT Switch, we have a 3PDT (3 poles, double throw) switch, that allows us to decide two alternative paths for three wires at same time.
You see that center on position of a DPDT can be implemented in three different ways. Since a 3DPT is a SPDT + a DPDT, we can have same issues with a 3PDT switch.
Look at the following chart:

As in the case of DPDTs, the usually found one is type 2 in this chart. There are still more possibilities to implement that intermediate position. Think on the different permutations you can do with those three poles, leaving one or two down or up but, since the design of a 3PDT is based on coupling together a SPDT and a DPDT, those three types should be just enough. Anyway, always get the information about how the centered on position is working in your 3PDT switch!.
Finally, the biggest toggle switch you would see in a guitar is a 4PDT switch. A 4DPT switch is (yes, you guessed it!) two DPDT put together. So same types seen in DPDTs will be seen in 4DPTs.

As in the rest of cases, the more usual center on implementation will be type 2.
We will continue describing more switches on next part.
21 July 2012
Wiring DIY - Part 02
Potentiometers (pots)
Well, in Part 01 we saw that the sound of our electric guitar is being generated by the pickups. If such a signal is directly routed to the jack nothing happens at all but, we are loosing the possibility to control the exact volume level that we want at every moment.
 Potentiometers (Pots) are variable resistors. They have three legs (connections). The middle leg (cursor) has a movable inner piece that sweeps an strap covered with some resistive material. The other two legs are linked to the both extremes of such a strap. The cursor is being moved rotating the post (rod or edge). When fully rolled off, the cursor is in direct contact with one leg and, when fully rolled on is in direct contact with the opposite leg. When the cursor in in an intermediate position, it presents different resistive values for each of the other two legs.
When used as a volume control, one of the external legs is the input and, the other leg is connected to ground. In that way, the volume is at full when the cursor is fully rolled to the input leg (no resistance) and absolutely off when the cursor is fully rolled to the grounded leg (all the input goes to ground). When intermediate positions, part of the signal is derived to ground, while the rest of signal is being send to the rest of circuit by the middle leg.
 When used as a tone control, only one of the extremes is being used as an input, while the middle one (cursor) is linked to a capacitor, which is also linked to ground. The idea here is to gradually throw to ground some high frequency range (that depends on the capacitor value).
You can think on pots as if they were faucets that can be opened in more or less degree to let flow the exact amount of water (signal) that you wanted at any instant.
As any resistor, pots are identified with a value that specifies their maximum resistance. So, if a pot has a value of 250 KOhm, it means that it will have a resistance of zero when "open" and a resistance of 250 KOhm when "closed). Which intermediate values the pot presents when the cursor is sweeping the resistive strap will depend on the type of potentiometer.
There are Linear pots, where the increase of its resistive value (when rolling on the cursor) is linear so, you can expect half resistance (125 KOhm) in the middle point or a quarter (62.5 KOhm) when the cursor is on a quarter of its sweeping range. Linear pots are identified with letter B.
The most common pots are Logarithmics. Logarithmics start very slowly to increase the resistive value, until they reach the middle of the sweeping range, more or less, then they increase very fast the resistive value with way shorter sweeps. Logarithmic pots work analogically equal to the human ear and, therefore are felt as working in a more natural way. This is way they are called also Audio pots and, are identified with letter A.
Usually, electric guitars have Audio (logarithmic) pots but, a linear pot can be of help if you wanted a better control over tone, by example. You should noticed that when rolling off the tone of your guitar, at the beginning of the rotation there is a few loose of trebles but, when reaching the middle position, more or less, the loose of trebles is way dramatical and, it is really difficult to set up an intermediate treble content between one position and the following one on the dial of your tone knob.
There are even more types of pots (anti-logarithmic, etc.) but, I never saw one of those in a guitar so, we can forget those by the moment.
 Independently of if they are logarithmics or linears, we have some special pots. We have stacked pots that are two pots stacked one over the other and actuated with a central rod that can be pulled up (to reach the upper pot) or pushed down (to reach the lower pot). Imagine that old Juke Boxes that had a lot of disks stacked inside and a single pickup to reproduce them. Stacked pots usually have two pots with different resistive values (by example 500K and 250K) and, they are useful if you wanted to have the volume and tone controls under the same knob, by example.
The famous Fender TBX tone control is a sort of stacked pot wired in a tricky way.
Fender introduced no-load pots. Regular pots have some resistance (greater than zero) when completely open. The no-load pot has a resistance of zero (no resistance) when the pot is fully open and, it begins to present some resistance as soon as the cursor is being rolled off.
 We have also pull/push and push/push pots. Those are really two passive electronic components assembled together. Above, we have a regular pot and, below we have a switch (usually a DPDT on/on switch). The two positions of the switch can be selected by pushing down or pulling up the rod of the pot and, the values of the pot are controlled by the rotation of the rod. The famous Fender S-1 volume pot, usually seen in Deluxe models is a push/push pot with a 4PDT switch below.
So, under the common aspect of a control knob, a guitar can hide some special features, depending on the type of pot that we are using. Usually guitars come from factory with standard logarithmic pots, with resistive values of 500K (for humbuckers), 250K (for single coils) or 10K (for active pickups). The highest the resistance of a pot, the brighter the pickup will sound, because it raises the resonant peak of the pickup.
That's why greater values are being used for humbuckers (darker by nature) and lower values of single coils (brighter by nature). Active pickups are an special case and the value is more related to the load that active pickups want to see.
I recommend you to see this video if you are curious about what is inside a pot and how it works:
And, this one if you want to see the differences between Linear and Logarithmic pots:
Capacitors (caps)
 In the case of guitar electronics, a cap is mainly being used to roll off trebles. You can search any electronics page to have a deeper knowledge about caps but, for our needs, just think on a cap as if it was a device to capture just a certain range of high frequencies. The cap allows just a certain range of frequencies to cross it and, the range of such frequencies is being determined by its capacitance value. The starting frequency in the range that can cross the capacitor is being called Cutoff Frequency.
The higher the capacitancy value is, the lower the cutoff frequency so, the wider the range of high frequencies that are crossing the capacitor.
So, we have a "net" to catch high frequency "fishes". What we finally do with those catch frequencies depend on what do we want to achieve.
The regular use of a cap is to used it together with a pot, as a tone control, allowing to remove part of the higher frequencies present in the sound of our guitar. So, the pot is sending to the cap part or the full signal and, the cap throws the range of high frequencies that are able to cross it to the "trashcan" (ground).
But caps are also used for Treble Bleed mods. We are bridging the input and output of a volume pot with a cap and, in this way, we are ensuring that a certain range of high frequencies are being directly sent from the input to the output, even if the signal volume is decreasing (what usually ends in a darkening of tone, also).
Usually, humbucker pickups work with capacitors with a value of 0.022 mF (micro Farads) to remove less high end and, single pickups with higher capacitance values, as 0.047mF or even 0.1 mF. But lately, practically all guitars are using 0.022 mF capacitors, independently of their pickups because this value is just enough to dark guitar's tone (it can go excursively muddy if a very high capacitance value is used).
Capacitors are constructed in a different way and using different materials for their plates and dielectric. The cheapest is the ceramic disk capacitor,.
Lately, people seems to be very happy using Sprage Orange Drops, because they are an slight improvement respect of cheaper caps but they still have a very reasonable price.
There is some other people that prefers PIO (Paper In Oil) capacitors (that's my personal case).
You can or cannot hear some slight difference using some or other type of cap. Most of people hears no difference and every man schooled in electronics will say that a cap is just a cap, the only thing that matters is its capacitancy, that's all. But, surprisingly, most of those people ends loading their axes with Sprage Orange Drops, swapping the cheap caps and, usually they rave against PIOs.
The famous Bumblebee cap found in vintage Gibson LPs is a PIO cap. Vintage caps can have an abusive price on market but, there are some PIO caps at reasonable price (Mojotone Vitamin-T, Sprage Vitamin-Q, etc).
In any case, the improvement in sound is always negligible, compared to the improvement that many other changes can do to your guitar. To be honest, a change of pick (plectrum) can be more noticeable than a change of cap in your tone (usually, always open) control but, you know, everything sums up together for the big bill.
If you are in the doubt about if it makes sense to swap your capacitors, I fully recommend the following two videos to you:
It's an awesome test and it's a very helpful information for your decision, whichever it will finally be.
This man has several other videos of interest, related to wiring topics. They worth the time. He has an Oriental patience, IMHO.
Well, in Part 01 we saw that the sound of our electric guitar is being generated by the pickups. If such a signal is directly routed to the jack nothing happens at all but, we are loosing the possibility to control the exact volume level that we want at every moment.
When used as a volume control, one of the external legs is the input and, the other leg is connected to ground. In that way, the volume is at full when the cursor is fully rolled to the input leg (no resistance) and absolutely off when the cursor is fully rolled to the grounded leg (all the input goes to ground). When intermediate positions, part of the signal is derived to ground, while the rest of signal is being send to the rest of circuit by the middle leg.
You can think on pots as if they were faucets that can be opened in more or less degree to let flow the exact amount of water (signal) that you wanted at any instant.
As any resistor, pots are identified with a value that specifies their maximum resistance. So, if a pot has a value of 250 KOhm, it means that it will have a resistance of zero when "open" and a resistance of 250 KOhm when "closed). Which intermediate values the pot presents when the cursor is sweeping the resistive strap will depend on the type of potentiometer.
There are Linear pots, where the increase of its resistive value (when rolling on the cursor) is linear so, you can expect half resistance (125 KOhm) in the middle point or a quarter (62.5 KOhm) when the cursor is on a quarter of its sweeping range. Linear pots are identified with letter B.
The most common pots are Logarithmics. Logarithmics start very slowly to increase the resistive value, until they reach the middle of the sweeping range, more or less, then they increase very fast the resistive value with way shorter sweeps. Logarithmic pots work analogically equal to the human ear and, therefore are felt as working in a more natural way. This is way they are called also Audio pots and, are identified with letter A.
Usually, electric guitars have Audio (logarithmic) pots but, a linear pot can be of help if you wanted a better control over tone, by example. You should noticed that when rolling off the tone of your guitar, at the beginning of the rotation there is a few loose of trebles but, when reaching the middle position, more or less, the loose of trebles is way dramatical and, it is really difficult to set up an intermediate treble content between one position and the following one on the dial of your tone knob.
There are even more types of pots (anti-logarithmic, etc.) but, I never saw one of those in a guitar so, we can forget those by the moment.
The famous Fender TBX tone control is a sort of stacked pot wired in a tricky way.
Fender introduced no-load pots. Regular pots have some resistance (greater than zero) when completely open. The no-load pot has a resistance of zero (no resistance) when the pot is fully open and, it begins to present some resistance as soon as the cursor is being rolled off.
So, under the common aspect of a control knob, a guitar can hide some special features, depending on the type of pot that we are using. Usually guitars come from factory with standard logarithmic pots, with resistive values of 500K (for humbuckers), 250K (for single coils) or 10K (for active pickups). The highest the resistance of a pot, the brighter the pickup will sound, because it raises the resonant peak of the pickup.
That's why greater values are being used for humbuckers (darker by nature) and lower values of single coils (brighter by nature). Active pickups are an special case and the value is more related to the load that active pickups want to see.
I recommend you to see this video if you are curious about what is inside a pot and how it works:
And, this one if you want to see the differences between Linear and Logarithmic pots:
Capacitors (caps)
The higher the capacitancy value is, the lower the cutoff frequency so, the wider the range of high frequencies that are crossing the capacitor.
So, we have a "net" to catch high frequency "fishes". What we finally do with those catch frequencies depend on what do we want to achieve.
The regular use of a cap is to used it together with a pot, as a tone control, allowing to remove part of the higher frequencies present in the sound of our guitar. So, the pot is sending to the cap part or the full signal and, the cap throws the range of high frequencies that are able to cross it to the "trashcan" (ground).
But caps are also used for Treble Bleed mods. We are bridging the input and output of a volume pot with a cap and, in this way, we are ensuring that a certain range of high frequencies are being directly sent from the input to the output, even if the signal volume is decreasing (what usually ends in a darkening of tone, also).
Usually, humbucker pickups work with capacitors with a value of 0.022 mF (micro Farads) to remove less high end and, single pickups with higher capacitance values, as 0.047mF or even 0.1 mF. But lately, practically all guitars are using 0.022 mF capacitors, independently of their pickups because this value is just enough to dark guitar's tone (it can go excursively muddy if a very high capacitance value is used).
Capacitors are constructed in a different way and using different materials for their plates and dielectric. The cheapest is the ceramic disk capacitor,.
Lately, people seems to be very happy using Sprage Orange Drops, because they are an slight improvement respect of cheaper caps but they still have a very reasonable price.
There is some other people that prefers PIO (Paper In Oil) capacitors (that's my personal case).
You can or cannot hear some slight difference using some or other type of cap. Most of people hears no difference and every man schooled in electronics will say that a cap is just a cap, the only thing that matters is its capacitancy, that's all. But, surprisingly, most of those people ends loading their axes with Sprage Orange Drops, swapping the cheap caps and, usually they rave against PIOs.
The famous Bumblebee cap found in vintage Gibson LPs is a PIO cap. Vintage caps can have an abusive price on market but, there are some PIO caps at reasonable price (Mojotone Vitamin-T, Sprage Vitamin-Q, etc).
In any case, the improvement in sound is always negligible, compared to the improvement that many other changes can do to your guitar. To be honest, a change of pick (plectrum) can be more noticeable than a change of cap in your tone (usually, always open) control but, you know, everything sums up together for the big bill.
If you are in the doubt about if it makes sense to swap your capacitors, I fully recommend the following two videos to you:
It's an awesome test and it's a very helpful information for your decision, whichever it will finally be.
This man has several other videos of interest, related to wiring topics. They worth the time. He has an Oriental patience, IMHO.
Wiring DIY - Part 01
Introduction
One day you will be curious about how to get more sounds from your axe or how to change something that you don't like on how the controls are being mapped. Maybe, you think that you better don't touch your axe and, that's fine as far as you don't know how it works and how to achieve your goals but, the good thing is that this is not so difficult at all and that, even if you are doing a bad wiring, the worst thing that can happens is that you don't get any sound or some of the positions of your selector switch until you fix the issue but, in no case you will damage your amp or rest of equipment (pedals, etc).
Alright. The best way to start wiring is to understand which electronics components are usually found in an electric guitar, how they work and what else can be done with all them. So, this first part will be focused on components description but, mainly on pickups.
Electronic Components in an Electric Guitar
We will review the most common electronics components that you can find in an Electric Guitar. For sure, there will be even more not described here, since there is always something new in that world but, most of guitars will include at least one or more of the components described here.
Pickups
This is were the magic begins. You can think on pickups as the real source for your sound, they generate your guitar's sound and, they way as they do it is, at same time, tricky and simple. But, let see how everything started first.
A bit of history
First type of pickup ever used was the Contact Pickup. Contact pickups use some mechanism to feel the vibration of the guitar and transduce such a vibration to electrical signals, that will be lately amplified by a guitar amp. They give the typical acoustic sound of a guitar but, they aren't so interesting when we are talking about solid body guitars. Even that this is an interesting pickup type, that can be in use even today for acoustic guitars, we will focus on the most common electric guitar's pickup types.
When solid guitars started their production, the Electromagnetic Pickup was born. This is the most common type of pickup you can find in a solid-body or semi-acoustic guitar, nowadays.
The electromagnetic pickup creates an electromagnetic field that remains stable while strings aren't on movement. When strings are strummed, since they are metallic, they alter the electromagnetic field, that induces a current on its coil. That current is routed to the guitar's jack, to be sent to the amp for its amplification.
 The first documented magnetic pickup was made in 1931 and used for Rickenbacker's solid aluminium guitar. The design was a bit different from what we can see nowadays. It consisted in a coil, with some pole pieces, surrounded with a magnetic bar, with the shape of a very closed "C" that maintained strings between the coil and the extremes of that "C".
 In 1932, Dopyera Brothers included inside their Dobro Resonator guitars a pickup built with a magnet surrounded with copper wire.
A bit later, in 1934 or 1935, Gibson started to make electric Hawaiian guitars and banjos that incorporated some magnetic pickup but, it wasn't until the release of their Electric Spanish guitars (ES), around 1937, that pickups started to take consistence. The Gibson ES150 as the first one that won the respect of musics, loaded with Charlie Christian's pickups.
Paul Bigsby created the first modern solid body electric guitar, around 1947 and, his guitar included some pickup designed by himself, consisting in a bar magnet wound with copper wire.
Then, in 1948, Fender released their first massively produced solid body guitar in the world, the Broadcaster, that had pickups consisting in six vertical alnico magnets wound with copper wire (that is, the first single coil pickup). This guitar was renamed Telecaster, later.
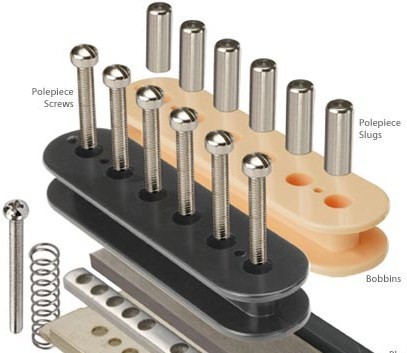
Gibson introduced their Les Paul model in 1952 and, this guitar included a revolutionary pickup designed by Seth Lover, the pickup consisted in two twin coils surrounding their own six pole pieces and, laying both over a magnetic bar, everything enclosed in a metallic cover. The Humbucker was born and, this design was known as P.A.F. (Patent Applied For) and, it's still the reference for vintage humbucker' sound.
For sure there are many other designs, still in use, as mini-humbuckers, active pickups, P90 and, even pickups with more than two coils (motherbucker), etc. But, what all them share is that a pickup creates a magnetic field, that can be extended with the use of pole pieces (metallic posts, not magnetic) and that, when strings vibrate, the alterations of such a magnetic field generate an electric signal to be amplified later.
Pickup Classes
There are two main classes: Active and Passive pickups.
Active pickups need of Active Electronics components to pre-amplify the signal before it exits the guitar. The signal generated within an active pickup is very low so, an active pickup will need some special pre-amplification circuit to raise the level of the signal to the standard level that can be achieved with passive pickups. To do this, this kind of circuits need to be powered by a battery so, every active pickup needs a battery compartment and, a loaded battery to work.
The signal produced by this pickups is more Hi-Fi than the rude sound generated in passive pickups and, as every time happens with electric guitar, the most Hi-Fi that the sound goes, the less interesting to the musical ear is. The pros of this type of pickups is that they work awesome to get every note with pristine clarity and, with a very low floor noise and, there are often used for shredding under very high gain environments.
The drawback is that you can run out of battery at any moment and, if this happens, your guitar will suddenly shut up, until you replace the battery.
Passive pickups are generating a higher signal so, they doesn't need pre-amplification circuits, the signal can be directly amplified by the amp itself. The sound of a passive pickup is more rude, includes more floor noise (and very specially, single coils) and sounds more undefined. The pro is that the sound of a passive pickup is always more musical to the ear, warmer and more natural. The con is that they introduce significatively more floor noise and, if the pickup is "unpotted", it can be prone to microphonics issues.
Within every of those both classes, pickups can be classified by several aspects:
 This was the first modern pickup, in the way that we know them nowadays.
The idea is quite simple. A magnetic bar was cut in six little bars (one by string) to create the magnetic field. Those bars (poles) were fixed at bottom and top with two pieces that supported them standing up (vertical). Then, an isolated wire of copper was wrapping those poles, with around 7000 turns. The coil was protected with a plastic cover and, the start and finish of the wrapped wire where soldered to a pair of conductors to route the signal out of the pickup.
This is the typical pickup that Fender's guitars loaded from the very beginning and, responsible for the tones of Telecaster and Stratocaster guitars, by example. They can be a bit noisy and, are prone to feedback issues. If they aren't wax potted, the feedback will make their wire to friction with itself and this will lead to microphonics issues.
They usually have a high attack, are bright, snappy, and bell-like sounding. With the right design (magnets, wound turns, wire type, etc), can be awesome for clean work with attitude.
P90, soapbar, eardog and other single coil pickups differ a bit in the design (and they are even bigger in size). They have screws as poles (not magnetized) and the magnet is just a bar that lies under those poles. The voice is slightly different to Fender's, because the shape of the magnetic field created by 6 vertical magnets is different of the magnetic field created by an horizontal magnet bar that increases the field with those screws.
Single coils are usually more clear sounding than humbuckers (or multi-coil pickups).
Well, the real thing is that to kill the noise affects also to the sound and, those pickups start to sound not so appealing with those solutions but, if you are fed up of noise but you still love single coil's vibe, you can always try one of those solutions to see if they leave enough mojo for you.
Humbuckers


A bit of history
- Number of coils
- Type of poles (posts, bars, vertical bars, etc).
- Type of magnets (alnico II, alnico III, alnico IV, alnico V, alnico VIII)
- Output (low, medium, high)
- Vibe (vintage, hot, high gain)
- etc.
Single Coil Pickups
We already mentioned their drawbacks and, that's the reason why there are some tries to minimize the noise (noiseless single coil pickup) coming from practically every well know pickups Maker.
- Some are using a dummy coil below the real one just to cancel the noise.
- Some are using two half coils inside, one to cover one half of pickup and other to cover the other half.
- Some are using some special magnets (as the Samarian-Cobalt in Noiseless).
- Some are using some special trick, as Shure.
Since single coils were so noisy (and specially if they were unpotted), Les Paul models started to work with another approach. Seth Lover designed a way to cancel the hum inside a pickup and, since it bucked the hum, it was called humbucker.
Each coil has an opposite magnetized field and, coils are connect with inverse electrical polarity. What at the end happens is that everything that the magnetic field catches is being cancelled while everything that the pole pieces get is being accepted.
When humbuckers have twin coils if when they have the major hum rejection ratio. Even that the original design was like this, nowadays, a lot of humbucker models have differently voiced coils (specially if they are used for splitting tasks) and, therefore, some floor noise can pop up.
First humbucker designs, made by Seth Lover, had an sticker or writing on the back plate that read P.A.F. (Patent Applied For) and, you will hear this term very often to people that is trying to get that vintage vibe that the early humbuckers (PAF) had.
Original PAFs had their coils in series and that made their signal powerfuler than a single pickup, what added more sustain and a warmer and thicker sound. While the first PAFs have an output level very close to first single coils, nowadays they are humbuckers with an output up to three times the vintage one.
In pickups' world, everything matters. The height of the coils (taller = treblier), capacity of bobbins, turns of wire, wire gauge, wire's isolant type, wounding method (auto, scattered), magnet's size, magnet's material, magnet's molecular alignment (rough, casted, aligned, ...), etc. This results in very different voiced pickups and, the slightest change can make a big difference.
Traditionally, the pair of bobbins inside a humbucker were connected in series (imagine a train with two wagons) but, lately, they started to release humbuckers with 4 conductors, each pair corresponding to the start and finish of each of the two coils. In that way, with a tricky wiring, we can select any of the two coils or to arrange them in a different way (parallel-series, in phase-out of phase).
The ground wire is always soldered to the base plate.
Nowadays, you can see humbuckers with and without cover. The cover was part of the trick to make the humbucker to reject the noise. As we know, any electronic component enclosed in a metallic cage that is connected to ground (Faraday's cage) will reject most of noise. Humbuckers without cover aren't inside a Faraday's cage and therefore, are more prone to catch noise and interferences, while covered humbuckers are quieter.
Even splitting a humbucker (that is, selecting just one coil), you will never get the same sound as with a traditionally single coil. The coils of a humbucker lie over a magnetic bar and, therefore, the magnetic field is in principle horizontal. The trick of using pole pieces and screws inside the bobbins helps to project the magnetic field over the pickup, in the area of vibration of strings. But, since the pure single coils have magnetic pole pieces, in vertical position, the magnetic field that they create is vertical and react in a different way as a coil inside a humbucker.
The opposite is also true, if you put together two pure single coils, to create a humbucker, you will never get same sound that you achieve with a pure humbucker and, reason is exactly the same: different shape-orientation of the magnetic field, results in different induced electrical signals.
Active Pickups
EMG is a very well known Maker who is mainly delivering Active Pickups. For a long time, it covered practically the whole market with their models, specially EMG 81 and EMG 85.
But, while those kind of pickups, with a very similar look to a passive pickup (except for the absence of visible pole pieces or screws) is what we usually know as an Active Pickup, any pickup that needs active electronic components is an active pickup.
As we said, this kind of pickups need a pre-amp circuit able to raise their low signal level up to the level that traditional passive pickups deliver. So, they way as those pickups are wired inside a guitar is different and, it includes the use of one or more batteries and one or more PCB (Printed Card Boards) with one or more circuits (pre-amp, middles booster, etc.).
While with passive pickups we use switches to select wires and get the results we are looking for, in active pickups some changes can be made just if we add some more PCB circuit or any other active device.
We already discussed pros and cons of using such a kind of pickups.
Piezo Pickups
Piezo criytals are able to generate electrical signals when suffering pressure differences and, that's the principle behind Piezo pickups. Those pickups need to be in touch with a vibrating area that creates slight pressure differences that generate very low electrical signals. Due to the low signal level, those pickups need active electronics to pre amplify the signal up to the typical levels of passive pickups.
Even that those pickups were mainly used in acoustic guitars, it's not so strange to see them in an electrical guitar, specially in semi-acoustic guitars.
The most usual is to see those pickups delivered under the saddles of a guitar's bridge so, they can directly catch the vibration from the strings (Ghost piezo saddles, by example) but, they can also consist in some kind of bar that sets horizontally under the bridge or under the fretboard (Epiphone Ultra II).
The signal of each saddle is the mixed together and sent to a pre-amplification stage, before it can exit the guitar.
You cannot directly mix a piezo or active pickup signal with a passive pickup signal, you need first to pre amplify any active signal before you can mix both types. The preamplifier includes also the proper filters to get exactly the kind of targeted sound.
Piezo pickups deliver an acoustic-like tone, very different from the typical electrical-like tone that is being achieved with typical passive and active pickups. Guitars with piezo pickups usually have a blend control that allows to mix the electrical and acoustic sound to get a wide range of nuances in the sound. Also, it is very common to have or different outputs (electric and acoustic) or an stereo output (electrical and acoustic in separate stereo channels) to allow to run every signal in a different amp, by example.
Other pickups
There are variate designs currently available, as the 4-coils Motherbucker, and some hybrids that try to get the sound of a P90 when split and the sound of a humbucker when full (P-Rails), or a strato-like single coil when split and a single-sized humbucker when full, etc.
But, the thing that will determine which possibilities of wiring a pickup has is if it is Active or Passive, because rest of components in the circuit should be used accordingly to this.
There is always a way to mix both worlds, after the active signal has been preamplified.
Some pickups are humbuckers (two coils) that will be a direct replacement for a strato single-coil pickup, those are being called single-sized humbuckers. Each coil can cover half of the pickup or, they can be stacked (vertically).
19 July 2012
Amp: checking retubed Vox Night Train
Introduction
The Vox Night Train is a very interesting amp, little in size and big in tone. It usually gets very comfortablely any pedal in front of it. But, as typical in any British amp, it's bright and, as typical with Celestions, the NT112 cab' speaker makes it even brighter. Well, that's Vox signature sound, chimmy bright.
I wanted to check a couple of NOS tubes I had around, a pair of RFT tubes that, sounded to be a tad dark when making tests in the Princeton Reverb reissue.
The amp had a Mullard reissue 12AX7 on V1 and a NOS JAN/Philips 5751 on V2.
I wanted to try a darker 12AX7 on V1 and swap the 5751 with a 12AT7, to lower the break-up spot of power tubes (a couple of Mullard resissue EL84s).
The Philips 5751 does an awesome work, making the amp to feel realy responsive and open, taking well anything from slow playing to fast riffs.
Even that the 5751 suits better as a substitue of a 12AX7, because it's current drain is closer to this last, I wanted to check how well can work a 12AT7 instead (about 10 times more current draw!).
So, two things were in my head: to remove a bit of high end on the sound (the Philips 5751 is very bright) and to test if there is a noticiable difference in amp's feeling swapping that 5751 with a 12AT7.
Also, since I am still adjusting the settings of my new pedal board, I wanted to check how well it works with the NT, that usually takes any pedal with ease.
Checking the amp and pedals
First, I have set up amp's controls to my taste, with the guitar connected to the pedal board but, with no pedal active (all them are true bypass).
Then, following my "clean" tone sculpting way, I have switched on the Wampler Clean Buffer.
Well, it's clear that the signal cleans but, it goes really thin and bright then. I had to go back to the amp and lower a lot Trebles to recover the tone. With the Princeton Reverb Reissue, the Clean Buffer is night and day and very wellcome but, In the case of the NT, I don't feel like if it was necessary, at all.
Next pedal I have switched on is the Xotic EP Booster, just to let it bring that special touch that it has. The EP Booster often results in a brighter sound (with switches in factory default settings) but, this time, I didn't noticed such a change, just the nice touch of the EP. The EP Booster sounds a bit brighter in the Princeton.
The last foundational pedal was the Wampler Faux Tape Echo, that I usually leave in a sort of ambience sound. This one went also a bit bright to my taste and, clearly brighter than in the Princeton. I had to tweak a bit the delay also, removing some trebles.
Next pedal to test was the Wampler EGO Compressor. This one went really thin and bright, maybe because the Clean Buffer is before it and, the sound didn't convinced me. I had to roll off practically all the trebles on this pedal. This one works flawless in the Princeton.
I've followed the tests with the three overdrives and the two distortions. The three overdrives work fine. Maybe the one that liked me a bit less was the Plexi Drive, that seems to work better with the Princeton.
The Pinnacle (brighter by definition) went really bright here and, I had to change the Contour control up to feel a more comfortable place. This pedal goes also very bright in Princeton.
Finally, I've found the SLOstortion working way better in the Vox than in the Princeton. The voice in the NT is way clearer and defined and, the sensation of a boxy sound is over.
Video
This is the video I did during my tests. It takes about 17 mins and, there is speach just in the very few minutes, rest is just testing one unit after the other.
I wanted to check also how good or bad the overdrives stack together and, also how they stack with distortions.
Video has no covers, has no songs, just a crazy test of sounds with no structure, to check whatever I was thinking on that moment (picking dynamics, attack, pinch harmonics, basses, power chords, trebles, etc). I appologize for that, in advance.
What I've found is that the Paisley seems to like to push other pedals, whichever the pedal is.
Also, Euphoria into Paisley delivers a good overdrived sound, very balanced.
The Paisley helps to the Pinnacle to remove a bit of high-end content, making it more smooth but, you have to be careful with gain levels on both pedals.
The hardest to combine is, maybe, the Plexi Drive. You can understand this one as an amp so, it should be the last gain active pedal. When pushed with the Euphoria or Paisley, it sounds to me sometimes good for certain things and sometimes a tad compressed and confussing. The Plexi isn't good to drive distortions, by example.
Overall, the sound of that pedal board in that retubed NT works very well the most of times, everytime that I have trebles very well controlled. The Clean Buffer is, maybe, the main cause of that increase in high-end content, that can help a darker amp as the Princeton but, that doesn't seem to help to a brighter amp, as the Night Train.
The second conclusion is that, even choosing darker tubes, as the RFT are, the NT is voiced really bright and, the Celestion speaker mounted in that Vox NT112 cab makes it even more bright so, in my opinion, a speaker' swap can do way more for the tone than a change in tubes (I've tested everything on this little amp!).
Conclussions (updated 20/07/2012)
The pedal board isn't working fine, right now. While in the Princeton some of the issues seem to be masked, in the siper design of the Night Train everything comes in your face.
The guitar, directly plugged to the amp has a very nice vibe and therefore, this tube swap seems good for this amp.
What it's clear is that my tone is going thinner and brighter. Every pedal is thinnening and brighting the signal even more. Clean Buffer, Compressor and Tape Echo sound specially bad.
I've tested those pedals alone before so, I know they are not the root cause and, I'm suspeting some issue related to power supply. I've seen the light of the compressor going on and off during my tests, today.
I suspect on one of my pedal power 2 units, since i've already noticed that when I plugged some pedal on outputs 1 & 2, I had more floor noise coming up.
Or some of the outputs are defective or, the drain of all pedals connected to that power unit is more than the unit can support (I have to check this, reviewing the current drain for each pedal and summing it everything up).
In the past, I had surpresive results with an underpowered Octaswitch II, that produced wistles as soon as it was switched on. If I am over the maximum current consumption, then I can expect anything.
One pedal that was always a bit suspicious is that Polytune, even being True Bypass, I've noticed that it thinnes a bit the sound when it's being placed before the Wah but, since this was also done with a big pedal board, maybe the power supply unit is still the issue.
So, the amp' is ok but, I have to troubleshoot my pedal board, once more and, there is no short path.
I need to go step by step and pedal by pedal to isolate the issue.
OMG!. I hope tis is my last pedal board. I wouldn't like to do this the whole life!.
I will create an entry with my findings.
16 July 2012
Pedals: Wampler Paisley
Introduction
Following my wamplerization process, I needed a pedal that can cover Bluesy tones with ease and, from Wampler's line, the Paisley is the one. I have now a clen overdrive, a bluesy overdrive and a british overdrive so, I am done on overdrive's department.
Presentation
Same as every Wampler's pedal. The pedal comes inside a fabric bag, wrapped in bubble plastic and inside a discrete white carton box, with an appealing sticker on its face. Inside, as always, the single sheet that wants to be the "user manual" and, a promotional sticker with Wampler's logo.
As any other Wampler's pedal, this one seems to be built like a tank but, with the appeal of a deluxe car. This is by far, their pedal with more artistic design and, really it looks really sexy.
Controls
Volume
This one sets the overall output volume of the unit. Easy to dial the unitary volume level.
Tone
This adds or removes a lot trebles.
Gain
This sets the distortion level of the amplifying section of this pedal.
Presence Toggle Switch
This one adds a lot of high end (high-frequencies), when up and, removes that extra content when down.
Mids Contour Triple Throw Toggle Switch
This switch selects three different shapes for Mids Equalization.
Playing it
Well, it's so good and versatile that I could easily stack three Paisleys in a row, each one set up differently to cover all my overdriven sounds. It shares this characteristic with the Euphoria, also one of the most versatile overdrives I ever tested but, it differs from the Euphoria in its foundamental tone.
Euphoria is Wampler's take of Dumble-like overdrvies, smooth, very transparent, clean and with a bit of compression similar to the SAG of a vintage amp with a tube rectifier. But, it also does a perfect transparent overdrive, more in the league of a booster and, it also delivers a nice British overdrive mode.
I prefer the Euphoria to be used as a tranparent overdrive or, just with a Dumble touch but, without too much compression or drive and, I've got the Plexi Drive to perfectly cover the british overdrived sound.
Paisley is more voiced in the way as Tube Screamers are voiced, with prominent middles but, way more versatile than any regular TS. The three modes of its Mids Contour control are the key control in this unit. Selecting the right contour is the first step to build your sound.
Middle position of the switch delivers a barely plain mids EQ, in some way transparent but, with an added color different from Euphoria's one. This is usually used for rythmic work.
Low position is where mid-highs are bumped and, they are perfect for soloing and to distinguish the guitar from the rest of the mix.
Up position is some kind of mix between those two extremes and, maybe more versatile to cover everything together.
I find the Tone control a bit overdone in both extremes. The unit can go really dark (and this affects also to gain and volume, that drop noticiablely) or really bright (and this increases gain and volume, also), with piercing highs.
The foundational tone under every Mids Contour selection is common, a warm and silky sound that can go up to medium gain when Gain control is pushed hard. Extreme gain settings can sound a bit too much compressed to my taste but, maintaining the gain below the 2:00h, the sound is perfectly dynamic and bluesy.
With the gain around 9:00h, you can get just the color of the overdrive, without distorting the signal too much, just a "clean colored" type of sound, with that bump in middles.
Presence swith can help to give some bright to darker settings of the Tone control but, used with extreme bright tones, can be too much, generating piercing highs. It all depends on your rig and your needs but, it's there if you wanted to use it.
While in the same league as TS, it its more versatile and with a best presence of the low and high end frequencies, as in the case of the Mad Professor's Little Green Wonder (another awesome take of a TS pedal). In any case, is in the same league but has its own personality, as the Little Green Wonder has its own.
Stacks well with rest of pedals and doesn't seem to present any impedance issue.
When the tone is fully roll off, gain and volume drop excesively and can be more difficult to find the unitary volume level. As in other Wampler's pedals, I find a more confortable tone range between 10:00 and 2:00h but, you know, this will always depend on your rig.
Video
Well, I did an unstructured video this time, more in the league of testing extremes than to achieve nice sounds. I start checking the four sample settings that came with the manual and that, certainly help to have an overall idea of the territory that this unit can cover.
I follow the rest of video checking some random settings and, checking different things without any particular order: dynamics, tone range, pinch harmonics, blues sound, darkness, mudiness, brightness, etc.
I finally play a bit with two settings I've found interesting during the tests.
Conclusion
Well this pedal is a direct replacment of the Little Green Wonder. In the same league as TubeScreamers but, with less compression level and a better representation of high and low end frequencies and, way more versatile, from clean-colored tones to mid ranged distortion.
Perfectly stacks with rest of pedals, has a very low noise level and presents no impedance issues.
Delivers that bluesy mids that I love and, can project guitar' sound to stand over the mix with attitude.
One more keeper!.
15 July 2012
Pedals: Wamper EGO Compressor
Introduction
Ahhhh, a compressor!... mmm... nice... isn't it that pedal that everybody is recommending me but, that nobody really understands?.
Well, that was just up to today, dude. See my video to undestand what a compressor does and how can it serve to your needs!!!.
This pedal is a must for people doing Country so, most of them already know what to get from those units, even if they don't really understand what compressor effect is doing, it makes their job easier and, that's all they need to know. But, what about the rest of mortars?.
It's very common to hear that a compressor pedal can help a weak single coil guitar to have more body and, therefore, a bunch of people that loves Stratos and Teles (and aren't doing Country) have their compressor on the full time. Other people have their compressor all the time on, even if they are playing with guitars loadad with higher output pickups.
So, what's the mistery behind a compressor and, why Wampler's EGO Compressor?.
Well, if you are already used to what a compressor can do for your sound, you only need to hear HOW EGO can help you (or not). If you don't know what a compressor does or how it works, just take a look to the first part of the video, where compression effect is discussed in depth.
For the rest of this article, I will asume that you know what a compressor is and how it works so, I will focus particularly on how the EGO deals with compression features.
Presentation
As for every Wampler's pedal, the pedal is inside a fabric bag, surounded with bubble plastic and, everything inclosed in a discrete white carton box, with an attractive sticker on the front of the box.
Inside, as ever, a single sheet stands for the "user manual" and, there is a sticker with Wampler's logo.
The pedal seems to be built like a tank but with the appeal of a deluxe car.
Controls
OMG! a Wampler pedal without toggle switches!, what a strange!. Will it be versatile?.
Volume
This control determines how much the average level of volume raises.
Blend
This is a mixer control, that allows to exactly dial the amount of dry/wet signals. Perfect for Parallel Comrpession Technique.
Tone
This one adds or removes trebles to the resulting sound.
Attack
This one sets up the delay between the beginning of the sound and the beginning of compression effect.
It allows more or less peaks in the sound.
Sustain
This one controls the amount of compression. This is the compression ratio or, how much the sound is being compressed, once the delay selected by attack is over.
Playing it
Well, this is a compressor based on Dyna Comp and Ross compressors so, very traditional approach in one side but, it has more controls and more versatility than those old designs.
For sure, you can achieve warm highly compressed sounds in the way of Dyna comp but, you can also achieve very transparent sustain, without affecting peaks very much.
While the tone of Dyna is a tad dark (and can be lost in the mix), the EGO can go to very bright settings.
Once you understand what is behind the controls names, it easier to tweak the pedal to exactly obtain the sound you are looking for.
If you wanted that squeezy compression at the tail of your note, you can leave blend control at max (100% wet signal) and push the sustain (ratio) all the way up.
As in the case of the smart Barber compressor, the blend knob allows you to make it sound gentle even under the hardest compression level that this unit can reach (that, to be honest, isn't so dramatic as in other compressors).
It's reasonablely quiet, way quieter than the vintage Dyna Comp and, more or less in the same league as the T.Rech CompNova or the MXR Custom Comp.
The separated controls for attack, tone and sustain, allow to make it work just to tame peaks or to increase sustain in tails and, everything in between.
The blend control allows to raise the original signal in a way that the original attack stands over the average volume created by the compresor and, when the original signal drops, the comrpessed signal stands over, adding sustain, achieving a very natural compression effect (Parallel Compressiion Technique).
If you are used to compressors effects, this one is really to tweak.
If this is your first compressor, it will take certain time (but my video can help you a lot!) but, it's really difficult to have a bad setting, even in the extreme cases.
Video
The first 8 minutes are dedicated to discuss how a compressor works, with graphics that help to understand first the meaning of the ADSR Curve and, how a compressor modifies that curve (how it affects dynamics).
Following 2 minutes are describing controls and comparing their functions with the topics already discussed in the first part.
Then, the rest of video is demoing the effect of every control over the sound, showing some extreme situations (affecting peaks without increasing sustain, raising sustain without affecting peaks, natural sound and, highly compressed sound) and, the use of the blend knob.
Half hour of video so, take it easy. I couldn't compressed it more! (LOL!).
Conclussion
A very nice compressor, with the quality of effects that Wampler is usually delivering. No impedance issues and works fine with rest of pedals chain. The sound can be a bit thin, compared to a vintage Dyna but, you can go from a very close tone to very bright ones.
Highly versatile. Can work as a pure sustainer, as a compressor and, even as a "clean" booster.
Blend knob allows Parallel Compression Technique and, it's quite difficult to select a setting that clearly ruins your tone. The highest compression level is very reasonable and not overdone. Slightly more compression level than in a T.Rex CompNova but, maybe a bit less than in a vintage Dyna Comp and, probably way less than in a Keeley, by example.
I cannot say that this is the best compressor of the world but, it's one of the bests, without any doubt.
Nice pedal and, a keeper.
13 July 2012
Pedals: Plexi Drive
Introduction
Since I am interested in electric guitars, the amps I always dreamed where those early Marshall's. The JTM45, JTM50 and the 1959 are my recurrent dream.
When I had to buy a tube amp, those were always on the top of my willings but, I had to downsize my rig to be able to enjoy a good tone with less low watts.
To be honest, I cannot crank any of those amps at home and, where is the fun then?.
But tone is tone and, I love that classic Rock tone so, I am dreaming always to have those amps.... but... wait a moment... once more that guy... Wampler is doing a JTM45-in-a-box pedal, would it work for me?.
Well, that's all about this entry.
Presentation
Same as in the complete line of Wampler's pedal. Anonymous white carton box, with the pedal inside a fabric bag and surounded by bubble plastic.
Typical sticker with Wampler's logo, some ads about rest of line and a single-sheet "user's manual".
Pedal is build like a tank with the beautiness of a deluxe car, as always.
Controls
Volume
Well, you guess it, this sets the overall volume output of the pedal. Very useful to tweak Unitary Volume level.
Gain
This is the distortion level, always in the ballpark of those earlier Marshall's so, don't expect high gain distortion but just that amazing distortion that old Marshall's delivered to Rock's dinosauries.
Tone
This adds or rollls out trebles but, the sound is always maintaining the basis foundational sound of those old Marshall's.
Bass Toggle Switch
This will add a bunch of basses to your sound.
Playing it
Well... does it perfectly emulates a JTM45 on fire?. Then, dude, I don't know but, it's definitively in that ballpark. All those sounds that you are use to, because of the many rock bands that exhibit it and, the bunch of songs recorded with that rig is there. Yeah!, is there!.
The pedal can be a single-trip poney but, what it does it does with stunning attitude and sound.
Do you ever wanted to sound like "The Song Remains the Same" disk, recorded live in Madison's Square Garden?. Do you wanted to have AC/DC tone on your rig?.
Yeah!, put your fingers at work, it all depends on your soul and touch but the sound is there, OMG, is there!.
If you are more interested on shredding, death metal and similiar, you can forget this pedal, that's clear but, if you are still dreaming with that JTM45, JTM50 or 1959, try this fucking pedal!!!.
I can say just one thing more: Thanks a lot, Wampler, you made me really happy!.
Video
As I said, not a versatile pedal as other Wampler's but, this pedal was designed to sound as that signature Marshall' sound that moved the rock world and this, it does well hands off.
The video is short and just a quick review of several settings, while I was checking the unit. Take into account that anything in Youtube sounds way worst than live. I don't know what you will think but, man, this is the more exciting amp-in-a-box pedal I've ever tried.
12 July 2012
Pedals: Wampler Nirvana Chorus
Introduction
Chorus isn't the type of effect that I use the most but, to have a good Chorus unit in my pedal board is always welcome. There are some kind of effects that only a Chorus can deliver.
For sure, there are more mythical Chorus units there, like the Boss CE-1 or CE-2 and, MXR's chorus all good enough.
Seeing the consistence and quality of Wampler's effects and, the fact that they seem to be made just to my taste, I wanted to give an oportunity to Wampler's Nirvana Chorus and, that's what this entry is all about.
Presentation
As usual in Wampler's pedal line. A discrete white carton box has the pedal inside a fabric bag and wrapped with bubble plastic. This time, not appealing sticker in the front with the picture of this pedal, but very discrete logo, instead.
Inside, the typical sticker with Wampler's logo, some info about other pedals and the "user's manual", a single sheet with just the necessarely info and 4 sample settings to test the unit.
As in the rest of Wampler's line, the unit is well made, the electronics work is clean, well designed and, the pedal seems built like a tank but, with the beauty of a deluxe car.
Controls
Volume
Well, this one sets the overall output level of the signal. It cannot seem interesting at all but, if you ever played other chorus units, you should notice that the sensation of loudness drops a lot when switching on chorus units. This practical control allows us to restore the unitary volume level, what is nice.
Tone
This adds or removes trebles but, the range covers nice tones, never going too dark or piercingly bright.
Depth
This is the depth of the chorus but, what it really means is that this is a blending control, which one you can use to choose the amount of clean and modulated signal that willl exit the unit.
In my opinion, the higher the intensity goes, the less wet signal you need to achieve a good tone.
Ratio
This sets up the speed of the effect or the space between modulation cicles.
Mode Toggle Switch
Up gives a chorus effect, while down is a vibrato effect.
Intensity Toggle Switch
This unit has 3 different intensity levels (this one is the one that should be named depth!). The weakest one is the middle position of this switch, the lower position corresponds to a typical chorus effect and the upper one is the deepest chorus effect of this unit.
Even that the highest intentisity can go crazy, there is always a possibility to use an extreme sound by rolling off the Depth control (increasing the dry signal level).
Playing it
I am not interested on comparing this unit to other chorus units. I only have a thing clear: this is the best chorus unit I've ever tested. Now, I understand why it was called Nirvana.
The foundational character of this chorus is analogic, the tone is always sweet and warm. You can go as dark as you want (not being muddy or boxy) and as bright as you want (not being piercing), the overall sounds is always sweet and well defined.
In my case, I prefer Tone control between 10:00 - 2:00h, just slightly darker, just slightly brighter, depending on what I am doing.
Inserted in my pedal board, with my foundational clean sound (Wampler buffer + Xotic EP Booster + Wampler Faux Echo), it sounds incredible angelical. It can go really weird when Intensity, Depth and Ratio are rolled up to high positions but, whith the right Depth (Blend) I find usable even the weirdest sounds.
Some of the settings are just so sweet and warm that they seem just the destiled essence of Love. What a tone, man!.
During this session, I didn't check it together with overdrives or distortion units, since I was just trapped in the clean sound nuances.
The unit exhibits some little distortion when pushed hard, this is a wanted effect and adds nice harmonics. It's very dynamic and responsive to picking strength. Smooth picking results on the sweetest sounds I've ever heard in a chorus unit.
Even that I tried the vibrato function, I am not so interested on it, since my Fender '65 Princeton Reverb reissue has the effect onboard. Sometimes, is a bit difficult to see the boundary between the Vibrato and Chorus side of this pedal, since the modulation in background of the Chorus is also altering up and down the pitch but, as a general rule, Vibrato sounds more defined and periodic than the chorused sound.
In the video, two of the sample settings proposed by Wampler are in Vibrato mode so, check those and compare them to two chorused samples.
Video
The video starts testing the 4 sample settings that Wampler is providing in their "user's manual". 2 are in Chorus mode and the other 2 in Vibrato mode. This gives an overall impression about what the unit can do and, it's a good starting point.
Following to this, I am reviewing each control's function and then, testing the effect of each individual control over the chorused sound.
You shouldn't understand this video as a commercial demo with outstanding songs to demo the unit's possibilities but just as the same test routine that you would probably do to this pedal.
Not so much speach here, just from time to time to comment something I find interesting to mention.
The length is about 21 mins so, take it into consideration before pushing the button.
Conclussions
Every Wampler's pedal that I test, is liking me every day more and more. That man seems to have same ears than me but all the skills I haven't to build a pedal unit with my dreamed tones.
As consistent and with the same quality of the rest of Wampler's pedals, this Chorus unit is a granted success in your election. If your rig is good enough, this pedal will enhance your sound, no doubt.
Not interesting on to establish comparisons with other well known chorus units. This pedal has everything I ever dreamed, period. Integrates flawless with the rest of my pedal board and works perfect with the rest of Wampler's pedals.
It's a keeper. Yes, no doubt.
Subscribe to:
Posts (Atom)