Introduction
None of my 3 amps is a high gain one. Well, maybe the Marshall 1923C can cover tones beyond a JMC800 but, this is not a kind of high-gain monster like the Soldano SLO-100 is.
Even that this is not my usual vibe, from time to time I missed some sound on the style of Soldano's, Diezel's or Boogie's way. I am not thinking on to spend money on such an ampl that will use really few times so, some kind of Soldano-in-a-box, Diezel-in-a-box or Mesa-in-a-box pedal interested me a lot.
For sure, I know that for the real thing, you must have the real thing but, at the end it doesn't matter really to me if I achieve the exact tone of those amps, I just want a high gain pedal that can have same gain characteristics, even if the tone isn't 100% accurate. I will never enter in discussions about if this is or not the best Soldano-in-a-box pedal ever made, because this is sterile for me. I just want to check if this pedal has an use in my pedalboard, if it has a nice tone and if it is compatible with my rest of pedals. And, that's what is in the background when I face a review or test like this one.
Presentation
Wampler's way. Once more the pedal unit comes wrapped in bubble plastic inside a fabric bag. The box is that kind of white annonymous type that boutiquers use but, with a nice decal in the front that sets it a bit appart.
As ever, the user's manual is just a single sheet of paper, with a very generic description of the unit.
There are no recommended settings this time.
At the bottom of the box, a sticker with Wampler's logo, as usual.
Controls
Volume
This one sets the overall output volume of the pedal. Very easy to find the Unitary Volume Level. Not a big range over Unitary Level (but, we have the boost switcher for this).
Gain
Sets up the range of amplification and distortion of the unit. Very easy to tweak.
Boost
Sets the amount of boosted volume, when the Boost is switched on.
Treble
This is a treble's roll off control type. Is the control that less impacts in the final tone but, helps a lot to define and clarify the sound.
Bass
This helps to conform the body of the signal. Has more impact than Treble but way less than Middles.
Middles
This is the most important control in this unit. You can imagine it as a kind of that Contour knobs that you can find in Mesa-Boogie amps. This sets up some kind of pre-ecualization that changes the overall response of the unit. It also has a big impact in gain and volume.
Boost pedal switch
This switches on a boost section after the amplification stage that increases the volume of the unit in a real high range controlled by the Boost knob. This is a clean volume increase, not a gain increase.
Mode Toggle Switch
Two modes are available: crunch and overdrive.
Crunch mode provides a hard overdrive-like tone, not so British as a Marshall's crunch but, crunchy anyway.
Overdrive mode provides those solo singing tones that we are mostly expecting from a pedal of this kind.
Playing it
I've integrated this pedal within my pedal chain, between the Wampler Pinnacle and the ProCo RAT, just to check if there is any kind of incompatibility, as some impedance issue or whatever else anomaly. Everything seems to work flawless and the pedal smoothly integrates in the rest of pedal board.
This time, I challenged myself. I wanted to check this pedal to evaluate how it works with different types of pickups so, I've choosed the PRS 513 to test this pedal. The 513 has the hability of do its job with whatever pickups' configuration so, I can easily swap from single coil to half-humbucker (medium-output humbucker) to full-humbucker (high-output humbucker). In that way, I can compare how this pedal deals with each type of pickups.
Yesterday, I did a short test so, this is my second try on this pedal. During that test, I've realized that the most important knob in this unit is Middles. I leaved all controls at noon and started to tweak Middles knob, since this control creates the overall voice and gain range of this pedal.
When moving Middles to the left (rolling them off), there is some kind of mids scoop behaviour but, the sound seems to have more presence of mid-high frequencies range, more on the way of a British amp, if you want.
When moving Middles to the right (rolling them on), ther is some kind of mids bump but, way darker, as if mids-lows were increased. Also, gain goes harder and the voice of this distortion unit remembers me to an small high-gain combo, as the Mesa-Boogie 5:25, by example. The sound becomes darker and a bit boxy, as if we were playing in a closed-back combo.
So, I prefer Middles knob to be a point before noon, more or less at 11:00h.
After setting Middles, Bass control is the following one to tweak. This helps to finish the body of the sound, avoiding to go muddy or confussing. I prefer Bass knob just a bit before noon, let say 11:58h.
Last tone control to tweak is Trebles. This one helps a lot to clarify the sound and, its amount will depend on the other two controls. I prefer this one past noon, more or less between 1:00 and 2:00h.
Once the foundational tone is selected, with Tone knobs, to find the right amount of gain is just a kid's game. One of the things you should take into account is that all controls are highly interdependent so, changes on tone controls modify the range of gain available and, therefore, the output volume, as well.
So, after every tweak, remember to re-check your volume, if you wanted Unitary Volume Level.
As with the rest of Wampler's pedals I've tested, this unit seems to love to be recorded. When I was mounting the video, I realized that the SLOstortions sounds even better recorded than in front the amp (and, it sounds good enough). Some of the boxyness that I can feel "live" seems to disapear while hearing the video.
As with the rest of Wampler's pedals, is quite easy to achieve an Unitary Volume Level, even after every tweak, you only need to move a bit the knob right or left. There is not that big jump that I find in Mad Professor's gain units.
From all high-gain amps, the SLO-100 isn't the darkest one or the one with the highest saturation or the one with the bigger lows. It's some way more refinated and clearing sounding, as the Peavy 5150 is.
So, don't expect total doom on this pedal. Is producing just a liquid distortion that makes soloing really easy.
I wanted to check the amount of floor noise that this pedal adds to the signal (or raises from the original signal) so, I didn't use the ISP Decimator G-String (Noise Gate) to remove the noise.
Even being a high gain pedal, the floor noise was really comfortable and reasonable, even with single coil pickups, what says a lot about its design.
Well, I wasn't excited with the Crunch mode of this pedal, since I have other units to do that job but, I recognize that is a very usable mode. But, in my case, I prefer British crunch and, this unit is not exactly providing that, is giving Soldano's crunch. Fully usable but, not my beer.
The Overdrive mode is was had the most interest in my case and, I loved it. As I said, this will be not my number 1 distortion pedal, because my style is more classic but, I am happy to have this pedal for other stuff that I like to play from time to time and, it's very welcome for certain themes.
If you are expecting a deeper sound, as Diezel or Boogie deliver, this is not your pedal. Please, check Wampler's Triple Wreck (some kind of Recto-in-a-box), instead.
Enough writting. Better to see/hear the videos.
Videos
Alright!. I split the take into a pair of videos. First one is describing controls and testing in deep how every control affects to the Sound, always in Crunch mode. Second video is all about the Overdrive channel, not going so deep with controls but, checking several different settings with all kind of pickups: single coil, medium-output humbucker and high-output humbucker.
Each video is about half hour long so, go for a beer, some pop corns, sit down comfortablely, roll up your volume's control and push over those videos!. Or, leave it for a better time.
Conclusions
It seems that my ears are in sync with Wampler's ears, at least when discussing about gain boxes.
Once more one outstanding Wampler pedal that delivers interesting tones.
I am not in the aim of discussing if this is the best SLO-100 in-a-box pedal ever made. This lacks interest to me. What really interest me if this pedal gives me high-gain tones that I can use in my own themes and, it does it with ease.
The pedal seems to have no issues with impedances and smoothly integrates with the rest of pedals of my pedal board. The floor noise is surpresively low for a high-gain unit as this one, comfortable even with single pickups and without Noise Gate switched on.
If you are expecting some deep and creamy high-gain sounds, with excesive lows as the Diezel's or Mesa's deliver then, this is not your pedal. Please, check the Triple Wreck, instead.
The sound is more close to the clean and defined high-gain that a Peavy 5150 can deliver, by example.
Definitively a good weapon to have ready for those high gain solos.

Everything about electric guitars world
30 June 2012
28 June 2012
Pedals: Wampler Euphoria Overdrive
Introduction
 Usually, gain pedals are the most swapped in a guitarist's pedalboard. We are always getting something that seems to be the definitive one but, after a while, we always find that pedal as lacking something or having more than we wanted.
The thru is that best driven sounds are coming from tube amps. Period. To use a gain pedal to emulate another amp character or to push harder the tubes tends to fail on long time but, you know what, we will continue testing gain pedals the rest of life. It's the cursed life of the guitarist.
In my case, I love the sound of my current 4 overdrives: Fulltone OCD V3, Mad Professor Little Green Wonder, Mad Professor Sweet Honey Overdrive and Fulltone Plimsoul. All them are different and, all them have something that I love and something that I hate.
By example, the OCD has some impedance issues and, depending on the pedals that are stacked before or after, the sound, volume and (specially) the gain ratio change. It's one of the best Overdrives around but, when it works without issues.
Both overdrives from Mad Professor are awesome in sound's department but, they also have some issues. Those overdrives probably have a Gain knob that is logarithmic so, to achieve the unitary level is really difficult, fact that goes worst when I swap my guitar and / or amp. Any little change needs to reset the controls, beginning from scratch and, since Gain knob is hard to tweak for Unitary Level, it becomes a real mess.
Plimsoul is too much gainy for me to consider it as an overdrive. The sound is really good but, I see it more like a distortion than like an overdrive. Still not sure if will stand in my pedalboard.
From those, the OCD is the all-purpose overdrive, works well as a light overdrive as well as a hard overdrive and works really good with other overdrives (when it works fine). The Little Green Wonder is voiced in the league of Tubescreamers but, it removed what I hate from Tubescreamers and its way more versatile. The Sweet Honey Overdrive is a warm and light overdrive, that I dig specially for Blues stuff or, when what I want is just a touch of dynamic break-up in the sound.
So, I am still after an overdrive that can be as versatile as the OCD but, without the issues of the same and, without the issues (constant reset) of Mad Professor's and, this is my new try: Wampler's Euphoria Overdrive. Why?. Latelly, gain pedals from Wampler seem to be in tune with my own taste. I bought the Pinnacle and inmediatelly loved it so, I am gonna give one more try to other Wampler's pedal.
Presentation
The pedal unit comes inside a white carton box with some frontal sticker that makes it more attractive than other pedals from other Boutiquers.
Inside the box, a signature thing of Wampler, the pedal comes inside a fabric bag and it's being wrapped in bubble plastic.
In the bottom of the box, we can find a Wampler' sticker and the "User's Manual" that, you already guest it, is just a single sheet of paper (but way more attractive than in others Boutiquers).
Wampler includes again 4 sample settings that allow you to test different possibilities of this pedal.
Thank you, again, Wampler.
Controls
Volume
Well, this one sets the overal output volume of the pedal and, it's quite easy to achieve Unitary Level (and go way further).
Gain
This one controls the amount of saturation (level of amplification) of the inner amplification stage(s).
Bass
More than just control the amount of basses, this control gives the overall body to the sound but, also the distortion grain. It's being placed before the amplification stage(s).
Treble
This is a typical treble cut-off filter but, treble is affecting also the high frequencies that we usually see as Presence so, it can sound really harsh if overdone. This seems to be a common design in Wampler's pedals, as per my short experience with them.
Toggle Switch Voice
This switch allows to select three different voices for the foundational tone of the overdrive.
Smooth is voiced to mime the character of Dumble amps.
Open is the transparenter of all voices and very plain frequentialy.
Crunch is voiced to mime the typical British driven sound.
This makes this Overdrive as if you had three very different overdrives in a box.
Playing it
I've integrated the pedal on my pedal board, just before the rest of overdrives and, after the Phaser, just to check if there are impedance issues and, if it stands up in a big pedal board.
No issues detected by now. The pedal seems to smoothly integrate with the rest of the pedal board.
When I bought this pedal, I wasn't aware that this was the take of Wampler's about that Dumble sound (think on Robben Ford), in the way as Hermida's Audio Zendrive is. If its name has the adjectiv "Transaparent Overdrive", that's what I was expecting and, not a pedal emulating a Dumble amp.
I resold my Hermida's Audio Zendrive because, even that I loved that sweet sound, I hated how the pedal was killing my attack. I love my attack, I want to make tubes to explode when I pick hard. The Zendrive, had a lot of compression during the attack phase of the sound, maybe it's a Dumble characteristic but, not my beer.
So, I was affraid that I would go in same troubles with this Euphoria pedal. I've first started with the 4 settings that Wampler propose to test the pedal's versatility and, just the first one is "Robben Ford's tone". Well, If memory doesn't fails, the Zendrive sounded to me sweeter and warmer, even silkier but, with that ugly compression that flattened all my attack. The Euphoria didn't sound to me exactly the same.
In one side, the kind of distortion is more rude. Depending on the settings of Bass knob, the distortion character seems as it was built based on little balls that grow as soon as you dial in the Bass button. It's difficult to explain but, my sensation is that the grains of distortion are bigger, when rolling on the Bass control.
In other side, the compression type was more like the sag that a tube rectifier produces but, not so heavy as the compression level present on Zendrive.
So I would probably prefer the sound of the Zendrive but, I prefer way more the dynamics of the Euphoria.
They don't sound exactly the same but, I am not disapointed with the sound of the Euphoria. I find it more useful than the Zendrive, in my particular case.
Fortunatelly, this overdrive isn't just a Dumble emulation. After checking the Smooth Voice, I wanted to check the Crunch Voice and, it sounded damn right to me.
The Crunch channel is really convincent and brings you the best British Crunch sound.
In fact, Wampler has the most exciting plexy-in-a-box pedals that I've never heard so, no surprise that the Crunch mode sounds really good.
Not only I am not disapointed with the crunch channel but, I think it's really helpful.
Maybe, running it over a Marshall make the trick so, I need to recheck this pedal with other amps, specially with the Princeton, to see if the crunch is still so fantastic.
What I can say is that individual notes jumped out of the speaker with ease, on this mode.
And, finally, here we have the transparent overdrive, at the end. The mode is called Open and, I think is the flattest equalized voice of this overdrive. If Bass Knob is not overdone and gain well controlled, it can bring a nice transparent overdrive that set tubes in their sweet spot, while fully preserving the tonal signature of your instrument and amp.
Not disapointed with this mode, also. Very useful and interesting voice.
I find that the hardest thing of this pedal is to achieve the best compromise between the settings of two knobs: Gain and Bass. Bass is helping to the overall body but, also hardening the distortion textures so, I've found myself rolling a bit Bass when I've increassed Gain and, viceversa.
Even this, I've found the sound more grainy while playing in front the amp than when editing the demo video, where I loved the sound and didn't noticed such a grainity. Maybe the compression of mics help to it and, this ensures a good sound in Studio, anyway.
As any gain pedal, it increases a bit the floor noise that, in this case, I hadn't controlled with the help of the ISP Decimator G-String noise gate, because I wanted to hear everything, the good and the bad.
The noise level didn't raised spectacularly, anyway. Was very reasonable.
I would like to add some particular note about the Tone control. Usually Tone controls are cut-off filters that roll off to ground some treble frequencies but, those frequencies are below the range of frequencies named "air". Last ones are usually tweaked with a Presence control that can sound really harsh if overdone.
I've found that Tone controls in the two tested Wampler pedals are not limited to the trebles below the air range but, that they include also the highest frequencies so, be carefull when rising the Tone, because trebles can go really piercy and harsh.
Demo Video
This is my very first contact with this pedal so, I didn't prepared a demo session thinking on what to do and in which order and, neither what to play. It's easier when you already know the textures of the pedal to find something more appropiated for each voice mode but, I was suspecting that I would like this pedal (because of several youtube videos I already heard) so, I've jumped down without net.
Anyway, at the beginning of the video, I am testing the 4 settings recommended in user's manual, just to get an overall idea of this unit's possibilities. Later, I am focussing in how Bass and Gain knobs interactuate and, how the grain and thickness of distortion changes. Then, I leaved the Bass and Gain knobs in a fixed position and checked the Tone knob.
After testing all this in Smooth mode, I wanted to check Crunch mode and, finally Open mode.
At the end of the video, I am leaving exactly the same setup (except for volume knob, that needs to be readjusted when changing mode) and playing more or less the same riff to check how the sound changes depending on the mode.
About 30 min. of video so, take a beer some pop corns, wear your headphones, roll up the volume and hear it!. Or wait until you have more free time.
Conclusion
I was expecting just a transparent overdrive, in the way as the Timmy, by example so, I went scared when I read the "user's manual" saying that this pedal is Wampler's personal take of the "D" sound (D stands for Dumble).
Dumble tone is awesome, without any doubt but, not for everybody and not for every work so, I've thought: "Oh, no. One more Zendrive!". Fortunatelly this is not a Zendrive and, not just another Dumble-in-a-box pedal.
After selling the Zendrive, I wanted to check the Dumkudo, because it had 3 different voices, being one of them the Dumble one. I liked the sound of the Zendrive but I hated its compression that flattened my pick attack. So, I always wanted to test a Dumkudo, and see if its approach to Dumble sound was different from Zendrive's but, I leaved this idea sleeping on my chair (and pressed under my bottom).
On this sense, the Euphoria approach seems more based on Dumkudo's approach than in Zendrive's itself. Dumkudo has also three voices but, not sure at this time if they are remotelly similar.
Fortunatelly, I've found the Dumble's voice more dynamic than in Zendrive and more tweakable, to runaway from that excesive compression level. They don't sound exactly equal but, I find more useful the tones that I can take from Euphoria and I am not in the fight of which pedal does better the emulation of a Dumble amp. This really doesn't matter to me. My concern is more about which pedal can help me better and I don't mind what it sounds like, if it works for me, it works. Period.
Crunch and Open voices are fully usefull and really good so, even if you don't dig Dumble's voice, you have still two different overdrive textures to test. I am quite sure you will like at least one of them but, I see you probably using each one for different stuff.
This pedal is like to have a Timmy, a Zendrive and a Plexy Drive in a single pedal. This is just to help you to take the idea. For sure, the Open Voice isn't a Timmy, the Crunch voice isn't a Plexy Drive and the Smooth voice isn't a Zendrive but, they are similar and sound fantastic.
My impression right now is that this one will be easily my main overdrive unit and that will last long time in my pedal board but, as I said on the introduction, this is never granted for an overdrive.
27 June 2012
Pedal Effects: What they do? - Part 4
Category Modulation Effects
Modulation effects create a secondary signal modulating the input signal. The way as every pedal modulates the signal depends on the effect itself.
Family Phasers
 Phasers are copying the original signal and, rotating its phase, across several de-phasing stages and, finally blending original signal with dephased signal or providing just the dephased signal (100% wet effect).
As a result of that cycle of phase rotation, some frequencies are reinforced, while others are being practically cancelled so, despite of the washing sound hear, volume can go up (reinforcement) or down (cancellation), depending on the source note and cycle spot.
The most famous phase pedal effect of all the times is the MXR Phase 90. The Electro-Harmonix Small Stone was also very appreciated and, has an slightly different implementation that results in some different sound.
Some phasers (specially vintage ones) have just one knob to set up the phaser's character, while others provide a higher number of knobs to set up different phasing characteristics as: Phase (effect width), depth (blending dry/wet), speed (sweep speed or lenght of the cycle), etc.
Chorus, Flangers and Vibes are all based on phaser effect but, with some differences.
Family Chorus
 Chorus effect is doubling the original signal and, the second signal is being modulated in several ways. As in the Phaser's, the signal has an slight change of phase but not so noticiable as in phasers. Also, the second signal is slightly detuned, to create the sensation that a second instrument is making the chorus to the first instrument.
From the very beginning, Chorus had more controls available than original phasers, even that the control are more or less the same seen in phasers, what changes is the range of speeds that the chorus pedal has (speeder), compared to a Phaser and, that detuning feature.
Well, one of the widely used chorus had just a single control knob: the MXR Micro Chorus but, the epitome of those pedals seems to be the Boss CE-1 (Chorus Enssemble 1), that provided warm and lush chorus tones.
Family Flanger
 Also based on Phaser effect, the flanger work in a different speed range (slower) so, the sweeping of a flanger is slower than in a Phaser. Additonaly to this, the flanger includes a regeneration stage, that gets the output of the flangered signal, feeding back the input signal (that has now the original guitar signal plus the already flangered signal).
Flanger is the hardest sounding effect of this family and creates that Jet-alike type of sweep.
I was hardly ussed by Eddie Van Hallen but, it's also present in many records and many different instruments (I can remember the flanged batery bridge change in 'No Quarter' by Led Zeppelin, by example).
One of the most famous flangers was the MXR M-117 but not the unique mythical unit around.
Family Tremolo
 The Tremolo effect is affecting the loudness of the signal during a cycle. It drops the signal every X time in a cycle, resulting in a trembling sound.
When Leo Fender built his first Vibrato-loaded amps, he failed naming the effect, the vibrato channels of well known Fender's amps is really a Tremolo effect. Nowadays, it is difficult to change that wrong naming.
To make things even more confussing, Leo Fender gave the name Tremolo arm to the floating bridge's arm used in Stratocasters. The whammy arm of a floating bridge is just a Vibrato effect and, not a tremolo effect but, imagine, who can fix this error!.
Some of the first Tremolo pedal effects were also named Vibratos so, be sure what do you have on hands.
Family Vibrato
 The vibrato, instead of changing the loudness of the signal is affecting slightly the frequency, shifting a bit the pitch up and down during a certain cycle. Results are quite similar but, not exactly the same as with a tremolo.
The whammy bar of a floating bridge is the most understable vibrato effect. By moving down or up the bar, you are pitching down or up the sustained note. A vibrato pedal does this permanently and at regular periods.
Read Tremolo's description to be aware of the confussion between Tremolo and Vibrato effects.
Let say that the chorus is a mix of vibrato and phaser, with modified speed range.
Family Vibes
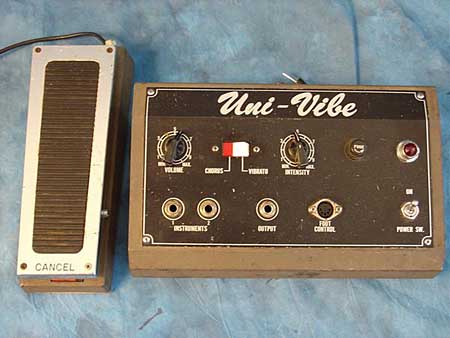 The vibe is an special take of the chorus effect, and its between a phaser, a chorus and a vibrato pedal in-a-box. Even having some common ground with all them, it has a very distinctive sound, very similar to the effect that a Leslie rotating speaker delivered in Organs.
Many other Rotating Speaker effects are quite similar to the vibe effect.
The sweep of the vibe seems to be deeper than the sweep of a phaser, creating the sensation that the sound rotates 360º around your head.
This amazing effect is the basis of "Machine Gun" by Hendrix (a true master on the use of this pedal effect).
The most famous vibe effect of all the times is the Dunlop Univibe, even that current edition doesn't seems to be so accurated to the original one, as Boutique's pedal designers claim.
Family Talk Box
 This is a really interesting pedal and, maybe the most human one, since we can modulate the sound of our guitar' signal just with our mouth!.
The Talk Box has two inputs: the guitar input and our mouth input. The signal coming from our mouth modulates or sculpts the guitar' signal, producing really interesting sounds.
To achieve this, a tube exits from the Talk Box unit that should be inserted in our mouth (usually, supported with a Mic' stand). The sounds we produce in our mouth are send down the tube to the vox, where a membrane, working like any mic, transduces the air changes into electrical signals. That electrical signals will be used to modify the guitar' signal, producing interesting effects.
First time I clearly heard that effect was in "Show me the way" by Peter Frampton but, of course, that effects' wizzard called Gilmour used it for some Pink Floyd songs (as Dogs from The Wall, by example).
The drawback is that, usually, a Talk Box isn't an chained effect but, the output usually needs to be routed to a separated amp. I think that just the Banshee Talk Box allows you to stack this effect in your chain (but memory can fail here). Just be sure to check how your Talk Box should be connected in your rig before buying one, maybe you cannot have to amps working at same time.
Category Time Effects
Time effects are copying the input signal and creating several images of that signal delayed in time and, decreassing in loudness.
Family Reverb
 Reverberation effect tries to emulate the echos obtained in a reflexive room. Depending on the place you are playing, the room can sound very dry and the amp can sound very in your face. Reberberation effect allows to move an step backwards the sound of the guitar and helps to place it within the mix space.
First reverberation effects applied to guitar world was the spring-reverberation. The signal was driven to a can that had several springs, the mechanical movement of those springs was transduced to electric signals and the result blended with the original signal. This is the typical guitar's amp reverberation that we can see in a bunch of amps.
Reverberation echoes are a bit confussing and the first echos produces sub-echoes that, produce sub-sub-echoes, etc.
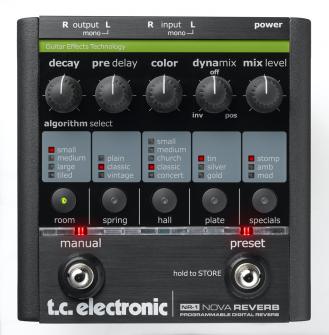
But nowadays, any versatile reverberation effect includes a wide toolset of different reverberations: Hall (open spaces), Room (small rooms), Cathedral (Cathedral behaviour), Slapback (just a quick echo), etc.
What does new versatile reverberation effects want is to mime the reflexion patterns that some specific spaces have. Some do it in a very good way, some sound very digital.
One of the best reverb effects are found in TC Electronics stuff, that had a lot of experience designing reverb units for Studio Environment.
Family Delay
 Delay pedals are quite similar to Reverb pedals but, instead to try to emulate the reflexive patters of some loved spaces, the delay generates just echoes of the input signal, with a certain cadence and with a certain decay time.
Delays are based in the first Echo Units, as the EchoPlex, that used a magnetic tape to record the sound and then, to reproduce the recorded sound slightly after in time.
First Echo or Delay units that had a good use for the regular guitarist were all Boss pedals (like the DD-3).
First delay units were analog and, therefore, their hability to delay the sound in time was very limited.
When digital units came, the delay time went longer.
Analog delay units have a warmer and lusher sound but, they can sound dark, also and, they are not so good for everything, because they can create some kind of veil on your sound.
Digital delay units sound clearer, brighter and more defined but, the drawback is that they can create sound's artiffacts (well known as digititis) that can sound mettalic and synthetic, when overdone.
Maxon AD-999 or the MXR Carbon Copy are two good examples of analog delays, while the well known Boss DD-3 and DD-7 are clear examples of Digital Delays.
Most of modern delay units, despite of having several delay emulations (tape delay, among modeling some delay units used in Studio), can have a looper feature, that allows us to record a short riff and make the unit to repeat it while we continue playing over the riff.
Modulation effects create a secondary signal modulating the input signal. The way as every pedal modulates the signal depends on the effect itself.
Family Phasers
As a result of that cycle of phase rotation, some frequencies are reinforced, while others are being practically cancelled so, despite of the washing sound hear, volume can go up (reinforcement) or down (cancellation), depending on the source note and cycle spot.
The most famous phase pedal effect of all the times is the MXR Phase 90. The Electro-Harmonix Small Stone was also very appreciated and, has an slightly different implementation that results in some different sound.
Some phasers (specially vintage ones) have just one knob to set up the phaser's character, while others provide a higher number of knobs to set up different phasing characteristics as: Phase (effect width), depth (blending dry/wet), speed (sweep speed or lenght of the cycle), etc.
Chorus, Flangers and Vibes are all based on phaser effect but, with some differences.
Family Chorus

From the very beginning, Chorus had more controls available than original phasers, even that the control are more or less the same seen in phasers, what changes is the range of speeds that the chorus pedal has (speeder), compared to a Phaser and, that detuning feature.
Well, one of the widely used chorus had just a single control knob: the MXR Micro Chorus but, the epitome of those pedals seems to be the Boss CE-1 (Chorus Enssemble 1), that provided warm and lush chorus tones.
Family Flanger
Flanger is the hardest sounding effect of this family and creates that Jet-alike type of sweep.
I was hardly ussed by Eddie Van Hallen but, it's also present in many records and many different instruments (I can remember the flanged batery bridge change in 'No Quarter' by Led Zeppelin, by example).
One of the most famous flangers was the MXR M-117 but not the unique mythical unit around.
Family Tremolo
When Leo Fender built his first Vibrato-loaded amps, he failed naming the effect, the vibrato channels of well known Fender's amps is really a Tremolo effect. Nowadays, it is difficult to change that wrong naming.
To make things even more confussing, Leo Fender gave the name Tremolo arm to the floating bridge's arm used in Stratocasters. The whammy arm of a floating bridge is just a Vibrato effect and, not a tremolo effect but, imagine, who can fix this error!.
Some of the first Tremolo pedal effects were also named Vibratos so, be sure what do you have on hands.
Family Vibrato
The whammy bar of a floating bridge is the most understable vibrato effect. By moving down or up the bar, you are pitching down or up the sustained note. A vibrato pedal does this permanently and at regular periods.
Read Tremolo's description to be aware of the confussion between Tremolo and Vibrato effects.
Let say that the chorus is a mix of vibrato and phaser, with modified speed range.
Family Vibes
Many other Rotating Speaker effects are quite similar to the vibe effect.
The sweep of the vibe seems to be deeper than the sweep of a phaser, creating the sensation that the sound rotates 360º around your head.
This amazing effect is the basis of "Machine Gun" by Hendrix (a true master on the use of this pedal effect).
The most famous vibe effect of all the times is the Dunlop Univibe, even that current edition doesn't seems to be so accurated to the original one, as Boutique's pedal designers claim.
Family Talk Box
The Talk Box has two inputs: the guitar input and our mouth input. The signal coming from our mouth modulates or sculpts the guitar' signal, producing really interesting sounds.
To achieve this, a tube exits from the Talk Box unit that should be inserted in our mouth (usually, supported with a Mic' stand). The sounds we produce in our mouth are send down the tube to the vox, where a membrane, working like any mic, transduces the air changes into electrical signals. That electrical signals will be used to modify the guitar' signal, producing interesting effects.
First time I clearly heard that effect was in "Show me the way" by Peter Frampton but, of course, that effects' wizzard called Gilmour used it for some Pink Floyd songs (as Dogs from The Wall, by example).
The drawback is that, usually, a Talk Box isn't an chained effect but, the output usually needs to be routed to a separated amp. I think that just the Banshee Talk Box allows you to stack this effect in your chain (but memory can fail here). Just be sure to check how your Talk Box should be connected in your rig before buying one, maybe you cannot have to amps working at same time.
Category Time Effects
Time effects are copying the input signal and creating several images of that signal delayed in time and, decreassing in loudness.
Family Reverb
First reverberation effects applied to guitar world was the spring-reverberation. The signal was driven to a can that had several springs, the mechanical movement of those springs was transduced to electric signals and the result blended with the original signal. This is the typical guitar's amp reverberation that we can see in a bunch of amps.
Reverberation echoes are a bit confussing and the first echos produces sub-echoes that, produce sub-sub-echoes, etc.
But nowadays, any versatile reverberation effect includes a wide toolset of different reverberations: Hall (open spaces), Room (small rooms), Cathedral (Cathedral behaviour), Slapback (just a quick echo), etc.
What does new versatile reverberation effects want is to mime the reflexion patterns that some specific spaces have. Some do it in a very good way, some sound very digital.
One of the best reverb effects are found in TC Electronics stuff, that had a lot of experience designing reverb units for Studio Environment.
Family Delay
Delays are based in the first Echo Units, as the EchoPlex, that used a magnetic tape to record the sound and then, to reproduce the recorded sound slightly after in time.
First Echo or Delay units that had a good use for the regular guitarist were all Boss pedals (like the DD-3).
First delay units were analog and, therefore, their hability to delay the sound in time was very limited.
When digital units came, the delay time went longer.
Analog delay units have a warmer and lusher sound but, they can sound dark, also and, they are not so good for everything, because they can create some kind of veil on your sound.
Digital delay units sound clearer, brighter and more defined but, the drawback is that they can create sound's artiffacts (well known as digititis) that can sound mettalic and synthetic, when overdone.
Maxon AD-999 or the MXR Carbon Copy are two good examples of analog delays, while the well known Boss DD-3 and DD-7 are clear examples of Digital Delays.
Most of modern delay units, despite of having several delay emulations (tape delay, among modeling some delay units used in Studio), can have a looper feature, that allows us to record a short riff and make the unit to repeat it while we continue playing over the riff.
Pedal Effects: What they do? - Part 3
Category Gain Pedals
Even that most of our gain needs can be obtained with the proper amp, not everybody can have more than one amp and, even having just more than just one amp, not always it is possible to crank the amp to obtain its best.
Some Gain pedals help the tubes to break earlier at lower volumes, some copy the sound of a cranked amp, and others work just like emulations of very particular amps.
Anyway, it is difficult to see a guitarist without at least a single gain pedal in his pedal board.
Family Dynamics
There are some pedals that are modifying the dynamic range of the signal. The Dynamic Range is the difference between the highest peak of the signal and the average signal level.
This family of pedals is not always well known or understood.
 A compressor is a pedal which focus its attention on the volume envelop of the signal (search ADSR Curve, for further info). What at the end does is to flatten the peaks, to raise the average signal level and, eventually, to increase the release time of the note. Usually, a Gain control will increase the average signal level, an Attack or Compression control will slightly or hardly flatten the peaks and, a Release control will maintain the tail of the note to add sustain to the sound. A compressor can be used to balance the average level of music, avoiding high differences between peaks and valleys.
A sustainer is some kind of specialized compressor, more oriented to the tail of the sound, to provide more sustain but, without affecting the attack phase (peaks).
For sure, there pedals that have both effects together but, some are very specialized in attack phase (compressor) or release phase (sustainer).
 A Noise Gate is also a very specialized compressor that works as an electronic gate. In every signal, there is a certain amount of floor noise. Such a floor noise becomes more and more evident when we begin to stack gain pedals or raise the gain in our amp. Pedals are treating all the signal the same and, are not able to distinguish what is noise and what is music.
A Noise Gate is some kind of electronic gate that will allow to trespass the gate to such a signals that reach some determined level. The level where the gate opens is usually called Threshold.
Once the gate is opened, it will close when the sound level goes down to the threshold value during a certain time (take into account that we are talking always about few milliseconds in dynamics).
What the noise gate does is to use a downward compressor for the noise, dramatically reducing its level. Since the difference between the sound (above the threshold) and noise (below the threshold) are now higher, the noise is less perceived.
Some Noise Gates have full controls to configure the different values of threshold, gate open time (how much time must a signal be raising the threshold for the gate to be opened), gate close time (how much time must a signal drop under the threshold to the gate to be closed) and, even downward compression ratio.
The drawback of Noise Gates is that the boundaries between noise and signal aren't stable in time and clearly defined. Sometimes some of our signal drops down below the average noise level. If we force the threshold really low, part of the noise will pop up and, in an intermittent way, what is really ugly.
If we raise the threshold, we can loose the subtle of the tails of our sounds.
So, a Noise Gate well setup can be awesome but, a Noise Gate of bad quality or wrongly setup can be a real hell and, way worst than support the noise.
All pedals affecting dynamics are affecting the signal level (volume envelope) in one or more ways and, because they tend to raise the average signal level, they are prone in increase the floor noise (in the same amount as the signal is being pushed).
Family Equalizers
Equalizers are gain pedals that drop or raise the signal level but, of certain range the frequencies.
The audible spectrum is divided in several bands and, for each band, the equalizer allows us to raise or drop the signal level, therefore enhancing or reducing some particular frequencies.
The equalizer is, probably, the most important weapon for a Sound Engineer. It is the tool which one the engineer is able to let every instrument be clearly distinguishable from the rest in the mix.
So a equalizer in a pedal format should serve for the same. The equalizer will help to enhance those frequencies that better differentiate the guitar' sound from the rest of instruments, dropping the levels of those frequencies that can be in fight with other instruments.
But, equalizers can also serve to emulate signature sounds of some amps. Every amp has its signature way to enhance or dismiss every band so, with a single equalizer we can achieve a wide range of well knows sounds, without having to change the amp or the guitar.
Used after overdrives, distortions and fuzzes, can help to fine-tune the resulting sound to our taste and, this can dramatically change the sound of our distortion.
Being a gain pedal, the use of an equalizer increases the floor noise, as well.
Family Overdrives
 The boundary between a booster and an overdrive is tinny but, while the booster wants an increase in gain, volume or both, without specially coloring the signal, the overdrive wants it.
There are two types of overdrives: overdrives that push the tubes to break and, overdrives that emulate the sound of a certain drove amp.
Overdrives that push the tubes are used to help an amp to break-up early and to produce their wanted harmonic distortion before the spot (volume level) where they would naturally do. The good thing is that we are achieving the best distortion character possible, the one generated by the amp. The drawback is that, even being early that spot, the amp increases clearly its loudness and, maybe we cannot go so loud in our environment.
Overdrives that emulate drove amps, doesn't need to change the loudness of our amp, they just deliver a sound similar to a certain amp (which they emulate) going overdrive.
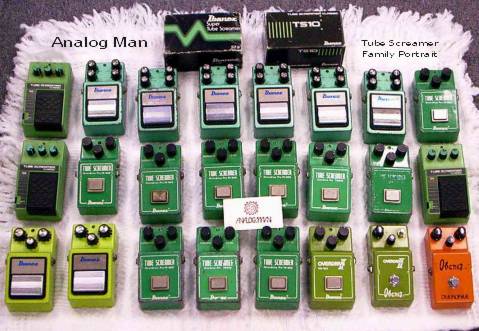
The most famous overdrive of all the times is the Ibanez TS-808 (this one pushes but coloring), widely used in lots of recordings and, very often seen in pedal boards, even today. Another highly used overdrive was the Boos SD-1 (this one emulates).
 The epitome of current days seems to be the Klon Centaur but, to get the best from this pedal, you need a good amp that can be pushed hard, otherwise, the sound of the Klon can be sterile.
Another well acclaimed overdrive is the Tim (or the Timmy) and, the Fulltone FullDrive and OCD are both widely used today, also.
There are overdrives for every taste and need. Overdrives that push tubes usually work better in tube amps while overdrives that emulate a driven amp work better in solid state amps, where there is no way to obtain that kind of sound.
The most of designs are based or on the Tubescreamer (Ibanez TS-808), or on the boss SD-1.
The way as those distort is different, the harmonics that they produce are of different order, being the TS warmer and undefined, while the SD-1 is cool, thicker and defined.
Lately there is a wave of new designs trying to emulate the driven sound of mythical amps that are really hard to have (because of their limited units and prohibitive price).
Family Distortions
Once more, the boundaries between an overdrive and a distortion can be really tinny. Let say that a distortion pedal wants to go further than the drive level of an overdrive, to produce highly saturated distortion. While overdrives try to preserve the foundational tone of your guitar, adding just a bit of color and those exciting harmonics that tube generate, distortions forget all that and go for producing a wall of sound, with highly distorted and colored sound (on some units, it doesn't matter what guitar are you playing and to which amp are you plugged, you get the sound of the distortion, that's all).
For sure, some distortion units want to give you in-a-box the amazing sound of high gain amps, that were set away producing their own signature high gain distortion sound (as the Soldano SLO-100, the Peavey 5151, the Mesa Boogie Triple Rectifier, Bogner XTC, etc.).
Some have their own signature sound and, not particularly copying a determined amp.
Some distortions are so sweet (MXR Distortion+) that, most than a distortion unit seem an overdrive and, most of the distortion units are able to deliver some kind of colored overdrive at very low gain levels.
 Once more, the best distortion we can get is always from our amp cranked to the max but, distortion units allow us to fake this, using the clean channel of our amp at any volume level.
While overdrives are more sensitive to gain and volume levels of our amp (because they want to push the tubes), distortions will generate their own sound, independently of the volume that we setup in our amp.
One of the most famous distortion units is the ProCo RAT, a very organic type of distortion, that can go from light overdrive to fuzz territory and, everything in between. Very classy and widely used in recordings.
Family Fuzzes
 Probably, the first pedal effect used with electric guitars. During the time of big orchestras, the guitar had not the protagonism that they have today. They were just creating some pads to support rest of instruments. The Fuzz was designed to provide a sound similar to a Sax and, was firstly designed to be used with keyboards (electronic organs).
Guitarists liked the idea to make their guitar to sound as a Sax so, they tried it and "Satisfaction" was reached.
There are mainly two kind of fuzz units. The one drived by a set of Germanium transistors (that have reversed polarity) and the one drived by a set of Silicium transistors. As in the case of the TS compared to the DS-1, the germanium units deliver a warmer, more organic and wild sound that the silicium units, that can sound cooler, more synthetic.
Even this, they are two main voices: British and American. British fuzzes are voiced brighter, with less gain (more as a dirty overdrive), thinner in body and sometimes harsh. American ones are thicker in body, more obscure in sound and with way more gain.
British models are based, more or less, in the first Vox ToneBender model, so you will see a lot of MKI, MKII, MKIII tones around. The ToneBender was in fact based in the Maestro Fuzz, designed in USA. The Electro-Harmonix Big Muff is maybe one of the thicker fuzzes around.
Fuzzes started to highlight when songs like "Satisfaction" of Rolling Stones started to climb the Hit Parade lists. Jimmy Page used very often a ToneBender MKII fuzz.
Prices of clones built with same components and same specifications as vintage units have prohibitive prices today.
A vintage fuzz is awesome if it is the only pedal in our chain but, it can be a real headache if we have to integrate it in a full-equipped pedal board. In one side, the reversed polarity of germanium fuzzes require to use isolated power sources, to avoid the mix with "normal" polarity pedals. In other side, since the Fuzz was initially designed for organs, the impedance levels (way lower) were appropriate for such an instrument so, when we are stacking that fuzz, we can have some impedance-related issues with rest of pedals and, even a pedal before the fuzz can dramatically change its sound.
This is way most of people that loves fuzzes try to keep them in a separated loop and, out of the circuit the most of time.
Fortunately, not all the fuzzes available today are just re-creations of the mythical vintage units. There are some people there creating their own designs from scratch and, providing units that work flawless with rest of pedals, because the design is now created for a guitar, instead of an organ.
The fuzz is the most synthetic sounding of all the gain pedal families. Its the gain pedal with the highest sustain and thicker wall of sounds of all (except for very vintage units). Very used during '60s to '70s and, not so favored nowadays.
Even that most of our gain needs can be obtained with the proper amp, not everybody can have more than one amp and, even having just more than just one amp, not always it is possible to crank the amp to obtain its best.
Some Gain pedals help the tubes to break earlier at lower volumes, some copy the sound of a cranked amp, and others work just like emulations of very particular amps.
Anyway, it is difficult to see a guitarist without at least a single gain pedal in his pedal board.
Family Dynamics
There are some pedals that are modifying the dynamic range of the signal. The Dynamic Range is the difference between the highest peak of the signal and the average signal level.
This family of pedals is not always well known or understood.
A sustainer is some kind of specialized compressor, more oriented to the tail of the sound, to provide more sustain but, without affecting the attack phase (peaks).
For sure, there pedals that have both effects together but, some are very specialized in attack phase (compressor) or release phase (sustainer).
A Noise Gate is some kind of electronic gate that will allow to trespass the gate to such a signals that reach some determined level. The level where the gate opens is usually called Threshold.
Once the gate is opened, it will close when the sound level goes down to the threshold value during a certain time (take into account that we are talking always about few milliseconds in dynamics).
What the noise gate does is to use a downward compressor for the noise, dramatically reducing its level. Since the difference between the sound (above the threshold) and noise (below the threshold) are now higher, the noise is less perceived.
Some Noise Gates have full controls to configure the different values of threshold, gate open time (how much time must a signal be raising the threshold for the gate to be opened), gate close time (how much time must a signal drop under the threshold to the gate to be closed) and, even downward compression ratio.
The drawback of Noise Gates is that the boundaries between noise and signal aren't stable in time and clearly defined. Sometimes some of our signal drops down below the average noise level. If we force the threshold really low, part of the noise will pop up and, in an intermittent way, what is really ugly.
If we raise the threshold, we can loose the subtle of the tails of our sounds.
So, a Noise Gate well setup can be awesome but, a Noise Gate of bad quality or wrongly setup can be a real hell and, way worst than support the noise.
All pedals affecting dynamics are affecting the signal level (volume envelope) in one or more ways and, because they tend to raise the average signal level, they are prone in increase the floor noise (in the same amount as the signal is being pushed).
Family Equalizers
Equalizers are gain pedals that drop or raise the signal level but, of certain range the frequencies.
The audible spectrum is divided in several bands and, for each band, the equalizer allows us to raise or drop the signal level, therefore enhancing or reducing some particular frequencies.
The equalizer is, probably, the most important weapon for a Sound Engineer. It is the tool which one the engineer is able to let every instrument be clearly distinguishable from the rest in the mix.
So a equalizer in a pedal format should serve for the same. The equalizer will help to enhance those frequencies that better differentiate the guitar' sound from the rest of instruments, dropping the levels of those frequencies that can be in fight with other instruments.
But, equalizers can also serve to emulate signature sounds of some amps. Every amp has its signature way to enhance or dismiss every band so, with a single equalizer we can achieve a wide range of well knows sounds, without having to change the amp or the guitar.
Used after overdrives, distortions and fuzzes, can help to fine-tune the resulting sound to our taste and, this can dramatically change the sound of our distortion.
Being a gain pedal, the use of an equalizer increases the floor noise, as well.
Family Overdrives
There are two types of overdrives: overdrives that push the tubes to break and, overdrives that emulate the sound of a certain drove amp.
Overdrives that push the tubes are used to help an amp to break-up early and to produce their wanted harmonic distortion before the spot (volume level) where they would naturally do. The good thing is that we are achieving the best distortion character possible, the one generated by the amp. The drawback is that, even being early that spot, the amp increases clearly its loudness and, maybe we cannot go so loud in our environment.
Overdrives that emulate drove amps, doesn't need to change the loudness of our amp, they just deliver a sound similar to a certain amp (which they emulate) going overdrive.
The most famous overdrive of all the times is the Ibanez TS-808 (this one pushes but coloring), widely used in lots of recordings and, very often seen in pedal boards, even today. Another highly used overdrive was the Boos SD-1 (this one emulates).
Another well acclaimed overdrive is the Tim (or the Timmy) and, the Fulltone FullDrive and OCD are both widely used today, also.
There are overdrives for every taste and need. Overdrives that push tubes usually work better in tube amps while overdrives that emulate a driven amp work better in solid state amps, where there is no way to obtain that kind of sound.
The most of designs are based or on the Tubescreamer (Ibanez TS-808), or on the boss SD-1.
The way as those distort is different, the harmonics that they produce are of different order, being the TS warmer and undefined, while the SD-1 is cool, thicker and defined.
Lately there is a wave of new designs trying to emulate the driven sound of mythical amps that are really hard to have (because of their limited units and prohibitive price).
Family Distortions
Once more, the boundaries between an overdrive and a distortion can be really tinny. Let say that a distortion pedal wants to go further than the drive level of an overdrive, to produce highly saturated distortion. While overdrives try to preserve the foundational tone of your guitar, adding just a bit of color and those exciting harmonics that tube generate, distortions forget all that and go for producing a wall of sound, with highly distorted and colored sound (on some units, it doesn't matter what guitar are you playing and to which amp are you plugged, you get the sound of the distortion, that's all).
For sure, some distortion units want to give you in-a-box the amazing sound of high gain amps, that were set away producing their own signature high gain distortion sound (as the Soldano SLO-100, the Peavey 5151, the Mesa Boogie Triple Rectifier, Bogner XTC, etc.).
Some have their own signature sound and, not particularly copying a determined amp.
Some distortions are so sweet (MXR Distortion+) that, most than a distortion unit seem an overdrive and, most of the distortion units are able to deliver some kind of colored overdrive at very low gain levels.
While overdrives are more sensitive to gain and volume levels of our amp (because they want to push the tubes), distortions will generate their own sound, independently of the volume that we setup in our amp.
One of the most famous distortion units is the ProCo RAT, a very organic type of distortion, that can go from light overdrive to fuzz territory and, everything in between. Very classy and widely used in recordings.
Family Fuzzes
Guitarists liked the idea to make their guitar to sound as a Sax so, they tried it and "Satisfaction" was reached.
There are mainly two kind of fuzz units. The one drived by a set of Germanium transistors (that have reversed polarity) and the one drived by a set of Silicium transistors. As in the case of the TS compared to the DS-1, the germanium units deliver a warmer, more organic and wild sound that the silicium units, that can sound cooler, more synthetic.
Even this, they are two main voices: British and American. British fuzzes are voiced brighter, with less gain (more as a dirty overdrive), thinner in body and sometimes harsh. American ones are thicker in body, more obscure in sound and with way more gain.
British models are based, more or less, in the first Vox ToneBender model, so you will see a lot of MKI, MKII, MKIII tones around. The ToneBender was in fact based in the Maestro Fuzz, designed in USA. The Electro-Harmonix Big Muff is maybe one of the thicker fuzzes around.
Fuzzes started to highlight when songs like "Satisfaction" of Rolling Stones started to climb the Hit Parade lists. Jimmy Page used very often a ToneBender MKII fuzz.
Prices of clones built with same components and same specifications as vintage units have prohibitive prices today.
A vintage fuzz is awesome if it is the only pedal in our chain but, it can be a real headache if we have to integrate it in a full-equipped pedal board. In one side, the reversed polarity of germanium fuzzes require to use isolated power sources, to avoid the mix with "normal" polarity pedals. In other side, since the Fuzz was initially designed for organs, the impedance levels (way lower) were appropriate for such an instrument so, when we are stacking that fuzz, we can have some impedance-related issues with rest of pedals and, even a pedal before the fuzz can dramatically change its sound.
This is way most of people that loves fuzzes try to keep them in a separated loop and, out of the circuit the most of time.
Fortunately, not all the fuzzes available today are just re-creations of the mythical vintage units. There are some people there creating their own designs from scratch and, providing units that work flawless with rest of pedals, because the design is now created for a guitar, instead of an organ.
The fuzz is the most synthetic sounding of all the gain pedal families. Its the gain pedal with the highest sustain and thicker wall of sounds of all (except for very vintage units). Very used during '60s to '70s and, not so favored nowadays.
26 June 2012
Pedal Effects: What they do? - Part 2
Families of Pedal Effects
We classified pedals depending on their high level functions and link types. Now it is time to see the most common families within those categories.
Category Signal Recovery
Family Line Drivers
 Line Driver pedals were designed to recover the slight lost of signal that can happens when guitar signal travels accross the guitar cable. Basic idea is to restore the original signal level, without add or substract anything else.
Line Drivers are different from Buffers and Boosters, in the sense that they are only trying to raise a bit the signal level, with total transparency.
Anyway, we will see that many pedals are crossing several boundaries and, do more than one function.
One of the first pedals of this kind was the Electro-Harmonix LPB-1, followed by the MXR Micro Amp (that colored the signal and it's something between a Booster and a Line Driver).
Family Boosters
Boosters were designed to increase the gain and volume levels of the signal. So, they aren't just for restore the original signal level but, they can change the gain (intensity) of the signal.
There are clean boosters, that just do that, to increase gain or level or both and, there are specializated boosters, that specialy boost some frequency ranges.
Clean boosters are specially interesting to give just that bit of body to weak pickups. This helps with sustain and with an overall rounder tone.
 One typical booster is a Treble Booster, since the first that is rolled off by a guitar cable is just the high end content. Treble boosters, despite of increase gain/volume, have an special enfassis in high-end frequencies. Brian May's had always a treble booster on his pedal chain. Of the first treble boosters was the Maestro RangeMaster.
Other typical specializated booster is the Fat Booster, that works similarly to a treble booster but, having special care of the low end.
Family Buffers
 A buffer is a pedal designed to re-adjust impedance levels so, increasing the input level up to a reasonable level (at least, the 1 MOhm impedance that an amp's input expects) and decreassig the output level (the closer to zero Ohm as possible).
It's very strange to see a Buffer Pedal Effect on the chain of most of guitarists but, every designed pedal board that Peter Cornish make for their renamed artists includes his own designed buffer.
Even that, a priory, a buffer can be of great help, it can also introduce some issues when used before some vintage effects (that weren't specifically designed for electric guitars, by example) but, we will talk about this later.
Family preamps
 Preamp pedals are some kind of boosters but, with a colored signal, equalizated to mime the goods of a mythical amp. By example, the Xotic AC Booster mimes the AC30, the Xotic BB pre-amp the BluesBreaker, Wampler Plexy Drive the Plexy, etc.
Those pedals are, more or less, copying the behavior and nuances of the preamp stages of those amps that they emulate.
There are other colored boosters not clean and not specializated on trebles or basses, that also doesn't mime any special amp but, that they clearly add some color to the signal. This is the case of the old MXR Micro Amp (that adds that sweet warm), the Xotic EP Booster (that mimes the preamp stage of an EchoPlex unit) and, many others.
As in the case of boosters, preamps want to raise the signal gain and volume up to a level that helps to achieve the right gain on amp's input but, with a distinguishable color. While in buffers, we usually two knobs (volume, gain) on clean buffers and, one more knob (treble, fatness, etc) in specializated boosters, in the case of pre-amps we can have a full tone-stack (treble, bass, mids).
Category Signal Followers
Family Tuners
 The tuner is a must have pedal on any pedal board. The tuner helps us to maintain the affination of our guitar flawless. Usually, there are two kind of tuners: digital and analogic.
Some time ago, digital tuners had less accuracy than analogic ones and, the response time of the analogic ones was clearly superior so, to tune the strings was easier (and expensiver) with an analogic tuner.
Nowadays, things seem to be reversed and, there are outstanding Tuners.
Usually, we want the tuner to be true bypass (to don't affect our signal), transparent related to impedance levels and, as accurated as possible, with a quick response to the pulsation of the string.
Current digital tuners have an accuracy (1 cent) better than the smallest interval that a human ear can distinguish (about 5 cents of tone) but, luthiers use very accurated tuners for their specializated work, with higher accuracy levels (0.1 and, enen 0.01 cents of tone).
The tuner is clearly a signal follower. It needs the cleanest signal directly coming from your guitar, to be able to catch the frequencies with accuracy.
Even that, in principle, it seems a "dummy" pedal, be sure you check the responsiveness of your tuner before choosing one and, be sure it works in true bypass mode and that, when switched on, it mutes your guitar (to tune in silence). Also, be sure you understand the display and that this one is highly visible in a natural position (pedal on floor and you standing up), even under high illumination levels.
Also, if you are using alternate tunings, be sure that your tune is able to let you to set up such a tunings, to help you in your work.
A tuner can be used also as an OFF switch. When pushed the guitar shuts up. If it is at the beginning of the chain or before time effects, last echo trails will be heared before complete silence.
As any signal follower pedal, its natural position is as early in the chain as possible. In principle, the tuner should be the first pedal but, we will see that sometimes, this is not possible.
Family Pitchers
 Pitchers are pedals designed to "read" the input signal and then to create one or more parallel signals with a different pitch (some tones up or down). You can imagine that to do a nice job, they need the purest signal possible, otherwise, the resulting pitch can be wrong, because of a "dirty" signal and pedal's difficult to understand what note came.
One typical pitcher is an Octaver, that creates a secondary signal an octave higher or lower than the original signal, mixing both on the output but, Boss designed long time ago some Pitch Shifter units that were able to produce a secondary signal of any musical interval (second, third, forth, etc.).
We have also arpeggiators, that given an input note, create a sequence of notes following some pattern refered to some scale. Other similar pedal is the harmonizer, that creates one ore more different voices, with different intervals that are re-adapted depending on the scale.
The famous Whammy is some kind of harmonizer-pitch shifter pedal so, you can expect this one working best as early in the pedal chain as possible.
Family Filters
There are some other pedals that aren't creating a second voice shifting down or up the original signal but, they need a clean note to work properly.
This is the case of Auto-Wah or Filter-Q pedals, which response varies depending on signal's strenght, attack, phase, etc.
A typical filter pedal is the Wah, which natural position is quite well at the beginning of the chain.
Family synthetizers
Yes, even in our analogic world there are synthetizer pedals available, as the Electro-Harmonix Pog.
Some other pedals, like the MXR Blue Box, create a secondary voice that sounds very artifficial (synthetized) and, work better early in the pedal chain, as the rest of signal followers.
We classified pedals depending on their high level functions and link types. Now it is time to see the most common families within those categories.
Category Signal Recovery
Family Line Drivers
Line Drivers are different from Buffers and Boosters, in the sense that they are only trying to raise a bit the signal level, with total transparency.
Anyway, we will see that many pedals are crossing several boundaries and, do more than one function.
One of the first pedals of this kind was the Electro-Harmonix LPB-1, followed by the MXR Micro Amp (that colored the signal and it's something between a Booster and a Line Driver).
Family Boosters
Boosters were designed to increase the gain and volume levels of the signal. So, they aren't just for restore the original signal level but, they can change the gain (intensity) of the signal.
There are clean boosters, that just do that, to increase gain or level or both and, there are specializated boosters, that specialy boost some frequency ranges.
Clean boosters are specially interesting to give just that bit of body to weak pickups. This helps with sustain and with an overall rounder tone.
Other typical specializated booster is the Fat Booster, that works similarly to a treble booster but, having special care of the low end.
Family Buffers
It's very strange to see a Buffer Pedal Effect on the chain of most of guitarists but, every designed pedal board that Peter Cornish make for their renamed artists includes his own designed buffer.
Even that, a priory, a buffer can be of great help, it can also introduce some issues when used before some vintage effects (that weren't specifically designed for electric guitars, by example) but, we will talk about this later.
Family preamps
Those pedals are, more or less, copying the behavior and nuances of the preamp stages of those amps that they emulate.
There are other colored boosters not clean and not specializated on trebles or basses, that also doesn't mime any special amp but, that they clearly add some color to the signal. This is the case of the old MXR Micro Amp (that adds that sweet warm), the Xotic EP Booster (that mimes the preamp stage of an EchoPlex unit) and, many others.
As in the case of boosters, preamps want to raise the signal gain and volume up to a level that helps to achieve the right gain on amp's input but, with a distinguishable color. While in buffers, we usually two knobs (volume, gain) on clean buffers and, one more knob (treble, fatness, etc) in specializated boosters, in the case of pre-amps we can have a full tone-stack (treble, bass, mids).
Category Signal Followers
Family Tuners
Some time ago, digital tuners had less accuracy than analogic ones and, the response time of the analogic ones was clearly superior so, to tune the strings was easier (and expensiver) with an analogic tuner.
Nowadays, things seem to be reversed and, there are outstanding Tuners.
Usually, we want the tuner to be true bypass (to don't affect our signal), transparent related to impedance levels and, as accurated as possible, with a quick response to the pulsation of the string.
Current digital tuners have an accuracy (1 cent) better than the smallest interval that a human ear can distinguish (about 5 cents of tone) but, luthiers use very accurated tuners for their specializated work, with higher accuracy levels (0.1 and, enen 0.01 cents of tone).
The tuner is clearly a signal follower. It needs the cleanest signal directly coming from your guitar, to be able to catch the frequencies with accuracy.
Even that, in principle, it seems a "dummy" pedal, be sure you check the responsiveness of your tuner before choosing one and, be sure it works in true bypass mode and that, when switched on, it mutes your guitar (to tune in silence). Also, be sure you understand the display and that this one is highly visible in a natural position (pedal on floor and you standing up), even under high illumination levels.
Also, if you are using alternate tunings, be sure that your tune is able to let you to set up such a tunings, to help you in your work.
A tuner can be used also as an OFF switch. When pushed the guitar shuts up. If it is at the beginning of the chain or before time effects, last echo trails will be heared before complete silence.
As any signal follower pedal, its natural position is as early in the chain as possible. In principle, the tuner should be the first pedal but, we will see that sometimes, this is not possible.
Family Pitchers
One typical pitcher is an Octaver, that creates a secondary signal an octave higher or lower than the original signal, mixing both on the output but, Boss designed long time ago some Pitch Shifter units that were able to produce a secondary signal of any musical interval (second, third, forth, etc.).
We have also arpeggiators, that given an input note, create a sequence of notes following some pattern refered to some scale. Other similar pedal is the harmonizer, that creates one ore more different voices, with different intervals that are re-adapted depending on the scale.
The famous Whammy is some kind of harmonizer-pitch shifter pedal so, you can expect this one working best as early in the pedal chain as possible.
Family Filters
There are some other pedals that aren't creating a second voice shifting down or up the original signal but, they need a clean note to work properly.
This is the case of Auto-Wah or Filter-Q pedals, which response varies depending on signal's strenght, attack, phase, etc.
A typical filter pedal is the Wah, which natural position is quite well at the beginning of the chain.
Family synthetizers
Yes, even in our analogic world there are synthetizer pedals available, as the Electro-Harmonix Pog.
Some other pedals, like the MXR Blue Box, create a secondary voice that sounds very artifficial (synthetized) and, work better early in the pedal chain, as the rest of signal followers.
Pedal Effects: What they do? - Part 1
Introduction
Usually, any guitarist will have at least one pedal effect between his guitar and the amp but, why?.
Which kind of pedal effects do we have?. What are they useful for?.
When stacking several pedal effects, which is the right order on the chain?.
Pedal effects are like colors in a painter's palette. They allow as to color our sound to get some nuances that we cannot achieve with the guitar and amp alone and, as in the case of that painter's palette, we cannot abuse so much of a single color.
Let review the pedal cathegories that we have.
Categories of Pedal Effects
We can group the several families of effect pedals in some bigger groups. Later in this articles, these categories will make full sense.
Signal Followers
Signal followers are all those pedals that need a clean signal from the guitar to deliver their best.
One of the example is just the tuner, in order to tune our guitar, we need to feed a clean signal to the tuner, for maximum accuracy.
Pedals like Q-Filters, Pitchers, Arpeggiators, harmonizers, octavers, etc., all they need a clean signal because the effect is based on how that clean signal changes during the time.
Signal Recovery
Some pedals are just designed to restore part of the signal level that was eventually lost because of guitar's cable. Line Drivers are increasing the gain of the signal. Buffers are readjusting the output impedance to a level that's good for the amp or rest of pedals in the chain. Treble boosters are restoring or enhancing part of the high frequencies rolled off by the cable, etc.
More than trying to give a new color to the sound, those pedals are trying to restore what is missing in the original guitar' sound.
Gain Pedals
Similarly to Signal Recovery pedals, gain pedals are raising the signal level but, differently, gain pedals add some kind of color to the signal. These pedals can raise more or less the signal level on the whole or part of the frequential spectrum and, some of them are highly reequalizing the signal.
Example of those pedals are compressors, equalizers, overdrives, distortions and fuzzes.
Modulation Pedals
Modulation pedals are affecting in a cyclical way the signal, varying its phase, frequency or volume.
Even that most of gain effects can be achieved just with the right amp, modulation pedals are really special pedal effects that clearly modify the sound.
Phasers, Vibes, Flangers, Chorus, Vibratos, Tremolos are all them modulation pedals.
Time Pedals
Time pedals are those that create repetitions of the original signal during certain duration and, they were designed to restore the sense of space when playing in dry environments. They help to place the instrument whitin the mix, in the wanted spatial location.
Reverb and Delays are time pedals.
Link Types of Pedal Effects
How a pedal affects the the link with other pedals, while is on or while is off is what I mean a Link Type. We can have following types.
Hardwired / True Bypass
 A Hardwired or True Bypass pedal remains off of the chain when switched off. The conductors of the input jack are directly linked to the conductors of the output jack.
Benefits are that those pedals will not disturb the chain if they run out of batery. Since the signal is hardwired from jack to jack, there is no need of a batery to power the signal.
Other characteristic is that the input impedance (delivered by previous pedal) is the same on the output, since there is no electronics component that can alter it.
In fact, when a True Bypass pedal is off, the effect is quite similar to just extend the length of the cable just a bit (the length of wires that link input to output jacks).
Main drawback is that, since is just some virtual extension of our cables, we have to sum up the length of cable that goes from guitar to pedal, the jumper inside the pedal and the cable that goes form pedal to amp. Most of times, once we reach a "virtual length" of about 10m (30ft), loss of signal level and roll off of frequencies is noticiable.
So, it is very often to see at least one Buffer or buffered pedal within the pedal chain to raise a bit the signal and restore that impedance that the amp is expecting on its inputs.
Pure True Bypass pedals, doesn't have a buffer neither when switched on.
Buffered
 A buffered pedal routes the input into an input-buffer and the output into an output-buffer.
A buffer is some electronic design that addapts impedance levels.
The input buffer is getting the impedance expected on its input and, modifying it to give the impedance that pedal's components need (by example, transistors).
The output buffer is getting the impedance that exits the pedal effect and, alters it to deliver the best impedance level at its output.
Theoretically, a perfect pedal would have an infinite input impedance and a zero output impedance.
That not possible in real world but, a good relation is to have inputs impedances of 1 MOhm (same that the amp expects) and output impedances of about 600 Ohm (similar to micro levels). At least, a relation 10:1 is a good thing.
Buffered pedals are affecting the signal. Even than the effect itself can be off, the input and output impedances are being transformed by pedal's buffers.
Main drawbacks are that buffered pedals need battery to work so, if battery goes off, the whole chain of pedals goes off so, we have a blackout.
Other drawback is that, depending on the position of the buffered pedal, the operation of the following pedal effect can be seriously affected, delivering a bad sound, by example, if the output impedance of the buffered pedal doesn't match the needs of the following pedal.
Buffered Bypass
 Buffered Bypass is a mix of the other two.
While the pedal is off, the link is Bypass so, nothing happens if we run out of battery and, we have the good and the bad of such a link.
As soon as the effect is switched off, the signal is being buffered, in the same way that we were discussing above, with the good and the bad.
This kind of pedals can be a surprise because their behavior change when switched off or switched on. If they are in a position not affecting previous or following pedals, everything is OK.
So, you need to check this pedal in both conditions, before being sure that it's not affecting the rest of chain.
Usually, any guitarist will have at least one pedal effect between his guitar and the amp but, why?.
Which kind of pedal effects do we have?. What are they useful for?.
When stacking several pedal effects, which is the right order on the chain?.
Pedal effects are like colors in a painter's palette. They allow as to color our sound to get some nuances that we cannot achieve with the guitar and amp alone and, as in the case of that painter's palette, we cannot abuse so much of a single color.
Let review the pedal cathegories that we have.
Categories of Pedal Effects
We can group the several families of effect pedals in some bigger groups. Later in this articles, these categories will make full sense.
Signal Followers
Signal followers are all those pedals that need a clean signal from the guitar to deliver their best.
One of the example is just the tuner, in order to tune our guitar, we need to feed a clean signal to the tuner, for maximum accuracy.
Pedals like Q-Filters, Pitchers, Arpeggiators, harmonizers, octavers, etc., all they need a clean signal because the effect is based on how that clean signal changes during the time.
Signal Recovery
Some pedals are just designed to restore part of the signal level that was eventually lost because of guitar's cable. Line Drivers are increasing the gain of the signal. Buffers are readjusting the output impedance to a level that's good for the amp or rest of pedals in the chain. Treble boosters are restoring or enhancing part of the high frequencies rolled off by the cable, etc.
More than trying to give a new color to the sound, those pedals are trying to restore what is missing in the original guitar' sound.
Gain Pedals
Similarly to Signal Recovery pedals, gain pedals are raising the signal level but, differently, gain pedals add some kind of color to the signal. These pedals can raise more or less the signal level on the whole or part of the frequential spectrum and, some of them are highly reequalizing the signal.
Example of those pedals are compressors, equalizers, overdrives, distortions and fuzzes.
Modulation Pedals
Modulation pedals are affecting in a cyclical way the signal, varying its phase, frequency or volume.
Even that most of gain effects can be achieved just with the right amp, modulation pedals are really special pedal effects that clearly modify the sound.
Phasers, Vibes, Flangers, Chorus, Vibratos, Tremolos are all them modulation pedals.
Time Pedals
Time pedals are those that create repetitions of the original signal during certain duration and, they were designed to restore the sense of space when playing in dry environments. They help to place the instrument whitin the mix, in the wanted spatial location.
Reverb and Delays are time pedals.
Link Types of Pedal Effects
How a pedal affects the the link with other pedals, while is on or while is off is what I mean a Link Type. We can have following types.
Hardwired / True Bypass
Benefits are that those pedals will not disturb the chain if they run out of batery. Since the signal is hardwired from jack to jack, there is no need of a batery to power the signal.
Other characteristic is that the input impedance (delivered by previous pedal) is the same on the output, since there is no electronics component that can alter it.
In fact, when a True Bypass pedal is off, the effect is quite similar to just extend the length of the cable just a bit (the length of wires that link input to output jacks).
Main drawback is that, since is just some virtual extension of our cables, we have to sum up the length of cable that goes from guitar to pedal, the jumper inside the pedal and the cable that goes form pedal to amp. Most of times, once we reach a "virtual length" of about 10m (30ft), loss of signal level and roll off of frequencies is noticiable.
So, it is very often to see at least one Buffer or buffered pedal within the pedal chain to raise a bit the signal and restore that impedance that the amp is expecting on its inputs.
Pure True Bypass pedals, doesn't have a buffer neither when switched on.
Buffered
A buffer is some electronic design that addapts impedance levels.
The input buffer is getting the impedance expected on its input and, modifying it to give the impedance that pedal's components need (by example, transistors).
The output buffer is getting the impedance that exits the pedal effect and, alters it to deliver the best impedance level at its output.
Theoretically, a perfect pedal would have an infinite input impedance and a zero output impedance.
That not possible in real world but, a good relation is to have inputs impedances of 1 MOhm (same that the amp expects) and output impedances of about 600 Ohm (similar to micro levels). At least, a relation 10:1 is a good thing.
Buffered pedals are affecting the signal. Even than the effect itself can be off, the input and output impedances are being transformed by pedal's buffers.
Main drawbacks are that buffered pedals need battery to work so, if battery goes off, the whole chain of pedals goes off so, we have a blackout.
Other drawback is that, depending on the position of the buffered pedal, the operation of the following pedal effect can be seriously affected, delivering a bad sound, by example, if the output impedance of the buffered pedal doesn't match the needs of the following pedal.
Buffered Bypass
While the pedal is off, the link is Bypass so, nothing happens if we run out of battery and, we have the good and the bad of such a link.
As soon as the effect is switched off, the signal is being buffered, in the same way that we were discussing above, with the good and the bad.
This kind of pedals can be a surprise because their behavior change when switched off or switched on. If they are in a position not affecting previous or following pedals, everything is OK.
So, you need to check this pedal in both conditions, before being sure that it's not affecting the rest of chain.
25 June 2012
Guitar Amp: How it works? - Part 5
Elementary, my dear Watson
After seen the several blocks of that Fender's Champ schema, we can guess following things:
The output type (6V6GT) will provide strong basses and a thick distortion (instead of crunchy or creamy), the sound can be easily missed in the mix (not cutting the mix enough).
This amp is probably well suited for Vintage-alike sounds and, possible for Blues Territory, every time that very fast riffs aren't needed (the tube rectifier creates some kind of slight delay in amp's responsiveness).
Because of its Class A design, we can expect a warm and rich tone.
Let me find some youtube demo of this amp around and let see how close we were with our deductions.
This little amp is a clear example that we don't need so complex designs to achieve outstanding sounds and that, usually, less is more. The low wattage of this amp allows us to crank it in any place, at home, at studio so, you can always get the loved harmonics that tubes generate, achieving a sound full of nuances.
Some Reflexions
For a guitarist, it makes no sense to go till the last electronics detail of an amp but, to understand the basics is a good thing to understand how to achieve the best from our amps.
We discussed that the signal is really being created by the last output tube, which signal is being modulated by its previous gain tube, which signal is being modulated but his previous gain stage and so goes on, until we reach the first stage, where the signal generated at this stage is being modulated by our guitar' signal (remember that key-copying machine that we talked about). That makes me think that the amp has more relevance than the guitar itself, since the real tone is generated within the amp, just copying the nuances from our guitar' signal.
Sometimes, we are expending way more money in a new guitars than in an amp that can satisfy our needs.
By, example, we can go for that Gibson '59 LP or Fender Custom Shop or PRS private Stock or any other kind of guitar with a prohibitive price and, use one of the cheapest amps in the planet.
This is very human but, definitively wrong. Sometimes, you can achieve a better result pairing a middle-priced guitar with an outstanding sounding +amp. The really important thing here is to have a comfortable guitar, with a set of pickups that can cover the sounds you are after. Let the amp to extract all the juice from your guitar.
Rightsizing the amp has a lot of benefits. Choose an amp that you can crank in your usual environment.
If you are usually using your guitar and amp at home, don't go for a 50W or 100W monster , because you will never get the best from that amp. Those need to go really loud to sing as the should.
You will early discover that even 5W in a Tube Amp is really loud for a flat and, way louder than those "dormitory levels" that we sometimes want (to no disturb rest of family and neighbors).
When going to most of small Recording Studios, you will find that high powered amps are usually an issue. The sound tech will start to claim about the loudness of that amp, asking you to roll off volume and, therefore, making you to loose the mojo coming from that cranked amp.
Same is usually happening in small venues, where the sound is all passed thru a Mix board and, where the overall loudness can be even lower than your amp's loudness when cranked.
I know all this is really easy to say and difficult to follow. I was also warned about all this but, you know, we all have the picture inlayed in our brain, those Marshall Full Stacks that our rock heroes used in their concerts are a heavy load for our preferences. If we buy something smaller, we think we aren't reaching the heaven but, it's the same case as to use a Porsche 911 to drive at 40 Km/h speed. OK, you are getting all the attention and, maybe you will attract some girl but, at the end, you are loosing all the fun that the car can bring to you.
Usually, an amp of 15W to 30W can cover the most of ground. It can be used at home (with some attenuator, for sure), in Studio environment and even being miked into a PA in a venue or, do an small venue without mics. Think that: you can make that amp to sound louder just with a speaker swapping.
Most of people confuses amp's power with loudness.
The output power of the amp is the power that the amp has available to move a speaker or set of speakers but, what at the end determines the overall loudness is the speaker itself.
One amp can sound weaker or louder depending on the speaker's efficiency.
By example, with same power handling capabilities and impedance, one speaker can be delivering 95 dB, while other can deliver 105 dB of SPL (Sound Preassure Level).
A difference of 10 dB in speaker's loudness seems few?. Let analyze that.
The difference between a 100W amp and a 50W (maintaining everything else equal) is just +3dB of volume increase. From 25W to 100W we have a +6 dB of volume increase and, from 12.5W to 100W we have a +9dB of volume increase. Do you get the picture?.
To choose an alternative speaker with +3dB can have the same effect as doubling the power output of your amp (despite of other nuances that a big amp can bring to the sound).
This is a well known case with the Vox AC30, a 30W amp that usually sounds way louder than some 50W and 100W amps. The trick is that the AC30 was using the highly efficient Celestion Alnico Blue while most of Fender's were using a less efficient Jensen speaker, by example.
Sometimes a low power amp can sound as biga as a high powered amp, depending on the set of speakers so, don't be fooled with amp's power. This never says the whole truth.
We didn't talk about speakers (because it's a world in itself) but, speakers are so important as the rest of parts in an amp. Speakers are more or less efficient in some frequency ranges and, they can have their own equalization of the sound generated in the amp. Speakers add their own distortion and have their own break up spot, also.
So, to pair the exactly wanted speaker with the exactly wanted amp is some kind of art and, a good (but expensive) experimentation way.
We can be expending a lot of money swapping tubes, while maybe just a change of speaker can do the trick.
Tube swapping as well as speaker swapping, are expensive experiences.
I would like to see in the future an instrument' shop having an area were you can test YOUR amp with different tube makers/models and speakers, to choose the most interesting ones for your needs.
My last reflexion is about the willing of buying an amp with the expectation of to change its sound later.
In the same way that you will be never able to make a Gibson LP to sound like a Fender Stratocaster, and viceversa, you will be never able to make a low-gain amp to sound as a high-gain monster.
We saw that the foundational tone is being sculpted within the amp and, it depends on several topologies, the different biasing values, tube types, etc.
We can change some details of the overall foundational tone. We can achieve a crunchier, or creamier, or thicker distortion by swapping some tubes (each tube can deliver a different distortion grain) or, we can wider the clean headroom or make the amp to break up earlier (working on the first stage and PI). We can make the amp to sound weaker or louder, swapping the speaker, or make it to enhance a bit more certain frequential range but, we cannot change the basis foundational tone.
A vintage-alike amp, that break-up just in slight distortion will never have that thick wall of sounds that a high gain monster with several cascading gain stages will produce. The opposite is also true.
Sometimes, it is better to run a good amp, with a very simple design and outstanding clean tone and, to use pedal effects to achieve different levels of gain and distortion sounds. For sure, the best distortion that you can always achieve is the one produced in the own amp but, at least, you can emulate most of the goods of a high gain monster by using a high gain distortion pedal in front an outstanding clean sounding amp.
David Gilmour achieves all his broad palette of sounds running a bunch of pedals in front of its outstanding clear sounding Hiwatt amps.
A cheaper experimentation path is just to understand what the pre-amp and power amp does to your sound. If you have gain and volume controls, theoretically you can get a better control of your pre-amp and power sections separately.
Lower the gain (to avoid the pre-amp to distort) and maximize the volume (to make the power amp to distort). Play with several volume levels (usually, interesting things start around 7 of a 10 dial). Increase bit a bit the gain and hear what happens. Then go opposite.
Lower the volume knob until you clearly hear your instrument and roll on the gain knob (usually, interesting things occur around 7 of a 10 dial). Hear the sound and then, begin to increase the volume knob, while hearing the changes. This should let you to achieve the most preferred sound from your amp, with the right amount of gain and volume.
If you have a tone stack, take into account the following: usually the tone control closer to the input of the amp is the one that has more relevance about the overall tone of the amp, moving the basis frequential range up or down, the rest of tone knobs just tame a bit that foundational tone.
So, imagine that we have Bass, Mid and Treble, in that order. Put your Mid and Treble all down and, start rolling on the Bass knob until you get a nice presence of basses, without going boomy or muddy. Then, start to roll on the Mid knob, until you get a nice presence of middle frequencies, without going honky or strident. Then start to roll on the Treble knob until you get a good definition of trebles, without being piercing.
Finally, tweak a bit more all knobs to find the best spot, because all the tone stack works together, as an unit.
If you have a Presence knob, start with it after you worked the tone stack. Presence knob should increase the high-end frequencies and give some air to the sound but, overdoing it you will obtain piercing trebles that can fatigue the ear in short time.
If you have a Contour control (some kind of set of basic equalization values), start with all tone control in middle position and roll on the Contour knob, until you get the basis equalization setting you want to work on, then start with the tone stack and presence knobs as mentioned above.
Take into account that everything can change as soon as you swap your guitar. Maybe what was good for an LP will not work for a Strato so, you could be forced to re-dial your settings very often.
Also, take into account that tone controls are intended to adapt the amp' sound to the environment. Maybe, in your practice room there is more resonance of certain range of frequencies but, once you move your amp to the Studio, the room characteristics change as well and, this usually needs you to rework the amp' settings.
The more you go experienced with amp's controls and how they change with every type of guitar and room, the easier it will be to readjust the controls.
In my honest opinion, it worths the spent time to play with all the controls at least once for each amp, carefully hearing the sound (not how good and exciting is your playing) and understanding how it changes with every knob's twist.
Finally, have into account that tubes need to run for between half to one hour to be in their best performance level so, play with those adjustments just after warming up the amp.
Also, take into account that a new speaker needs some time to stabilize and deliver its best. Sometimes, we are talking about 6 months to 1 year so, be patient with your new amp.
There are some technics to speed up the break-up time of the speaker (as described in Celestion' site), where we can achieve the 90% of the speaker's characteristics in a single session of about 1 hour but, for the 100% we will need that long time.
Well there is a lot more than can be discussed about amps and, a bunch of different implementation details for each amp design but, I am not skilled for it and, I am not in the need to go so far in electronics.
I hope that I made few mistakes while describing amp's characteristics but, please, if you find something that I should correct, let me know. No offense. I am not having the only truth and, maybe I misunderstood something when going deeper into electronics stuff.
What I really wish is that this info can be enough to make you aware of the basics about what is happening inside your amp and that can push your curiosity to know more about this imprescindible piece of gear for every electric guitarist.
After seen the several blocks of that Fender's Champ schema, we can guess following things:
- The amp has 3 tubes
- V1 is the only pre-amp tube. Tube is type 12AX7. First triode is the first gain stage and second triode is the second gain stage and Driver. So, this tube will wear at the same speed than the power tube.
- V2 is the single Power or Output tube. Tube is type 6V6GT so, the power of this amp could be around 5W to 7W, a low wattage amp that will not work for a gig but, that should work really good for home practicing and studio recording.
- V3 is the tube rectifier. Tube is type 5Y3GT. This means that this amp will have that sag compression that tube rectifiers give.
- The amp is designed to work with a single speaker with impedance of 4 Ohms.
- The amp has a single-ended Class A, cathode-biased topology so, it will not need to re-bias the output tube after substitution.
The output type (6V6GT) will provide strong basses and a thick distortion (instead of crunchy or creamy), the sound can be easily missed in the mix (not cutting the mix enough).
This amp is probably well suited for Vintage-alike sounds and, possible for Blues Territory, every time that very fast riffs aren't needed (the tube rectifier creates some kind of slight delay in amp's responsiveness).
Because of its Class A design, we can expect a warm and rich tone.
Let me find some youtube demo of this amp around and let see how close we were with our deductions.
This little amp is a clear example that we don't need so complex designs to achieve outstanding sounds and that, usually, less is more. The low wattage of this amp allows us to crank it in any place, at home, at studio so, you can always get the loved harmonics that tubes generate, achieving a sound full of nuances.
Some Reflexions
For a guitarist, it makes no sense to go till the last electronics detail of an amp but, to understand the basics is a good thing to understand how to achieve the best from our amps.
We discussed that the signal is really being created by the last output tube, which signal is being modulated by its previous gain tube, which signal is being modulated but his previous gain stage and so goes on, until we reach the first stage, where the signal generated at this stage is being modulated by our guitar' signal (remember that key-copying machine that we talked about). That makes me think that the amp has more relevance than the guitar itself, since the real tone is generated within the amp, just copying the nuances from our guitar' signal.
Sometimes, we are expending way more money in a new guitars than in an amp that can satisfy our needs.
By, example, we can go for that Gibson '59 LP or Fender Custom Shop or PRS private Stock or any other kind of guitar with a prohibitive price and, use one of the cheapest amps in the planet.
This is very human but, definitively wrong. Sometimes, you can achieve a better result pairing a middle-priced guitar with an outstanding sounding +amp. The really important thing here is to have a comfortable guitar, with a set of pickups that can cover the sounds you are after. Let the amp to extract all the juice from your guitar.
Rightsizing the amp has a lot of benefits. Choose an amp that you can crank in your usual environment.
If you are usually using your guitar and amp at home, don't go for a 50W or 100W monster , because you will never get the best from that amp. Those need to go really loud to sing as the should.
You will early discover that even 5W in a Tube Amp is really loud for a flat and, way louder than those "dormitory levels" that we sometimes want (to no disturb rest of family and neighbors).
When going to most of small Recording Studios, you will find that high powered amps are usually an issue. The sound tech will start to claim about the loudness of that amp, asking you to roll off volume and, therefore, making you to loose the mojo coming from that cranked amp.
Same is usually happening in small venues, where the sound is all passed thru a Mix board and, where the overall loudness can be even lower than your amp's loudness when cranked.
I know all this is really easy to say and difficult to follow. I was also warned about all this but, you know, we all have the picture inlayed in our brain, those Marshall Full Stacks that our rock heroes used in their concerts are a heavy load for our preferences. If we buy something smaller, we think we aren't reaching the heaven but, it's the same case as to use a Porsche 911 to drive at 40 Km/h speed. OK, you are getting all the attention and, maybe you will attract some girl but, at the end, you are loosing all the fun that the car can bring to you.
Usually, an amp of 15W to 30W can cover the most of ground. It can be used at home (with some attenuator, for sure), in Studio environment and even being miked into a PA in a venue or, do an small venue without mics. Think that: you can make that amp to sound louder just with a speaker swapping.
Most of people confuses amp's power with loudness.
The output power of the amp is the power that the amp has available to move a speaker or set of speakers but, what at the end determines the overall loudness is the speaker itself.
One amp can sound weaker or louder depending on the speaker's efficiency.
By example, with same power handling capabilities and impedance, one speaker can be delivering 95 dB, while other can deliver 105 dB of SPL (Sound Preassure Level).
A difference of 10 dB in speaker's loudness seems few?. Let analyze that.
The difference between a 100W amp and a 50W (maintaining everything else equal) is just +3dB of volume increase. From 25W to 100W we have a +6 dB of volume increase and, from 12.5W to 100W we have a +9dB of volume increase. Do you get the picture?.
To choose an alternative speaker with +3dB can have the same effect as doubling the power output of your amp (despite of other nuances that a big amp can bring to the sound).
This is a well known case with the Vox AC30, a 30W amp that usually sounds way louder than some 50W and 100W amps. The trick is that the AC30 was using the highly efficient Celestion Alnico Blue while most of Fender's were using a less efficient Jensen speaker, by example.
Sometimes a low power amp can sound as biga as a high powered amp, depending on the set of speakers so, don't be fooled with amp's power. This never says the whole truth.
We didn't talk about speakers (because it's a world in itself) but, speakers are so important as the rest of parts in an amp. Speakers are more or less efficient in some frequency ranges and, they can have their own equalization of the sound generated in the amp. Speakers add their own distortion and have their own break up spot, also.
So, to pair the exactly wanted speaker with the exactly wanted amp is some kind of art and, a good (but expensive) experimentation way.
We can be expending a lot of money swapping tubes, while maybe just a change of speaker can do the trick.
Tube swapping as well as speaker swapping, are expensive experiences.
I would like to see in the future an instrument' shop having an area were you can test YOUR amp with different tube makers/models and speakers, to choose the most interesting ones for your needs.
My last reflexion is about the willing of buying an amp with the expectation of to change its sound later.
In the same way that you will be never able to make a Gibson LP to sound like a Fender Stratocaster, and viceversa, you will be never able to make a low-gain amp to sound as a high-gain monster.
We saw that the foundational tone is being sculpted within the amp and, it depends on several topologies, the different biasing values, tube types, etc.
We can change some details of the overall foundational tone. We can achieve a crunchier, or creamier, or thicker distortion by swapping some tubes (each tube can deliver a different distortion grain) or, we can wider the clean headroom or make the amp to break up earlier (working on the first stage and PI). We can make the amp to sound weaker or louder, swapping the speaker, or make it to enhance a bit more certain frequential range but, we cannot change the basis foundational tone.
A vintage-alike amp, that break-up just in slight distortion will never have that thick wall of sounds that a high gain monster with several cascading gain stages will produce. The opposite is also true.
Sometimes, it is better to run a good amp, with a very simple design and outstanding clean tone and, to use pedal effects to achieve different levels of gain and distortion sounds. For sure, the best distortion that you can always achieve is the one produced in the own amp but, at least, you can emulate most of the goods of a high gain monster by using a high gain distortion pedal in front an outstanding clean sounding amp.
David Gilmour achieves all his broad palette of sounds running a bunch of pedals in front of its outstanding clear sounding Hiwatt amps.
A cheaper experimentation path is just to understand what the pre-amp and power amp does to your sound. If you have gain and volume controls, theoretically you can get a better control of your pre-amp and power sections separately.
Lower the gain (to avoid the pre-amp to distort) and maximize the volume (to make the power amp to distort). Play with several volume levels (usually, interesting things start around 7 of a 10 dial). Increase bit a bit the gain and hear what happens. Then go opposite.
Lower the volume knob until you clearly hear your instrument and roll on the gain knob (usually, interesting things occur around 7 of a 10 dial). Hear the sound and then, begin to increase the volume knob, while hearing the changes. This should let you to achieve the most preferred sound from your amp, with the right amount of gain and volume.
If you have a tone stack, take into account the following: usually the tone control closer to the input of the amp is the one that has more relevance about the overall tone of the amp, moving the basis frequential range up or down, the rest of tone knobs just tame a bit that foundational tone.
So, imagine that we have Bass, Mid and Treble, in that order. Put your Mid and Treble all down and, start rolling on the Bass knob until you get a nice presence of basses, without going boomy or muddy. Then, start to roll on the Mid knob, until you get a nice presence of middle frequencies, without going honky or strident. Then start to roll on the Treble knob until you get a good definition of trebles, without being piercing.
Finally, tweak a bit more all knobs to find the best spot, because all the tone stack works together, as an unit.
If you have a Presence knob, start with it after you worked the tone stack. Presence knob should increase the high-end frequencies and give some air to the sound but, overdoing it you will obtain piercing trebles that can fatigue the ear in short time.
If you have a Contour control (some kind of set of basic equalization values), start with all tone control in middle position and roll on the Contour knob, until you get the basis equalization setting you want to work on, then start with the tone stack and presence knobs as mentioned above.
Take into account that everything can change as soon as you swap your guitar. Maybe what was good for an LP will not work for a Strato so, you could be forced to re-dial your settings very often.
Also, take into account that tone controls are intended to adapt the amp' sound to the environment. Maybe, in your practice room there is more resonance of certain range of frequencies but, once you move your amp to the Studio, the room characteristics change as well and, this usually needs you to rework the amp' settings.
The more you go experienced with amp's controls and how they change with every type of guitar and room, the easier it will be to readjust the controls.
In my honest opinion, it worths the spent time to play with all the controls at least once for each amp, carefully hearing the sound (not how good and exciting is your playing) and understanding how it changes with every knob's twist.
Finally, have into account that tubes need to run for between half to one hour to be in their best performance level so, play with those adjustments just after warming up the amp.
Also, take into account that a new speaker needs some time to stabilize and deliver its best. Sometimes, we are talking about 6 months to 1 year so, be patient with your new amp.
There are some technics to speed up the break-up time of the speaker (as described in Celestion' site), where we can achieve the 90% of the speaker's characteristics in a single session of about 1 hour but, for the 100% we will need that long time.
Well there is a lot more than can be discussed about amps and, a bunch of different implementation details for each amp design but, I am not skilled for it and, I am not in the need to go so far in electronics.
I hope that I made few mistakes while describing amp's characteristics but, please, if you find something that I should correct, let me know. No offense. I am not having the only truth and, maybe I misunderstood something when going deeper into electronics stuff.
What I really wish is that this info can be enough to make you aware of the basics about what is happening inside your amp and that can push your curiosity to know more about this imprescindible piece of gear for every electric guitarist.
Guitar Amp: How it works? - Part 4
Putting all together
During the three previous parts, we discussed a while about the different parts of the amp, what they do individually and what role do they play in the amp as a whole set.
Now, we will use some very easy amp design to identify the parts that we were describing.
I am not going to discuss it in depth, since I have no electronics skills but, I will try to let you know the basics whithout having to deal with highly tech stuff.
Sample: Fender's '57 Champ
This little amp has been included in a waste amount of record tracks. Even being one of the simple designs, this amps delivers a really nice sound so, let me guide you in its design.
First of all, let see the complete diagram. Please, remember to double-click over the images to see them at real size.

There is some information that can be known at a single glance, just reviewing a bit the schema, by example:
The Power Transformer (PT)
Look at this picture:

The block highlighted with that red rectangle, corresponds to the PT and everything related to get the source power from our wall's mains and transform such a power to different levels to satisfy the specific power needs of every part of the amp.
Let zoom in:

At left hand, you can see the mains plug, followed with the power switch of the amp and some protective components (fuse, etc) until we reach the Primary coil of the PT (inside that red rectangle).
On the right side of the PT, we can see three coils that support the different tappers of the Secondary.
The lowest coil seems to be providing very few power (3.3VAC = 3.3 Volts of Alternate Current) and, it seems just lighting the ON light of the amp, with some protection around (see Fuse F3, by example).
Also, It seems to be providing the power needed for the filaments (cathodes) of the two tubes of this amp, see V1-C and V2-B 6V6GT labels at right hand, before the bulbe symbol.
The two other coils above, are delivering different levels of power to be used by the rest of the amp.
Special interest has the middle coil, which extreme conductors go to a tube rectifier (inside that green circle).
I think we didn't talk about rectifiers before. The rectifier transforms the input power delivered as AC (Alternate Current) to DC power (Direct Current). Most of the components inside the amp will work with DC power, instead of the typical AC power that we can find in our mains sources.
This amp has a tube rectifier but, nowadays is usually more common to find a solid state rectifier, instead.
Tube rectifiers doesn't work in a very lineal way, so, they produce some kind of compression and a behavior that is called rectifier' sag.
Solid state rectifiers are way more linear and quicker in their response. While a tube rectifier can have a bit of delay in the responsiveness of the amp, solid state rectifiers react instantenely so, tube rectifiers are usually found in Vintage and Vintage-voiced amps.
This tube rectifier has an octal socket (see max pin number is 8) and it's a double triode (see the two plates inside the blue shape). As per the schema, it goes on position V3 (the third tube in a row).
We don't need to go further. The PT is transforming the power of the input into several levels of power, depending on the needs of the rest of components of the amp. The Rectifier is transforming some of that power delivered by the PT in one tap, from AC to DC and then, the rest of amp is being powered.
First amplification stage
Let me show you the block we are going to zoom now:

And, let zoom in, then:

We can see that this amp has two imput jacks (input J1 and J2). The resistor R1 of 1M is there to avoid noise in the circuit if nothing is plugged to none of those inputs. On the picture, they are enclosed in that green rectangle.
The first real component that our guitar signal crosses is just the resistor (R3 for J2 and R2 for J1) named grid biasing resistor. In this picture, those two resistors are enclosed in a red rectangle.
This resistor has as main goal to avoid some inestability within the tube, and filters a range of frequencies that are way lower than the lower frequency that a guitar signal generates so, it's not specifically affecting the "tone" ... or does it?. Well there are large discussions about which components affect to the tone and, which are the best materials or models to use for each position but, I will not enter in such a discussion.
You see that after crossing that grid biasing resistor, the signal path is directly entering in the grid (dashed horizontal line) of the first triode of the first tube (V1-A = triode A of tube 1). This first triode of the tube is enclosed in a yellow rectangle in this picture. The upper 'dash' within the tube corresponds to the anode or plate. The lower 'bracket' corresponds to the cathode or filament.
The three numbers close to those three elements are the pin number. So, pin #1 is the plate (output of the triode), pin #2 is the grid (that regulates the flow of the electrons beam released by the cathode) and pin #3 is the cathode (generator of electrons).
Time to remember how this triode works and first surprise for you.
Remember, the cathode, highly resistive goes hot when receiving energy (from the PT), while its hot, his surface starts to release electrons that create a beam that travels to the plate (polarized positive).
The grid goes negative, until being more negative or equal negative as the plate to interrupt the flow of the beam so, delivering no output on cathode.
Do you know that key-copying machines that you can see in some supermarkets?. You go with the key of your home and you want them to make you an exact copy of that key (and we know that, sometimes, the copy isn't 100% perfect).
Well, that's exactly what is happening at every single triode within the amp!.
The triode is some kind of signal-copying machine but, with the difference that the copied signal is being scalated way up than the original (more powerful).
But, what does it really mean?.
Surprise, surprise: your guitar signal deaths just in the grid of the first triode!.
The signal that will be propagated to the rest of amp at this time comes from the beam of electrons released by the cathode but, the shape of that signal will be modulated with the signal characteristics that come in the grid.
In fact, when the output of this triode enters in the following triode (cascaded gain), same thing happens.
The new triode is the one creating the signal that will be propagated to the rest of amp and, the output of the first triode is just "modulating" or "sculpting" the "shape" of that signal.
We already said that every triode (tube or solid state) should be biased but, a bias should be applied to every of its three components.
The resistor R5 in that purple rectange is biasing the anode or plate. This resistor will fix the range of voltage that the plate can variate when the beam from the cathode is being regulated with the help of the grid.
The resistor R4 in that blue rectangle, is biasing the cathode and, determines the amount of gain for this triode. Also, we can see a capacitor C1 bypassing the resistor. This capacitor has an effect basically on the feeling of low end frequencies. Depending on its value, the sound can have more or less presence on basses.
So, this is what we will typically see around a single gain stage triode.
I surounded one more componente inside that grey rectangle, capacitor C2 is usually named a coupling capacitor. It's called like this because it couples (links) two amplification stages. The function of that capacitor is basically to avoid the output of triode 1 to come back from next triode 2, it's some kind of door that opens in a single way (more or less, you get the idea).
Second amplification stange and Driver
Let see the block we are going to face now:

Let zoom in:

It seems quite well the same as the first stage, right?.
We can recognize quite well the same components with minor differences.
Firstly, the grid biasing resistor (that was a fixed value resistor) has been substitued here with a potentiomer (variable resistor). The input for this pot is just the output of the first stage, after crossing the coupling cap.
The output of that pot is the input for the grid of the second triode of the first (and only) preamp tube (V1-B).
You can see that this grid biasing variable resistor is called VOLUME and, it corresponds to the knob named Volume that you will see in the front of the amp and, yes, its function is to regulate the amount of volume of the signal that will be delivered to the power amp. When rolled off, the amp will shut up.
Is in this position, just before the grid of the second triode, where we usually find the so called Tone Stack. In this case, this amp has no more controls than just a single volume knob but, most of amps can stack here controls for basses, mids and trebles and, on amps with more than two stages, we can even found a Gain pot instead of Volume, by example. It's all about amp's design, at the end.
You can see that the bypass cap that was present in the cathode biasing resistor (R7 in this stage) is missing here. That cap is usually present just in the first amplification stage. Some amps, could have a switch to enhance basses, this switch is usually adding such a capacitor to the circuit or removing it (if no enhancement of basses is needed).
Like in the case of the first stage we already discussed, here R7 is the cathode biasing resistor, R8 is the plate biasing resistor and C3 is the coupling cap that will link this amplification stage with the following one (that, in this case is just the power tube), as we will see below.
Since this triode is the last stage between the preamp and the power sections, this is the Driver.
Power Tube
Let see the block we are going to work now.

Let zoom in:

The tube is clearly a pentode. See those three grids (dashed lines) between the cathode (pin 8) and anode (pin 3). Our well known grid is in pin 5 (the lowest dashed line). The upper grid is linked to the cathode so, same resistor that biases cathode is biasing that grid. The middle grid (pin 4) has it's own biasing resistor (R11).
So, the output of the driver (seen previously) goes thru the coupling cap C3 and enters in the grid (pin 5).
Resistance R9 is biasing the grid. We see here a difference. Instead of having the resitor in the middle of signal's path (as we have seen in the two pre-amp stages), resistor is connected to ground, in the same way as the biasing resistor for cathode is. This is known as a cathode-biased arrangement and, what at the end means to us is that this tube doesn't needs to be re-biased after substitution. This is also supported because we cannot see any variable resistor around to re-bias the tube.
Resistor R10 is biasing the cathode (setting the gain factor) and, we see coming back this bypass cap (C4) that will affect the amount of basses in the signal, making the amp to sound thicker and warmer.
The output of the tube is the plate or anode, in pin 3, which signal is being directly sent to the OT.
So, that single Power tube, together with the fact that is cathode-biased points to a Class A cathode-biased amp topology but, let take a look to the OT, first.
Output Transformer
Let first identify the block:

And, zoom in:

In this case, we see a single tap in the Secondary of the OT. The OT is adjusting the power output for an impedance of 4 Ohms so, an speaker with an impedance of 4 Ohms is expected there.
As I said, we can hung there speakers with higher impedances (8, 16, 32 Ohms) but, in that case, we are lowering the output power and overall volume.
Usually, the OT will have more than one tap and, at least 8 Ohms and 16 Ohms taps are present in most of amps.
During the three previous parts, we discussed a while about the different parts of the amp, what they do individually and what role do they play in the amp as a whole set.
Now, we will use some very easy amp design to identify the parts that we were describing.
I am not going to discuss it in depth, since I have no electronics skills but, I will try to let you know the basics whithout having to deal with highly tech stuff.
Sample: Fender's '57 Champ
This little amp has been included in a waste amount of record tracks. Even being one of the simple designs, this amps delivers a really nice sound so, let me guide you in its design.
First of all, let see the complete diagram. Please, remember to double-click over the images to see them at real size.

There is some information that can be known at a single glance, just reviewing a bit the schema, by example:
- It has a single preamp tube, one of its triodes should be the Driver or PI so, it has a single preamp amplifying stage (the first triode).
- It has a single power tube.
- It has a tube rectifier
- It's single ended
- Probably, this is a Class A amp.
The Power Transformer (PT)
Look at this picture:

The block highlighted with that red rectangle, corresponds to the PT and everything related to get the source power from our wall's mains and transform such a power to different levels to satisfy the specific power needs of every part of the amp.
Let zoom in:

At left hand, you can see the mains plug, followed with the power switch of the amp and some protective components (fuse, etc) until we reach the Primary coil of the PT (inside that red rectangle).
On the right side of the PT, we can see three coils that support the different tappers of the Secondary.
The lowest coil seems to be providing very few power (3.3VAC = 3.3 Volts of Alternate Current) and, it seems just lighting the ON light of the amp, with some protection around (see Fuse F3, by example).
Also, It seems to be providing the power needed for the filaments (cathodes) of the two tubes of this amp, see V1-C and V2-B 6V6GT labels at right hand, before the bulbe symbol.
The two other coils above, are delivering different levels of power to be used by the rest of the amp.
Special interest has the middle coil, which extreme conductors go to a tube rectifier (inside that green circle).
I think we didn't talk about rectifiers before. The rectifier transforms the input power delivered as AC (Alternate Current) to DC power (Direct Current). Most of the components inside the amp will work with DC power, instead of the typical AC power that we can find in our mains sources.
This amp has a tube rectifier but, nowadays is usually more common to find a solid state rectifier, instead.
Tube rectifiers doesn't work in a very lineal way, so, they produce some kind of compression and a behavior that is called rectifier' sag.
Solid state rectifiers are way more linear and quicker in their response. While a tube rectifier can have a bit of delay in the responsiveness of the amp, solid state rectifiers react instantenely so, tube rectifiers are usually found in Vintage and Vintage-voiced amps.
This tube rectifier has an octal socket (see max pin number is 8) and it's a double triode (see the two plates inside the blue shape). As per the schema, it goes on position V3 (the third tube in a row).
We don't need to go further. The PT is transforming the power of the input into several levels of power, depending on the needs of the rest of components of the amp. The Rectifier is transforming some of that power delivered by the PT in one tap, from AC to DC and then, the rest of amp is being powered.
First amplification stage
Let me show you the block we are going to zoom now:

And, let zoom in, then:

We can see that this amp has two imput jacks (input J1 and J2). The resistor R1 of 1M is there to avoid noise in the circuit if nothing is plugged to none of those inputs. On the picture, they are enclosed in that green rectangle.
The first real component that our guitar signal crosses is just the resistor (R3 for J2 and R2 for J1) named grid biasing resistor. In this picture, those two resistors are enclosed in a red rectangle.
This resistor has as main goal to avoid some inestability within the tube, and filters a range of frequencies that are way lower than the lower frequency that a guitar signal generates so, it's not specifically affecting the "tone" ... or does it?. Well there are large discussions about which components affect to the tone and, which are the best materials or models to use for each position but, I will not enter in such a discussion.
You see that after crossing that grid biasing resistor, the signal path is directly entering in the grid (dashed horizontal line) of the first triode of the first tube (V1-A = triode A of tube 1). This first triode of the tube is enclosed in a yellow rectangle in this picture. The upper 'dash' within the tube corresponds to the anode or plate. The lower 'bracket' corresponds to the cathode or filament.
The three numbers close to those three elements are the pin number. So, pin #1 is the plate (output of the triode), pin #2 is the grid (that regulates the flow of the electrons beam released by the cathode) and pin #3 is the cathode (generator of electrons).
Time to remember how this triode works and first surprise for you.
Remember, the cathode, highly resistive goes hot when receiving energy (from the PT), while its hot, his surface starts to release electrons that create a beam that travels to the plate (polarized positive).
The grid goes negative, until being more negative or equal negative as the plate to interrupt the flow of the beam so, delivering no output on cathode.
Do you know that key-copying machines that you can see in some supermarkets?. You go with the key of your home and you want them to make you an exact copy of that key (and we know that, sometimes, the copy isn't 100% perfect).
Well, that's exactly what is happening at every single triode within the amp!.
The triode is some kind of signal-copying machine but, with the difference that the copied signal is being scalated way up than the original (more powerful).
But, what does it really mean?.
Surprise, surprise: your guitar signal deaths just in the grid of the first triode!.
The signal that will be propagated to the rest of amp at this time comes from the beam of electrons released by the cathode but, the shape of that signal will be modulated with the signal characteristics that come in the grid.
In fact, when the output of this triode enters in the following triode (cascaded gain), same thing happens.
The new triode is the one creating the signal that will be propagated to the rest of amp and, the output of the first triode is just "modulating" or "sculpting" the "shape" of that signal.
We already said that every triode (tube or solid state) should be biased but, a bias should be applied to every of its three components.
The resistor R5 in that purple rectange is biasing the anode or plate. This resistor will fix the range of voltage that the plate can variate when the beam from the cathode is being regulated with the help of the grid.
The resistor R4 in that blue rectangle, is biasing the cathode and, determines the amount of gain for this triode. Also, we can see a capacitor C1 bypassing the resistor. This capacitor has an effect basically on the feeling of low end frequencies. Depending on its value, the sound can have more or less presence on basses.
So, this is what we will typically see around a single gain stage triode.
I surounded one more componente inside that grey rectangle, capacitor C2 is usually named a coupling capacitor. It's called like this because it couples (links) two amplification stages. The function of that capacitor is basically to avoid the output of triode 1 to come back from next triode 2, it's some kind of door that opens in a single way (more or less, you get the idea).
Second amplification stange and Driver
Let see the block we are going to face now:

Let zoom in:

It seems quite well the same as the first stage, right?.
We can recognize quite well the same components with minor differences.
Firstly, the grid biasing resistor (that was a fixed value resistor) has been substitued here with a potentiomer (variable resistor). The input for this pot is just the output of the first stage, after crossing the coupling cap.
The output of that pot is the input for the grid of the second triode of the first (and only) preamp tube (V1-B).
You can see that this grid biasing variable resistor is called VOLUME and, it corresponds to the knob named Volume that you will see in the front of the amp and, yes, its function is to regulate the amount of volume of the signal that will be delivered to the power amp. When rolled off, the amp will shut up.
Is in this position, just before the grid of the second triode, where we usually find the so called Tone Stack. In this case, this amp has no more controls than just a single volume knob but, most of amps can stack here controls for basses, mids and trebles and, on amps with more than two stages, we can even found a Gain pot instead of Volume, by example. It's all about amp's design, at the end.
You can see that the bypass cap that was present in the cathode biasing resistor (R7 in this stage) is missing here. That cap is usually present just in the first amplification stage. Some amps, could have a switch to enhance basses, this switch is usually adding such a capacitor to the circuit or removing it (if no enhancement of basses is needed).
Like in the case of the first stage we already discussed, here R7 is the cathode biasing resistor, R8 is the plate biasing resistor and C3 is the coupling cap that will link this amplification stage with the following one (that, in this case is just the power tube), as we will see below.
Since this triode is the last stage between the preamp and the power sections, this is the Driver.
Power Tube
Let see the block we are going to work now.

Let zoom in:

The tube is clearly a pentode. See those three grids (dashed lines) between the cathode (pin 8) and anode (pin 3). Our well known grid is in pin 5 (the lowest dashed line). The upper grid is linked to the cathode so, same resistor that biases cathode is biasing that grid. The middle grid (pin 4) has it's own biasing resistor (R11).
So, the output of the driver (seen previously) goes thru the coupling cap C3 and enters in the grid (pin 5).
Resistance R9 is biasing the grid. We see here a difference. Instead of having the resitor in the middle of signal's path (as we have seen in the two pre-amp stages), resistor is connected to ground, in the same way as the biasing resistor for cathode is. This is known as a cathode-biased arrangement and, what at the end means to us is that this tube doesn't needs to be re-biased after substitution. This is also supported because we cannot see any variable resistor around to re-bias the tube.
Resistor R10 is biasing the cathode (setting the gain factor) and, we see coming back this bypass cap (C4) that will affect the amount of basses in the signal, making the amp to sound thicker and warmer.
The output of the tube is the plate or anode, in pin 3, which signal is being directly sent to the OT.
So, that single Power tube, together with the fact that is cathode-biased points to a Class A cathode-biased amp topology but, let take a look to the OT, first.
Output Transformer
Let first identify the block:

And, zoom in:

The output of the power tube is linked to one of the extrems of the Primary of the OT, while the other extreme of the OT is linked to the power supply so, this is a single-ended topology.In this case, we see a single tap in the Secondary of the OT. The OT is adjusting the power output for an impedance of 4 Ohms so, an speaker with an impedance of 4 Ohms is expected there.
As I said, we can hung there speakers with higher impedances (8, 16, 32 Ohms) but, in that case, we are lowering the output power and overall volume.
Usually, the OT will have more than one tap and, at least 8 Ohms and 16 Ohms taps are present in most of amps.
Subscribe to:
Posts (Atom)